Woo hoo! Keith the Fireman’s fireplace is DONE! 😀
He finished it up on Saturday, so I scooted over there and snapped some pics of the final product to share with you. You can read about the mantel, hearth, bookcases and barnwood by clicking HERE, but today’s post is all about the Airstone faux stone on the front of the fireplace.
We found our Airstone at Lowe’s in Montgomery. They don’t carry it at the Prattville Lowes, so apparently it’s not available at every location. If you’re interested in picking some up- you may want to give your local Lowes a call first to see if they have it.
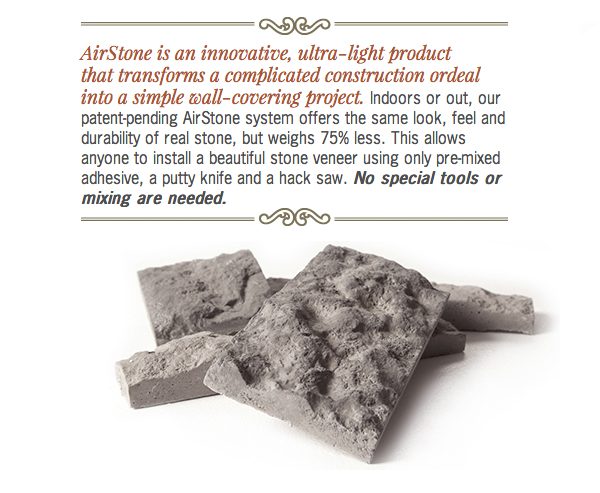
At first, I thought it was going to feel like foam, but it really does feel just like stone. It’s even cool to the touch!
Kevin and I helped Keith get started by following Diane’s tutorial at In My Own Style. She used the Autumn Mountain-colored stones and it turned out so great!

(You can find Diane’s tutorial here: Airstone Fireplace Makeover)
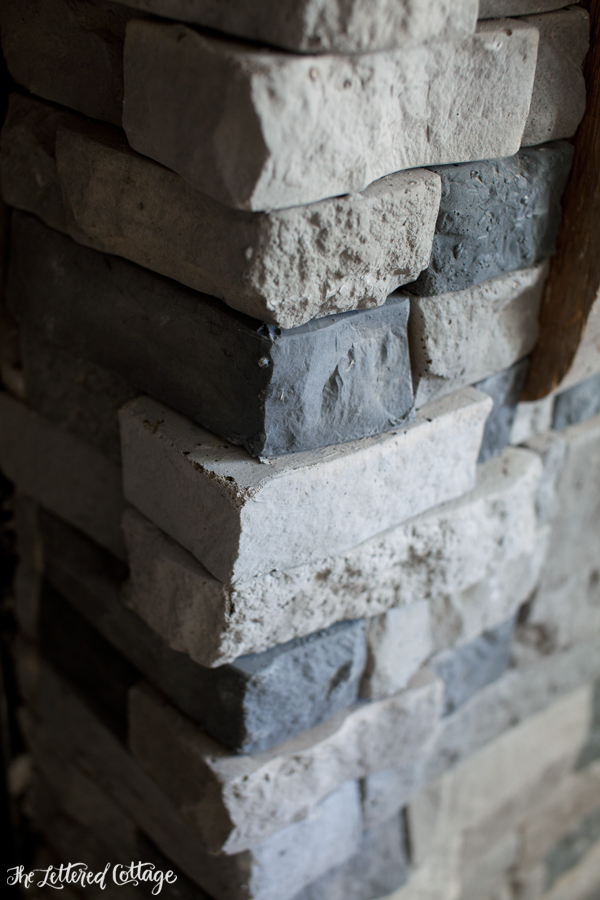
We used Spring Creek-colored stones at Keith’s house, and here’s a photo of the finished product:

What a difference, huh?
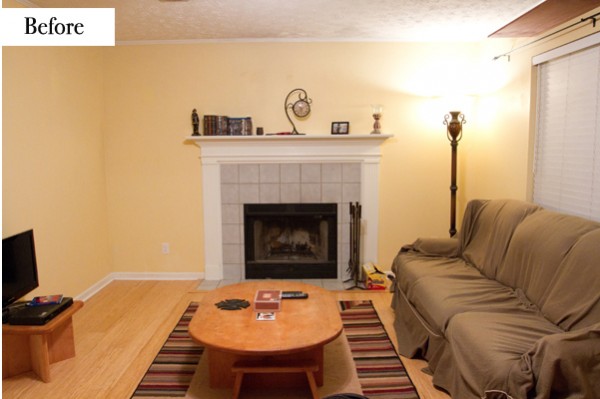
We’re almost done with the whole makeover now, so here’s another look back at the room when we started…
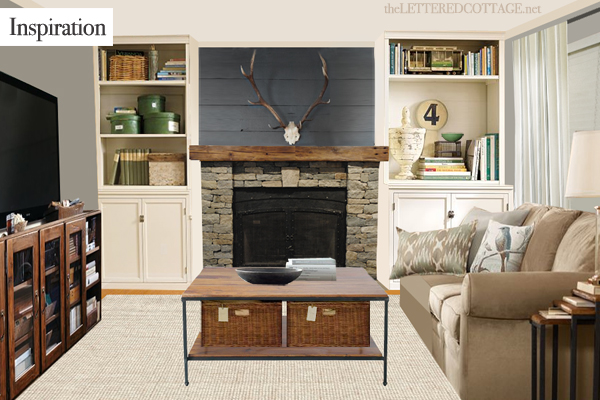
…and the Photoshop drawing I put together as inspiration:
All that’s left to do is bring in some new (previously-loved) furniture and put the final finishing decorative touches on the room. After that, I’m looking forward to sharing photos of the room’s new look in one final room reveal post. Can’t wait to show you (and Keith!) what I’ve got up my sleeve! 😉

PS- For more pics between posts, join me over on Twitter, Facebook and/or Instagram!


WOW that is GORGEOUS! When are you coming to Virginia to make my fireplace look this beautiful?
I love it all! You all are so talented.
What a difference! That fireplace looks awesome – good work, Layla!
It looks SO good – even better than your inspiration photo! I can’t wait to see the final pictures.
Y’all have added so much character to the fireplace! It looks like it will be there forever. Really well done!
It looks great!
We just used AirStone over the weekend for our fireplace makeover too. I was really happy with the results, although it took a little longer than I was expecting. 🙂 I LOVE the big chunky wood mantle you created.
It’s beautiful- love seeing the vision come to life.
So much easier than using the real thing. I don’t think I would want to attempt stacking real stone. I look forward to seeing the final reveal. It’s going to look like an entirely new room!
The fireplace looks so much nicer! Also, you have some mad photoshop skills! I really need to learn!
Oh my gosh it’s looking SO good so far!!! I can’t wait to see the full reveal:)
xo, amy
Wow, it turned out great! I will defiantly file that wonderful product away to be used at a future date. 🙂 Thank you!
Very impressive! It really does look very nice. Keith must have been pleased — I know that I would be.
Looks amazing. I can’t wait to see the final room reveal.
love it and can not wait to see the room.
You always do things top notch and this doesn’t disappoint! It looks fantastic in contrast with the huge warm wood chunks. And I can’t believe it isn’t “real” stone. My fireplace is getting the stinkeye right now!
How much did that cost for that area? I would consider it if it’s super cheap since we’re about to sell.
Thank you, Caroline! I think it ended up being about $300 total for the stones, adhesive, and miter box & saw. Not too bad! 🙂
That looks so great!
I’m sharing this post with my mom who can’t figure out what to do with her fireplace surround.
Hi Layla –
Thanks so much for the shout out and link to my AirStone post. XO Keith’s fireplace along with everything you have done to the room so far looks fabulous. You are soooooo talented and have great style. Love seeing the room unfold. Looking forward to what you have up your sleeve.
Girl, you knocked it out of the park with this one!!
Layla,
I just love the way it turned out. I can’t imagine how excited Keith must be. To me the thrilling part is what a great design tool “presto change-o” is for the client that has a hard time visualizing. They no longer have to! Great job.
I have some homework to do!!!
C
Oh my gosh!!! Layla, that is SOOO beautiful!! We are looking for a house in the city where most of the houses are 80-100 yrs old and most have fireplaces. From what I’ve seen, I will be lucky to find one that doesn’t need a makeover. This will definitely be the answer. Thanks so much for sharing this information. Keith is one lucky guy!
Do you know if this works outdoors?
Also, I’m super stoked about the chapel market! I’m making a special trip to see my best friend to be there and we. are. stoked.
Hi Erin! Here’s a link to AirStone’s FAQ page: http://airstone.com/faqs/
Looks like it can! 😀
Since you began this series, I can’t get over the irony of a fireman needing help with his fireplace!
I love it…the look of stone and barn wood go so well together! Another great job, well done! I’m gonna try this one myself!!
Looks stunning in the photos and i’m sure the impact of seeing it in person is even greater. All of the elements combined make the room look really cozy. One of my favorite makeovers for sure!
Also, your new header reminds me a little of the Sound of Music (which I love!!). I like the update. 🙂
Wow! That looks amazing!!!!
Love it, Layla! I’ve been so excited to see how it turns out – can’t wait for the final room reveal.
So fantastic! I have been pouring over all the posts but I can’t seem to find anything about how you made the big chunky mantel? Am I missing it somewhere? We have a big ol’ rock fireplace but there is no mantel…this would be perfect. Thanks!
Thanks, Kristy! Here’s a link to the post where I talked about the mantel:
https://theletteredcottage.net/keiths-fireplace-makeover-part-one/
😀
Have I missed the reveal on the living room?
Nope! We’re hoping to schedule that this month, Donna! 🙂
Inspirational, thank you. What did you use for the floor portion of the fireplace? Looks like it was tile previously. Now it’s a smooth grey. I’d like to do the same thing.
Beautiful transformation….I have a question. What product did you use on the hearth? We have the EXACT situation and want something with no grout lines to mess with. Any info would ne appreciated!
~amanda
Thanks, Amanda! We used a product called Skimstone. Here’s a link to my post about it:
https://theletteredcottage.net/skimstone-faux-concrete-fireplace-hearth/ 🙂
Hi Layla, I would like to duplicate the the blue wood behind the spiked mirror in the fireplace makeover. How was this done? What type of wood? Is it stained or is it a faux panel?
Jerry
Hi Jerry!
Here’s a link to the post all about it: https://theletteredcottage.net/keiths-living-room-makeover-barnwood-and-bookcases/
Thanks for visiting today! 😀