Kev made me a birthday hair flag yesterday morning and you can bet your bottom dollar I wore that sucker all. Day. Long!

Even to Publix.

Birthday lunch: spinach & artichoke dip, Townhouse crackers, california rolls, and mini cupcakes
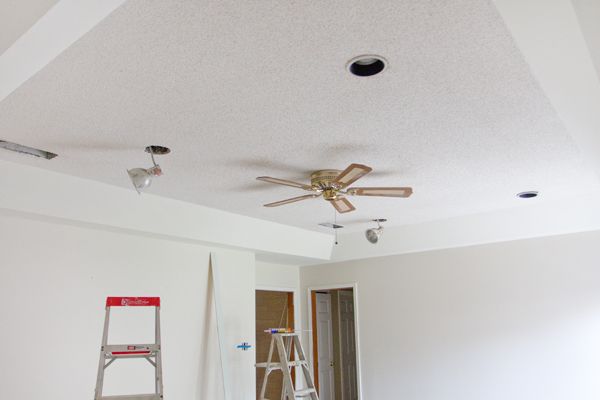
Yep. I turned the big 3-8 yesterday, and I celebrated in true DIY style- working on Kevin’s brother’s ceiling! Here’s what it looked like before we started nailing up the planks on Monday (11am)…
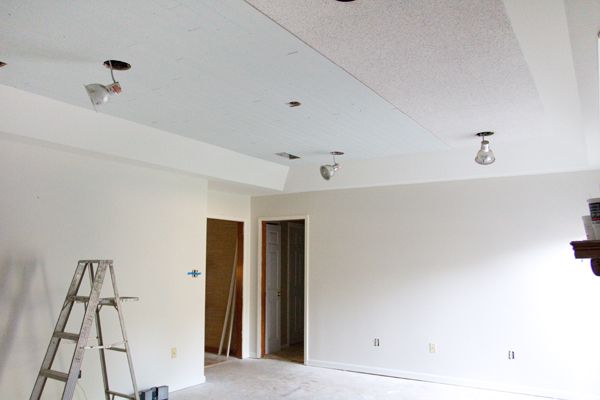
…and here’s where we left off last night (6:30pm)…
Like I mentioned the other day, we’re using this photo as our inspiration for this room…
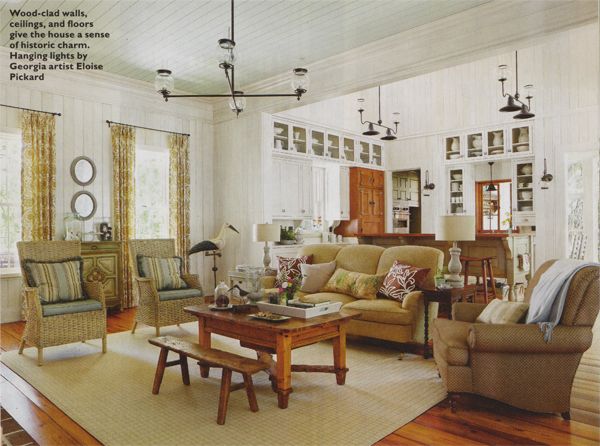
…so the blue-painted planks will really give it that Southern Living feel for less than $200.
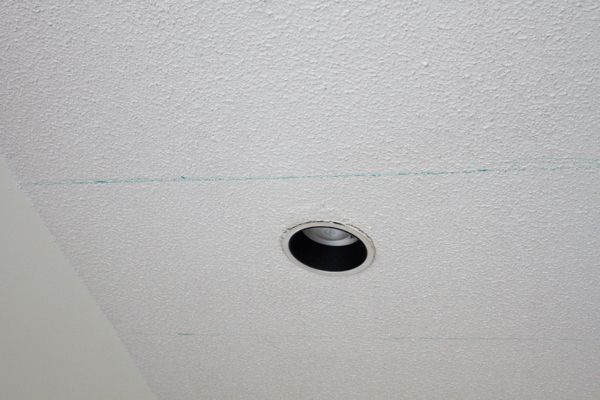
We started by pulling down the vent covers and two of the recessed lights…
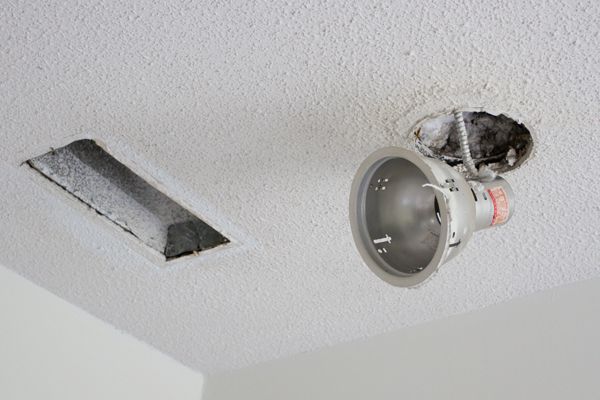
Insulation came raining down on our heads when we pulled the light fixtures down, and since each one had a big ol’ sticker that said…

…we made a quick call to Kev’s brother (Kerry) and suggested that he update his lights when we’re done working on the ceiling. (Note: Kerry agreed, and our electrician friend, Mark, is installing the new lights on Friday!)
After the lights and vents were down, we made trip #2 to the home improvement store because we realized that we’d definitely need one of these…

…and since we didn’t feel like making trip #3 to the home improvement store (doh!), we used a couple of these to mark our ceiling joists…

Note: Don’t forget to buy a chalk line when your at the store! It took a looong time to do it this way, and we probably should have just driven back and purchased one, but we did it, it’s done, and our crayon lines have been workin’ like a charm so far- ha!
(Note to Kevin- I love you so much for trusting my crazy ideas, and I hope that if you’re reading this several years from now, that you’re smiling REALLY big about our crazy days dropping “half crayons” from tall ladders. “Who’s turn is it to climb down and get it this time?” 😉
#IfYou’reWackyAndYaKnowItClapYourHands #ClapClap

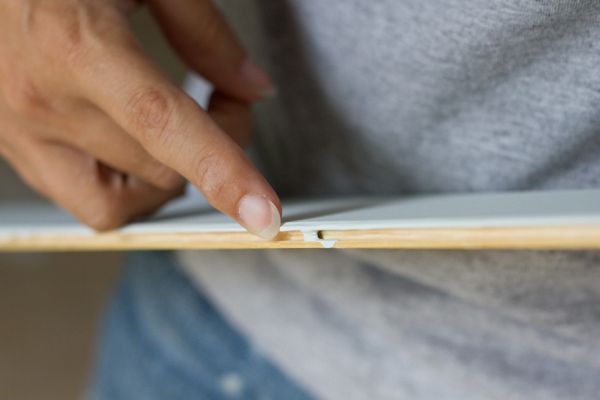
Oh, hey, and here’s another little time-savin’ tip (ya know, since we’re so good at saving time…hardy har har)- Paint drips are NOT your friend. Be very careful to use a light touch when paint your ceiling planks otherwise you will have to use a 5-in-1 tool screwdriver car key scissors to scrape out every little drip because the boards won’t click together like they’re supposed to.
We plan to finish the ceiling today, and then Kerry will start on touch-up duty: filling in some of the seams, knot holes & nail holes, and touch-up painting everything when it’s dry.
Things are definitely lookin’ up, and I can’t wait to blog about the project again later this week!


PS- Here’s another link to the planks we’re using: CEILING PLANKS. (Obviously) I’m no expert, but if you have any questions about my experience with them, I’d be happy to answer them in the comments section below! 🙂

Happy Birthday! Love the smurf glass. 🙂
I’m really enjoying your blog….so much to learn. Thanks! Girl power rocks!
Was the Smurf glass a gift or did you already have it on hand? Love it!! Hope you had a wonderful birthday and the ceiling is really coming along. YAY!
Gift from my neighbor. 🙂 And, yes, it DEFINITELY makes your drinks taste better. 😉
Ohhh, the blue ceilings look great. Kind of fitting the glass was matched with the blue smurfs. You guys plan everything perfectly. 🙂
Hi Layla 🙂 I have really been enjoying your blog! These ceiling planks interest me, and I am wondering what you use as trim around the edges? Or do you? Thanks! Brandee
Hi Layla!
I am getting ready to install these planks (stained) on my bathroom ceiling…Do you have any tips for cutting around light outlets?… btw- i am on the edge of my seat waiting to hear /see how the closets turned out 🙂 Happy Birthday!
Yes yes… just what I was scratching my head wondering. How on earth are the holes cut so precisely?! This will look awesome!!
Happy belated!
Hey Donna!
I’m going to have to write a separate post about those holes. Kev came up with a great (easy) trick to trace them out!
Happy Birthday! I don’t comment often, but I just have to say: You are absolutely gorgeous. Seriously, you don’t look 38. at. all. 29 tops. 🙂 Share your secrets!
Cannot wait to see the finished product! By the way Happy Birthday!
Hope you had a fabulous birthday!!
I remember those Smurf glasses from when I was growing up (almost 37!). They are Cool 🙂
Can’t wait to see the finished ceiling, it’s really looking great!
P.S. I think I need to send you and Kevin some new shirts,,,,,maybe with a big ‘ol G on them 😛 teehee
Layla,
Kerry’s ceiling is looking good! His living room will soon be magazine worthy.
Glad you had a happy day doing something you love (diy-ing) with your favorite person.
Your Friend,
Deborah
You’re cracking me up with those crayons 🙂
Did Kevin pull the stud finder trick? The one where he holds it next to him and makes it beep? Men…
The ceiling looks great, and happy belated birthday!
IfYou’reWackyAndYaKnowItClapYourHands #ClapClap . . . .you know I’m clapping right along. It seems like that is the pattern for most of our DIY projects. : ) Question. . .Did you use the exact ceiling color as in the inspiration pic. It looks to have a bit more green in it. . .or is it just lighting??? — Thanks
You are such great friends to everyone.
This room is going to look as beautiful as you do.
Happy Birthday Layla. My husband has the same birthday
and you seem very much a like. Calm and loving, super dedicated and hard workers.
I am thinking of wimping out. My whole upstairs is like a movie Theater on a Sat. night, Popcorn all over. Do you know anyone who installed headboard wall paper directly on top of a popcorn ceiling. Mine isn’t to rough. Thank you. Have a lovely spring day. Geri.
You’re way cooler than I will ever be.
(That’s why I read your blog.) 🙂 hehehe.
Happy, Happy Birthday, Layla!
Happy Happy Belated Birthday!
If ya ever come down to Destin — I’d be happy to take you kids to Harbour Docks for some really good – aka – THE BEST – sushi. I have no affiliation, other than I love the place. The Amazon Roll rocks your socks off. Nice glass of vino, the sun and salt in your hair, a view of dolphins playing and a gigantic sushi roll that is FRESH!
C’mon down! (I’ve been here for 7 mos and this is my very fav restaurant!!!!!) Happy Birthday pretty girl!!!!!
Hope you had a great birthday…..
Have a question about the plank ceilings (which I love by the way)
how do you determine which way to apply the planks?
Thanks and party on……
Since I don’t usually paint with a light hand, believing (mistakenly, I”m sure) that more is better…faster….less coats…I need to know if I need to paint the tongue part at all…and if I don’t have a nail gun how do I put them up? I am for sure having them in my new house that I want to look old.
You and your blog are my main inspiration.
I noticed the smurf glass too – and wondered: Did you sing, “Happy Birthday” or “La-la-la-la-la la….la-la-la-la-laaaa!”?
Best wishes! Loving the inspiration photo – can’t wait to see further progress!
And will Kevin be doing a tutorial on his Birthday Flags? Such incredible craftsmanship!
This looks gorgeous. Love the inspiration pic too. I’m thinking of doing this in my living room. How did you secure the panels to the ceiling? Just a nail gun? No screws?
Oh my, when I read this I imagine myself writing the same thing! I feel like you are another version of me!
You guys completely crack me up! No chalk line, stud finder etc!!! =) Don’t know how you have done it so far! Looking good though. Can’t wait to see the finished product.
I LOVE the idea of planked wood ceilings…so homey and unique!
Happy belated birthday, Layla!
I think your BIL’s ceiling is going to look awesome when you are done!
We are thinking about doing this in our kitchen. Here’s the reason: This house is old, like 97 yrs old. There are not many electric outlets. Adjacent to the kitchen is the new addition which has its own elec box which is separate from the old house one. Here’s the question: Can we run electric wiring for new outlets and lights under the wood planks? That is— between the old ceiling and the new? We could then use the new elec box which has lots of room for more switches available. The old one, we don’t want to mess with plus this is down stairs and we’d have to do weird things upstairs to mess with it. Thanks! Love you blog.
I don’t think you’d have enough room to fit wiring underneath the planks if you’re installing them over the existing celing, as they sit right up snug on whatever surface is under them. I would probably end up going right down to the studs for something like that, you’ll have more room to work, giving you more options for configuration. It won’t change the installation process at all, it will actually make it easier, no stud finder required 🙂
Thanks for answering. You are certainly right and I had not thought about that. Our house is so old that the walls and the ceilings are solid so stud finders are not necessary. But we might need to ‘float’ the ceiling or something to simulate studs. Thanks!
Hi Marilyn,
You could try doing what we did…install furring strips to the ceiling (screwing them into the ceiling joists). The furring strips are roughly 3 inches wide by 1/2 inch high. We then used a nail gun to nail the ceiling planks to the ceiling using the furring strips as our “studs”. This creates about a 1/2 gap between the old ceiling and the new ceiling (ie: the planks) which might work for your wiring issues. I have pictures of how we did it if you’d like me to email them to you. Good luck!
@ Marilyn, Just a guess, but I think that code would not allow for running electrical wiring between two finished surfaces. Consider checking into it with your local code inspector or a licensed electrician.
Love it! I can’t wait to see the finished project. I would love to do something similar for my mudroom ceiling. Just have to find the time! 🙂
Happy Birthday. I love your flag.
I am absolutely shocked that you are 38! I’ve been reading your blog for several months now and seriously thought you and your husband were in your mid 20’s!! You don’t look a day over 25! Hope you had a good birthday!
Happy Birthday Layla,
LOVE the room (and the Smurf glass) 🙂
Wondering what colour you used for the ceiling? I am in process of buying an OLD cottage and trying hard to get my hubs to play along with my crazy ideas and I want to do our living room with planked ceiling (painted blue) and light cream walls (so, um, a copy of Kerry’s house)
Any paint colours you can share? Wall and ceiling?
THANKS – love the work you do
Wendy xx
Happy Birthday!! Haha – I was DIYing on my birthday too!!! This may be a silly question, but how do you decide which direction to install the planks?
Thanks!
Leah: )
Glad to see you both wearing your colors!! War Eagle! 🙂
Ceiling looks fantastic!!
Happy Birthday, Layla! The ceiling looks amazing! I can’t wait for your next post!
Happy Birthday!! It only gets better from here (for the most part that is!) Can’t wait to see how the ceiling turns out. I too would love to do this in my family / kitchen.
I am about to do this same thing in our office. What sheen of paint do you use? And do you ever find that you have problems fitting them together because of the paint even though you scrape the drips out of the groove? I was thinking I would ‘assemble’ the planks on the saw horses and then paint them so as not to get paint on the tongue and groove part so they go together better on the ceiling. Have you tried doing this yet? Or do you think it wouldn’t work very well? We live in a very old house (1906!) and there isn’t one wall, ceiling, or floor that isn’t wavy or crooked. They also did the update of champions and added popcorn texture to all of the ceilings. Any advice would be greatly appreciated! Thank!
We used eggshell and yes, some of the boards are in worse shape than others, so it can be challenging to lock them together. Especially if your cuts aren’t perfectly straight, or if the surface you’re nailing them to isn’t perfectly flat! I don’t know about locking them together first. It’s worth a try, but hopefully they won’t stick together too much though. That’s the only thing I’d worry about doing it that way. If you try it and it works- let me know! 😀
Well you don’t look a day over….25! Seriously, Happy Birthday and always love reading about your projects…brings more laugh lines to this 30-something’s face everytime I read your blog!
XO! 😀
Layla, Happy Belated Birthday! It was my Birthday yesterday, too! However, I have a whole year on ya. I intend to make this, my final year “in my thirties”, my best one yet. Feeling pretty inspired.
BTW, I am loving your bro’s inspiration pic. Those chairs, the woven banana leaf and high backs,… any idea of the source? I am thinking of going with something similar in the dining room.
Much love and many wishes for a wonderful year!
xo, Jay
Thanks, Jay! And happy belated birthday to you, too!
I’ve seen chairs like that on PotteryBarn.com, but they’re pretty spendy. Maybe HomeGoods has some? I’ll keep my eyes peeled for you!
Happy, Happy Birthday! Love your blog!
Thank you, Genny! 😀
Happy birthday! Love the plank ceilings, and I can’t wait to see how it’s going to turn out! 🙂
Thank you! 😀
Hi Layla,
Hope you had a fantastic B-Day!
Love your ceiling! I was planning to do the exact same thing to my kitchen ceiling. Only problem I have is that my kitchen is 23 by 17 and the longest planks I can find are 12 feet. Your idea of scattering the seams is pretty neat, but I would have about 5 feet on each side. I was thinking of beams over the seems, but I am afraid I would have the same issue in finding them long enough. Any other ideas?
Thanks
Rosette
Thank you, Rosette!
Hmmm…maybe you could do a random staggered pattern? That’s what we’re doing in Kevin’s office/our guest bedroom and it looks just fine to us! 🙂
Happy Birthday Layla, hope you had a wonderful day!
Thank you, Jan! 😀
Happy Birthday, Layla! The smurf glass made me very happy.
Thank you, Jennifer! 😀
Love this! What type of planks are you using? We did this in our bathroom with pine floor planks, and every knot bleeds through! Even after many coats of Kilz and gloss paint. Also, they were heavy. I would like to continue the look but need to find another wood. I love your look, and so enjoy your blog! Phillis
Hey Phillis!
Just click on the link at the end of this post and it’ll take you over to the post I did about the planks. They’re super easy to work with! 🙂
Hi Phillis,
We had a similiar problem with knots bleeding through until we watched an episode of Holmes Inspection and they talked about the fact that apparently if you use a shellac based primer (Kilz and Zinser both have a shellac based primer) the knots won’t bleed through. We tried it and it worked! Who knew?!?! Good luck!
Just wanted to wish ya Happy Birthday my friend!!! You’re almost caught up with me *wink wink*
xoxoxo and a big cupcake to you!
Kate
Thank you, Kate! 😀
Happy birthday! The ceiling is going to look amazing…and I wonder where my Smurf glasses went…
Happy Birthday, Layla!
Warm wishes for a wonderful day!
A belatedly Happy Birthday to you! I’ve been away on vaca, and haven’t had time to get onto a computer. Glad that things are going great on Kevin’s room! It’s looking good! Couldn’t wait to get logged on to see what you’ve been up to!!
Happy (belated) birthday. That was my birthday, too! Isn’t June 5 the best?? 🙂 Love the bday hair flag!
What color/brandsky blue ceiling paint? Love it!
Happy Birthday, you inspirational girl, you! Can’t wait to see pics of the finished project!
Happy Bday Layla!
We are using this for ceiling in my son’s room but are planning on painting with a paint/primer after installing….is there a reason you painted them prior to install? Thanks! Ashley
Hi Ashley! We just didnt want to have to paint over our heads. (drippage, sore necks, etc) And in order to get into the grooves, you’d have to use a paint brush or sprayer…neither of which we wanted to do. Hope that helps!
That’s what I figured but I wanted to make sure I wasn’t missing anything…thank you!!
Happy belated birthday, Layla!
The ceiling is looking amazing! Can’t wait to see more!