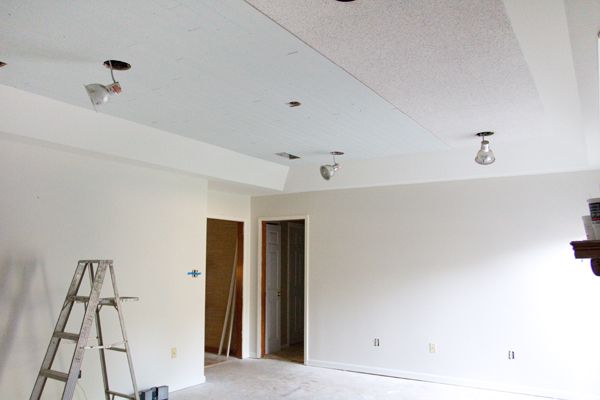
The last time I blogged about Kevin’s brother Kerry’s ceiling we were right here…
Since that day, we were able to finish installing the planks, and Kerry did a fantastic job of caulking the seams, and knot & nail holes…
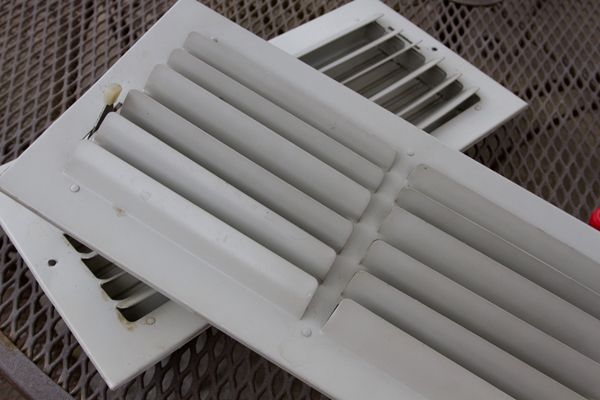
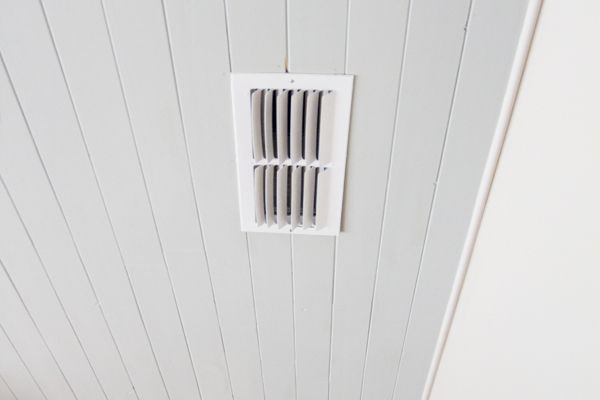
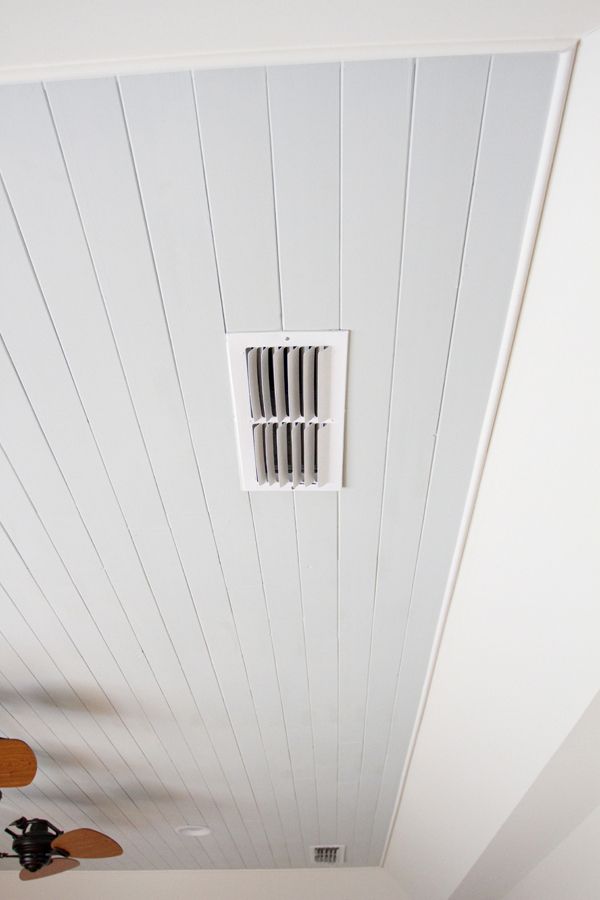
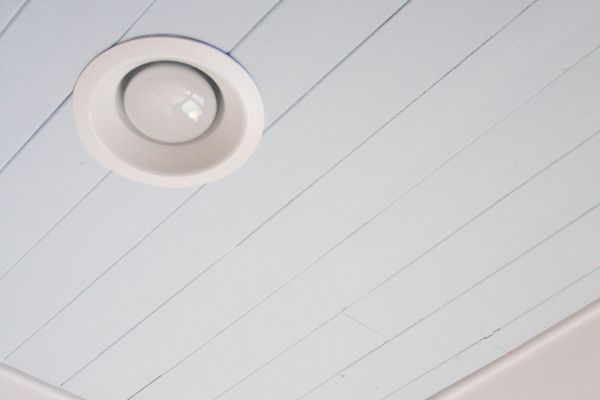
We used some Rustoleum primer and spray paint to freshen up the old light gray vents…

Before…
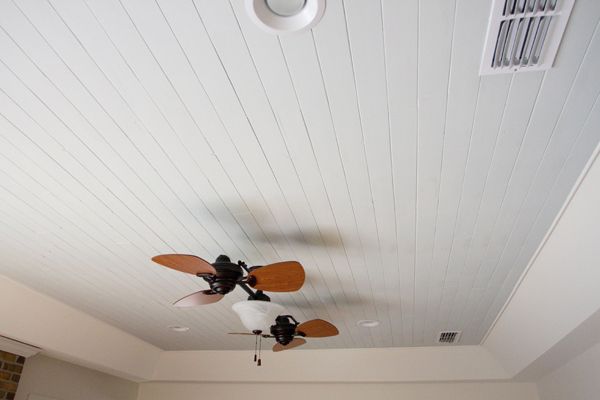
After!
We used some inexpensive half-round trim to finish out the edges of the ceiling…

I painted it Moonlight White (Benjamin Moore) to match the other trim in the room, and we just nailed it up with our pneumatic nailer…
To cut out for the recessed lights, Kev just held up a plank and used a pen to trace where the hole was…
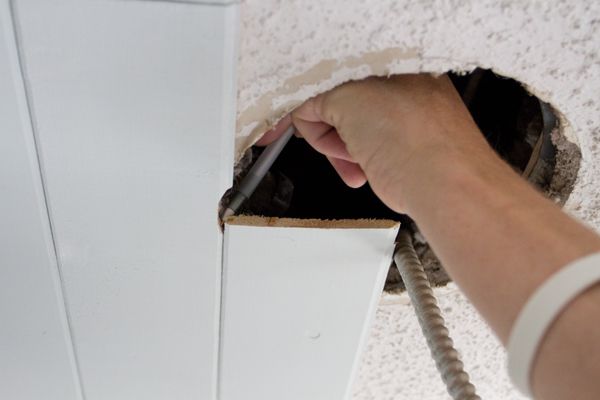
Then he used a jigsaw to cut it out…
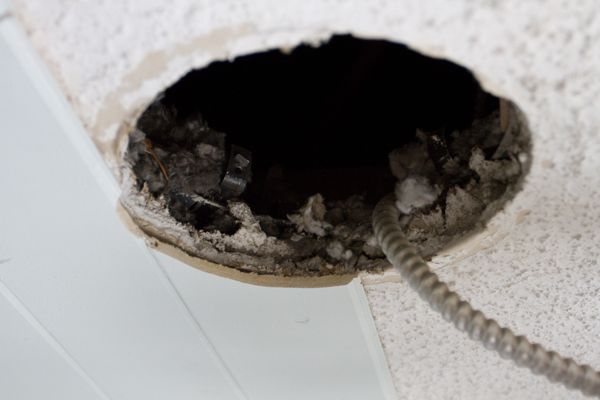
Here’s a pic of him doing the other side of the same hole…


Ta Da!
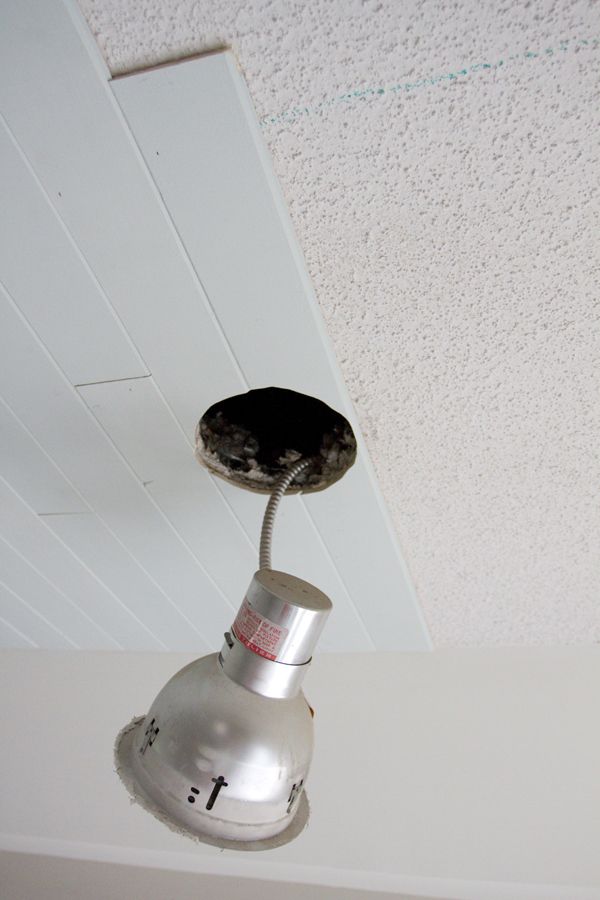
And speaking of the recessed lights, our friend, Mark, took down those old (unsafe) recessed fixtures after we finished the ceiling. Here’s a shot of the new ones…
And here’s a pic of the new ceiling fan…
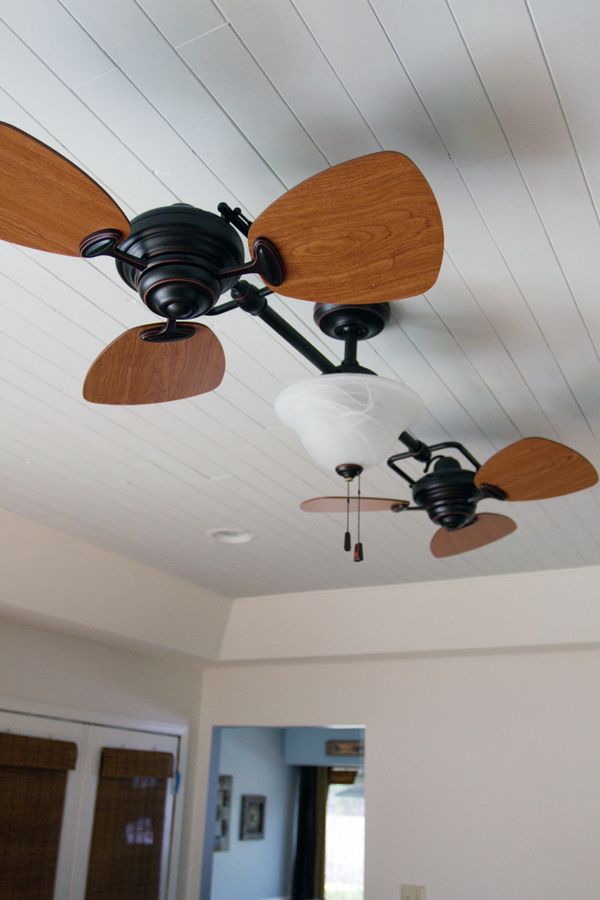
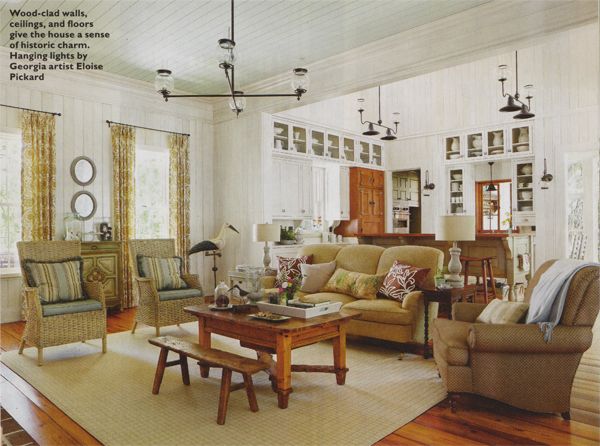
It came from Lowes, and it’s called the Twin Breeze by Allen+Roth. (Item #0275436) It cost $179, and I thought it was a good alternative to the ones they used in the Southern Living room we’re drawing inspiration from for this makeover…
Both fixtures have the long, oil-rubbed bronze bar, but having the fans will help keep their electricity bill down, which is always a good thing here in Alabama!
Next up, we’re going to head to Atlanta and pick up a white entertainment unit at Ikea. Something like the one I used in my presto change-o drawing…

…but, again, something much less expensive. We’re going with the Hemnes unit…

It’ll be similar to the unit above, but Kerry and Robyn are going with the 2-cubby bridging shelf and the 2-drawer TV stand, because the wall they’re putting it up against isn’t quite long enough to accommodate the larger pieces. It’s solid (white-painted) wood and it’ll fit the budget at $639 + tax.
I look forward to helping them accessorize it, and blogging about the next update soon!

The ceiling looks great! I would love to do something like that to mine. The light fixture/fan is really cool and definitely helps give the room a modern look. I have been eyeing the Ikea unit for a while and would love to have one for my living room as well. The hubby is coming around though and even declared last month that he thought a unit like that would look great in our living room.
The ceiling turned out amazing! It’s seriously gorgeous! Oh, and I have that Hemnes unit from IKEA. We needed the 3 drawer bottom piece to hold our TV, but our wall wasn’t big enough for everything. I ended up using the smaller bookcases on both sides. I’m really happy with how it turned out. You can check it out here for reference:
http://thejunkhouse.blogspot.com/2012/05/may-after-entertainment-center.html
I thought about that too, but unfortunately the smaller bookcases won’t work for Kerry’s electronic equipment. I may have to do some re-figuring! 🙂
I emailed you privately about my above post.
Thanks 🙂
I found one at Rooms To Go that is gorgeous! It was $1000.00. We love it! Very “cottage-ee”. AND YOU DON’T HAVE TO PUT IT TOGETHER!
Woo hoo! Gotta love pre-assembled furniture! 😀
Everyone always is blogging about IKEA…seriously wish we had one close by! 🙁
OH. MY. GOODNESS! That looks simply amazing! I loooove the fan! Can’t wait for more.
LOVE that ceiling!!! i’m jealous!
I just wanted to thank you for “teaching an old dog new tricks”. You have shared such wonderful ideas that I was inspired to redo our bedroom.my husband ( age 70) and I ( age 68) pulled up the old carpet, had the floors sanded & stained & had great fun painting, picking out new accessories & bedding. We completely changed the look from country to spa feel. You inspired us to change our brass headboard & gold mirror to a lovely silver with primer & Martha Stwewart “polished silver” paint. We are delighted with our new room that is peaceful.
Inspiring, Nannibuzz! Thank you.
Love that ceiling. We have the same ceiling fan. Never really thought about doing the boards like that on the ceiling but after seeing this we just might. Can you tell me what the rule of placement for recessed lighting? I was thinking that might be something to even tackle in that room if we’re going to be doing the ceiling anyways.
Thanks!
This is shaping up to be yet another great TLC transformation! Thanks so much to your family for letting us peek : )
Everything looks terrific! What a transformation!
I was thinking about using that same fan in our dining room and performing a bit if a hack on it with this Allan & Roth fixture: http://www.lowes.com/pd_339927-82850-34534_0__?productId=3388914&Ntt=edison&pl=1¤tURL=%2Fpl__0__s%3FNtt%3Dedison&facetInfo=
Have you heard of anyone using non-ceiling fan light fixtures on a ceiling fan?
I LOVE those fans and stop and look at them every time I’m in Lowe’s. I was all set to buy them and then read comments from people who had them that they are NOISY. That held me off buying. Would LOVE to hear what you think!
Looks absolutely fabulous
That looks awesome. We removed the popcorn from our ceiling and then used beadboard wallpaper in our familyroom. We found these great scraper things used specifically for taking of the popcorn…a long pole with a wide scraper and a place to attach a bag, so as you scape the junk off it falls into the bag. Nifty. As our ceilings are low, we just painted them the same glossy white as our trim and panelled walls, but i would love to have done a different shade like the Sea Salt. 🙂
So I have a personal question…would you mind telling how much it cost to put that ceiling in? I am thinking of doing this as well, but not sure what to expect cost-wise.
That looks GREAT! We have a similar ceiling in our kitchen and family room (it was dark brown, but we painted it a semigloss white). Someone suggested that we apply a glaze so the ceiling is more noticeable, but after looking at your photos I think we’ll leave it as-is.
I love it!! My husband and I are renovating a home built in 1900 and ALL of the ceilings and walls were made of tongue and grove planks. It’s crazy, and sad that we have to take some of them down 🙁 I love them so much!
Great job on the ceiling. Um, and those ceiling fans…awesome.
Layla,
The ceiling looks great! Such an improvement over yucko Stucco! I think we’ve all lived with it one time or another.
Your Friend,
Deborah
Love the ceiling!!!! The color is gorgeous and it adds so much character:) The fan is a neat final touch too!
Dying to know what colours were used? What blue on the ceiling and what colour wall paint? Getting ready to paint our cottage and love these colours
FAB job on the ceiling, going to try to steal, I mean copy that look in our new cottage!
Thanks
Wendy
Wow, that looks so good.
I heard this fan has an awful hum while it’s on.
Have you noticed this? I really LOVE this fan
It sure looks pretty =) What a lovely transformation!!
I absolutely am loving the results! Thank you again for all the close up photos of the DIY ceiling & how to cut around the recessed lights. I’m looking forward to doing our kitchen ceiling. By the way did you use 1 or 2 coats of paint on the boards?
Liz VanKirk
LOVE.LOVE,LOVE that ceiling and the inspirational room also. I have just recently discovered your blog and I am obsessed with it. I just love all of your rooms and ideas. Keep them coming. By the way you and Kevin are the cutest!!
are you going to put doors on it?
You guys are getting good. That is a very neat installation. I love the ceiling fan.
This is a really fun series of posts. I’m excited to see the finished product all accessorizes and “magazine ready”. BTW your husband has some mad photography skills. You’re quite a team!
Kevin and Layla,
You guys ROCK! I love the ceiling and the light fixture you have picked out. I can’t wait to see how you accessorize the entertainment unit. I sure could use some fresh ideas for mine! Love what you guys do!
You just motivated me to pull down our airconditioner vents in the ceiling and spray paint them. Oh my word they are so gross and nasty. Love the ceiling and those fans are perfect!!
The ceiling looks beautiful, but I am in LOVE with those fans…oh my gosh! And the price is so good for them. think I will make a run to Lowes to see if they have them around here. Nice job!
Kelly
That’s just gorgeous!! Now I want to do it everywhere too. LOL. I’m in love with the long panels you used-but didn’t you say at once time that they come in shorter lengths that you have to place differently? It would be great if that’s not the case. Just wondering….??
I love, love, LOVE those plank ceilings! I so badly wanted to put some in our living room when we renovated it… which never happened as we had to up and move out. Maybe if we go back to that little house one day! 😉
As for the Hemnes unit – good choice! I think it will work perfectly. We just purchased one for our rental and it’s a really great solution! Can’t wait for another update! 🙂
You’ve topped yourself this time. I’ve been waiting to see how you finished off the tray ceiling as mine is just like this (well–more like the b-4 photos!)
Gees, I wish I could get you two up to Idaho. What would it take?
we were JUST looking into options for ceilings and saw this… so TIMELY! love the fan, we saw it a few weeks ago (or one JUST like it) at a store.. I am in the “hem & haaw” phase of a room remodel and… it was SUPER to see how this room came out…
as ALWAYS, thank you Layla and Kevin for inspiration and encouragement… Just reading about all YOUR DIY projects is encouraging…
a real “gee.. you mean we aren’t the only never ending diy’ers?” lol
be blessed!!!!!!!!!!!!!!
< mama c
You guys are awesome! Always inspiring! I love how you interpret your inspiration photos when using them in real life/real home situations. (Not that they don’t come from real homes, but they looking nothing like what I live in!)
Great job and great photos. Could not have done a better job myself!
We put the Hemnes unit in our living room – the one with the two sections in the middle and 12″ wide on either side – and it’s wonderful. To make it look more substantial, we also took a piece of thin plywood and painted it to match. Then we hung it behind the “hole” in the middle on a French cleat. It was super easy, and it looks awesome!! I should have pictures on my blog of it soon – just getting it up and running.
I love the idea of the boards on the ceiling, it would solve a big problem in my kitchen. Those sponged ceilings always look patched when you move lights or fans. My husband many years ago made our box light for the kitchen glued , nailed, caulked that thing to the ceiling. it needs to go. Thanks for all the wonderful ideas.
Oh that cutting tip is perfect! Thank-you!! Now to figure out how to do it with full sheets of something… hmmm…
Everything looks gorgeous! Love the TV unit you choose too!
Donna
this is going to look wonderful
i have a question about the inspiration room…
do you happen to know anything about the drapes
are they store bought or did someone make them?
i love the fabric and would love to know where they are from
thanks so much
Layla, it is truly amazing the way you are able to find bargains that are almost identical to the pricier pieces. Love the IKEA entertainment center, and REALLY love the double ceiling fan! Awesome!!
Thanks, Kaye! 😀
LOVE what you have done but I really love the entertainment piece in the presto chango pic. The one that’s more expensive than the IKEA model? Can you share where it is from? I’m dying!
Pottery Barn! 🙂
looks great. What type of material did you use on the ceiling? Is that tounge and groove? Was this special material or is available at home stores?
Hi Stephanie!
Here’s a link to a post I published earlier this week:
https://theletteredcottage.net/wood-ceiling-installation/
There’s a link to the ceiling boards in that one! 🙂
Looks beautiful so far! Can’t wait to see more!
Lovely, just lovely!
What hard workers you two are…but you make it look like fun! Beautiful ceiling!
So, if the trim is Moonlight White and the ceiling is Sea Salt…what color is being used on the walls? I love love love this!!! We did our dining (converting into an office) ceiling like this after reading your blog. Everyone loves it! I sent you a pic of it to your pick my presto 🙂 Thank you for all the beautiful inspirations!
Thank you, Krystal! It’s called Aesthetic White, by Sherwin Williams. 🙂
The ceiling looks amazing and I love that color! Great tip on the vents. I need to do something about a rusty vent in our bathroom.
Looks fab! Wish you were my sister and brother-in-law!
I can’t wait to see how you accessorize the Hemnes unit…I just got the exact same one and it’s just sitting empty until I decide what in the world to put in all those shelves!
You could try a version of what we did. Buy two bridge units and place one of them directly on top of the TV unit. That will give you more space for electronics and you might be able to go with the smaller shelving units then.
We don’t have the shelving units. I bought one bridge to set on top of the TV unit because we needed more electronics space. It solved another problem for us too. I hate looking down at my TV. Having the bridge sitting on the main unit gives a height of 36″ instead of 22″. The final plus…It gives it a nice dimensional look that I love, since the bridge isn’t as deep as the TV unit.
Beautiful room. Can’t wait to see it all styled!