Howdy! Hope you had a great weekend!
I thought I’d blog about the tables we worked on for Kev’s parents porch makeover today.
First up, there was this guy…
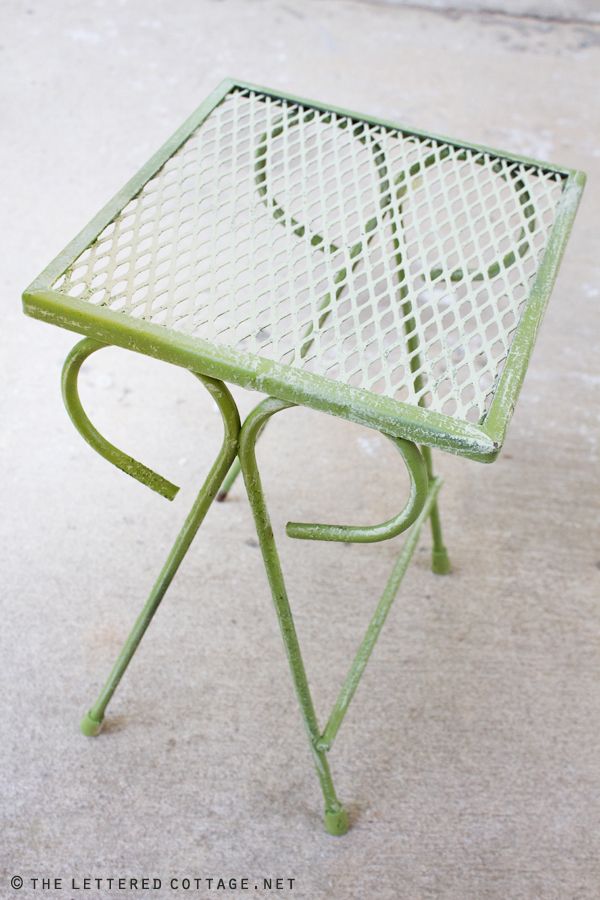
He looked great as-is, so we didn’t do a thing to him.
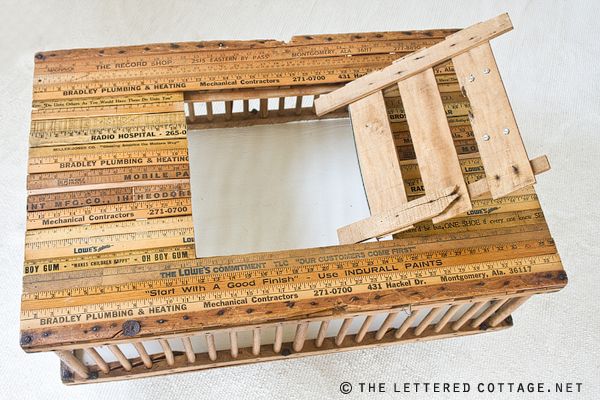
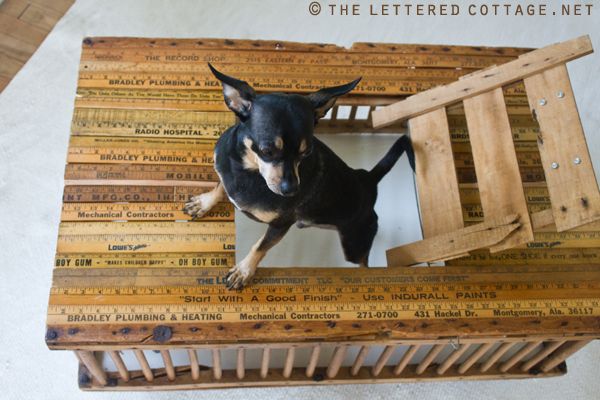
Then there was this guy…
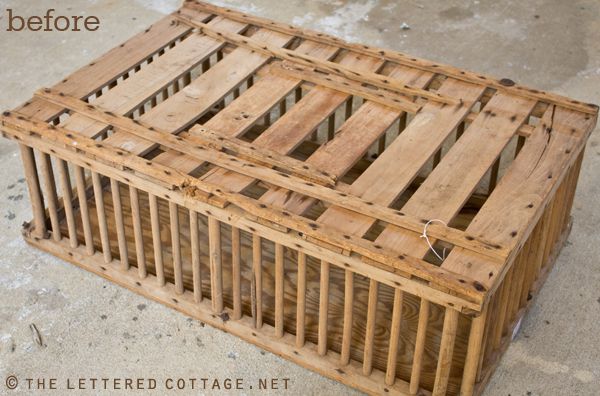
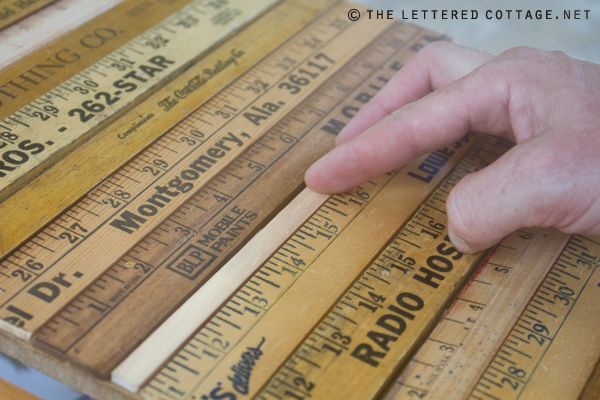
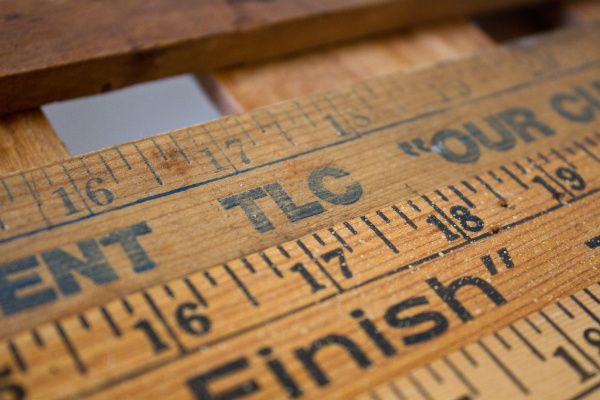
We primed and then painted the inside bottom of it a color called “Moonlight White” (Benjamin Moore), and nailed some vintage rulers and yardsticks (cut to length) to the top of it…
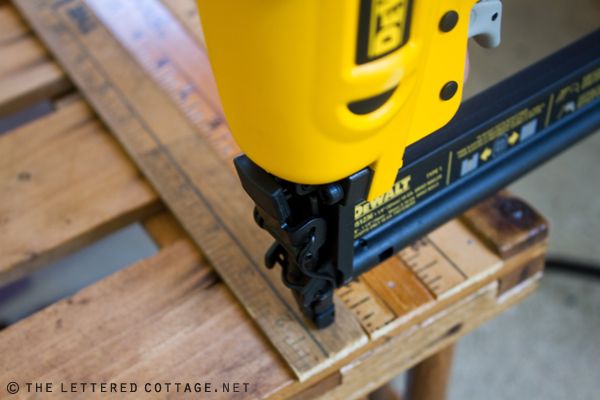
And like our DIY wall art project, we attached them one at a time, alternating from bottom to top as we went along. That way, if there was any weirdness, it would end up in the middle of the tabletop, not at the top or bottom. Of course there was weirdness when we got to the middle, but we found the perfect little piece of wood in the craft wood section of Michaels and it worked out great…
We attached everything around the door so that Kev’s parents could use the inside as storage…
…and this heavy old handle I purchased on eBay a few years back, and some vintage casters I purchased from AnythingGoesHere on Etsy earlier this month, made for the perfect finishing touches…
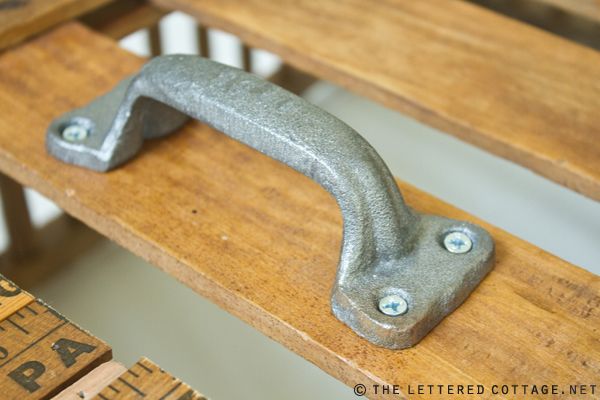
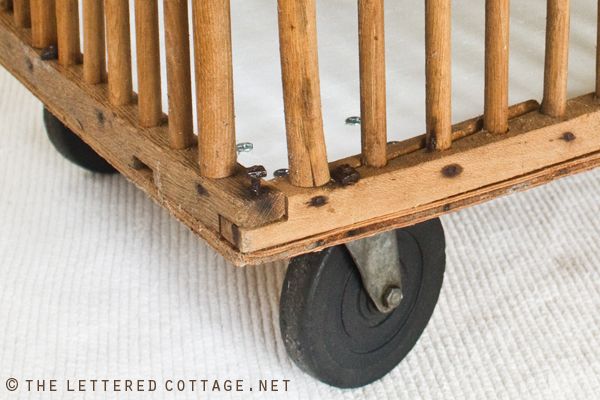
(PS- Before we painted the inside bottom of it, and attached the handle and casters, we sprayed the whole thing with two coats of polyurethane to help protect it from the elements.)

The “skull” side table we picked up at Prattville Pickers was super simple to modify. We just carefully removed the glass tile from the two strips of adhesive tape holding it to the underside of the tabletop, and cut several wood “fill-it” strips (available in the fencing section at Home Depot) to use as a tabletop surface instead. (We attached them with Liquid Nails.) We finished by painting on a coat of Miniwax Special Walnut colored stain, and once that was dry, we sprayed on some polyurethane to seal everything up.
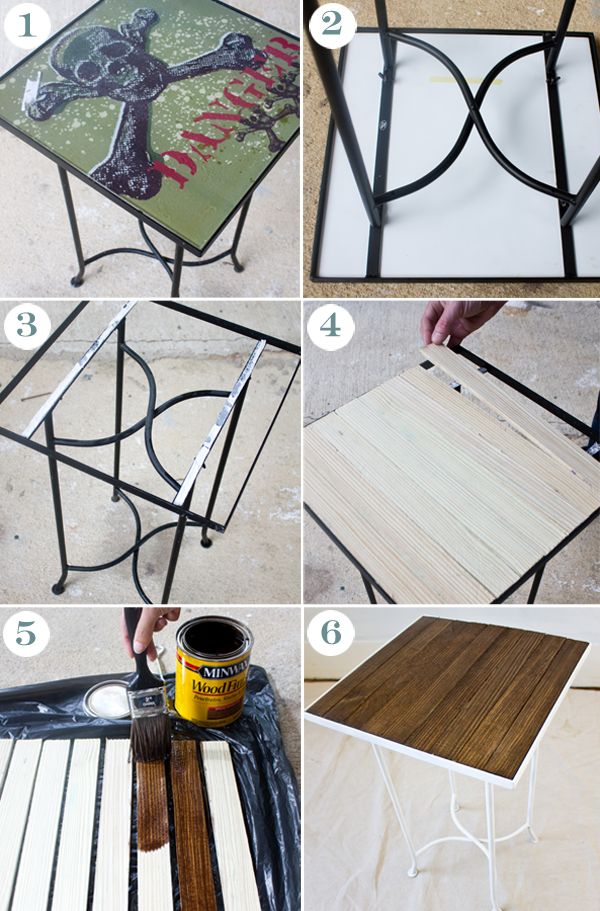
(PS- Prior to attached the strips of wood, we sprayed the black metal base of the table with some of this stuff…)

It’s available at True Value and it’s da bomb!
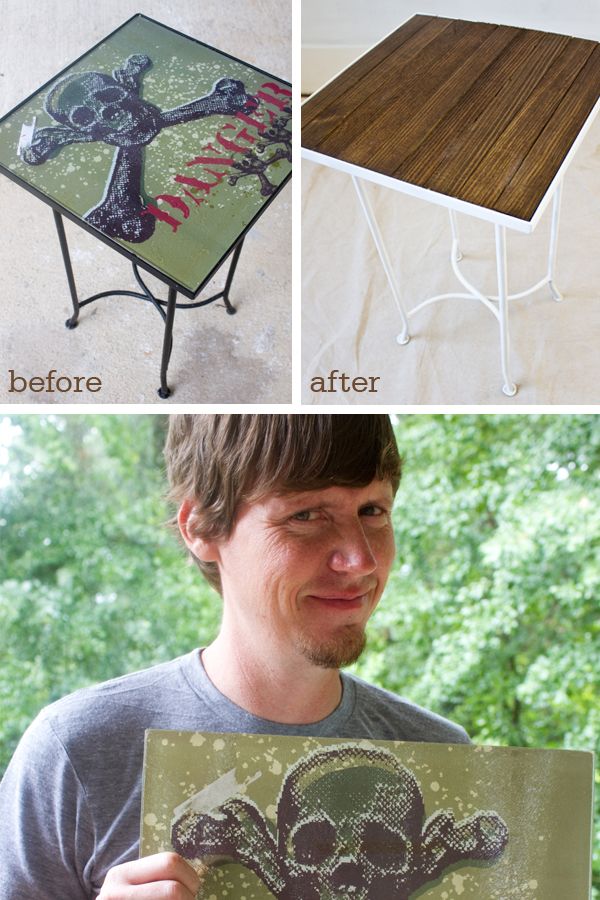
You’d never know that table used to be so freaky lookin’, would ya! (Poor Mr. Skull Tile is currently sitting out by the curb waiting for Mr. Garbage Man to come pick him up.)

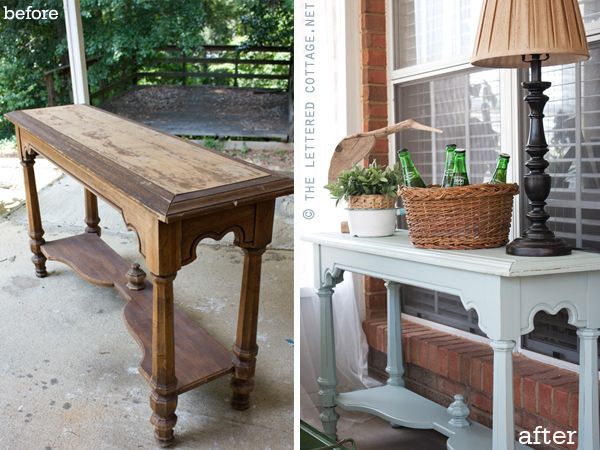
The $20 console table was a cinch to spruce up. Like I said the porch reveal post, Kev just picked out a color (Southern Breeze by Behr available at Home Depot) and I painted it on and distressed the edges when it was dry.
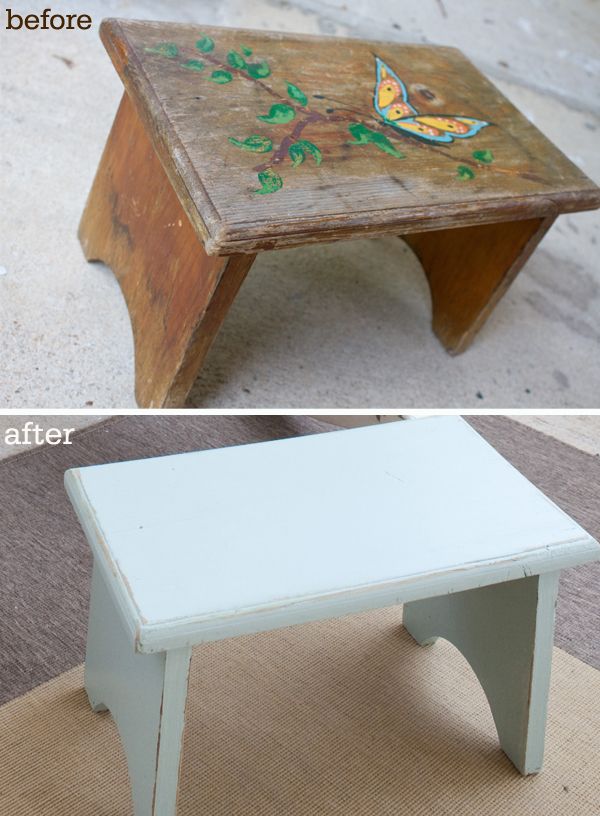
I did the same thing to the little foot stool we picked up…
And there ya have it! Four frugal furniture facelifts!
Stay tuned for Kev’s DIY sunburst mirror tutorial tomorrow and some more Pick My Presto action later this week. It’s been a while since I’ve done one and my PMP finger is chompin’ at the bit to have some Photoshop fun!


Layla I love that crate! The yard sticks and the handle are perfect!
Awesome – LOVE the vintage rulers and all of it looks great! You´re great at what you do! 🙂
These transformations are great! I love the new console table, that is my favorite. You really are so creative with taking old things, and giving them new life. 🙂
Anything with frugal and furniture in the same sentence always interests me. I love the use of the old rulers. It really makes that piece look interesting and unique. I can just picture my 1-1/2 year old climbing in and going for a ride! Everything turned out beautiful. TFS!
Pure perfection. You two are so creative!
Layla,
Great job on giving all of these tables a new look. The console table looks beautiful in “Southern Breeze.” The skull table is the best example of “never say never” and think “potential”. I especially love the repurposing you did on the chicken crate. Is the bottom of the crate solid? Hard to tell from the pictures.
Your Friend,
Deborah
Thanks Deborah!
As for the chicken crate- yep! We painted the plywood bottom “Moonlight White” by Benjamin Moore. 🙂
You can probably see it better in yesterday’s post:
https://theletteredcottage.net/porch-ideas
I loved all the tables and thought you all did a wonderful job! I love gifts like that…They last a lifetime in our memory…You are a great daughter in law…:) Loved Max helping out too…LOL 🙂 So stinkin cute!
They’re great, of course! I’m swooning over the crate table, you know.
🙂
shaunna
I am jealous that you found that beautiful console table for $20. I must not know where to look. When I go into Goodwill’s the stores are filled with mostly clothes and just a few pieces of furniture. When I go into antique stores everything is so pricey. Such a talent!
Hey Megan! Flea markets remain my number one fav spot to go junkin! 😀
This is the second converted chicken crate I’ve seen. Makes me drool! One would be perfect in my 1903 living room–if Icould just find one!
1903!!!! Awesome! 🙂
Oh my, I love that crate table so VERY, VERY much!
Love them all!!! I wonder if I could do that {the ugly table that you transformed with little strips of wood} to my outdoor table with a glass top!!! hmmmmm…..won’t hurt to try! Thanks for sharing all of your creativity!!
Give it a whirl! 😀
Hmm… I may try the same with my ugly glass top patio table that is on its last leg.
Great make overs!! Love, love the chicken coop with the old casters!! The addition of the rulers was the perfect finishing touch!!
Blessings!!
Cute, Cute, Cute!!!
Love seeing the furniture transformations!!!! And I’m so impressed with the console. Love the color!
I feel inspired by you every time I drop by. Thanks for that!
xo
Luciane at HomeBunch.com
Thank you for dropping by!!! 🙂
I love old yardsticks so natch I love your chicken coop makeover. I have memories of “Radio Hospital” in downtown Montgomery. “The Record Shop” has now morphed into “Cohen’s Electronics”…signs of the time.
I remember Radio Hospital, I bought my first guitar from Bailey Brothers Music right next door! Memories… 🙂
Thank you for being such an inspiration!
I love everything you guys are doing- and its inspired my husband and I to start our own blog! We just bought a house last November (in Canada) and are working on renovating and updating the entire place 🙂
Its been so fun so far and I couldn’t have done it without inspiration like yours!
LOVE the tables and the suburst mirror- I went out yesterday and bought a bunch of shims so I’ll be posting mine soon! I also found some vintage cedar shutters that Im going to redo soon as well!
Thanks again you guys are doing an incredible job and everything looks amazing!
Melissa
Hey there Melissa!
So glad to hear that you and your husband started a blog! It has been a wonderful experience for us! Look forward to seeing your sunburst mirror! 🙂
That table rocks my socks off!!! Oh to have such a handy and willing husband to go along with my crazy decorating…I’ll just have to dream 😉 Way to go! What an amazing daughter-in-law you are, and how stinkin’ lucky are Kev’s parents!!!
Love them all!!! Especially love the color of the Southern Breeze paint you used.. This may seem like a silly question, but….after you paint the tables, how do you “distress” them? Do you just use sandpaper? Are there other techniques that work well to “age” furniture that you have painted?
Yep! A sanding block wrapped with sandpaper will do the trick! 🙂
My friend Shaunna’s e-book about painting furniture (there’s a button in our sidebar) offers TONS of tips on distressing and aging painted furniture too!
I was going to ask the same question, and I’m so glad to find the answer in the comments! 🙂
You and Kevin did a great job, Layla! You are both so talented!
Yall did such a great job!! Curuious though…where do yall find all those vintage rulers and yardsticks??
Thanks Anne! We got ’em on eBay and at a local flea market! 🙂
Great makeovers!! That skull table became unrecognizable! When I saw the first picture I was thinking, “Wow, Kev’s parents must be pretty edgy…” lol. I just got done painting a bunch of furniture and now I’ve sworn to my hubby that I’m done for a little bit. But your pictures are making me itch to do more…..I feel like an addict who just got crack waved in her face!
LOL!!!!!! 😀
I love each and everyone! But the yardstick coffee table is by far my favorite. Well done!
If you have a chance, please stop by and enter my giveaway.
Happy Monday!
Wow!! Yet another inspiration to spruce up some older furniture we have. Now if I can only find the time!! Yardstick table=awesome!
I really love all of these projects, but my favorite one was the console table. I love the color that Kev chose and the distressing is just right! You guys are awesome! Thanks for the inspiration!
Love the painted tables. Do you sand and/or prime them first, or just paint directly over the stained wood? I just picked up two child size wood desks that I can’t wait to start on!!!
Hi Amy!
Layla sanded first and then painted right onto the sanded wood. Have fun with those desks! 🙂
I love the chicken crate and the yard stick top looks fantastic! I must say, I think my favorite transformation though was the skull table, it looks awesome now after some TLC! You two rock!
I love all of this – especially that console table! I’m a new follower – thanks for the inspiration!
Hi Ashley!
Thanks for the kind words!
Everything looks great!! You guys did a fantastic job!
Where did you get the chicken crate?
Hi Lara!
We picked up the chicken crate at a local flea market here in Prattville, Al called Prattville Pickers. We’ve seen a few over the years and Layla has always wanted to turn one into a coffee table. Thanks for the comment!
Thoroughly enjoyed the ‘reveal’ video! Made the porch area such a comfy, serene retreat! Beautiful!!
How awesome!! You guys are great!
Thank you so much for this inspiration. I am loving the chicken coop table AND love the painted console. Such great inspiration for my porch project.
Can you tell me any more info abou the paint you used? I know it is Behr, is it w/primer and what is the finish? Eggshell? Gloss?
Everything is great! I’m in love with that crate and what you guys did with it .
I can’t take my eyes off of this porch. The console table for $20 is amazing. The color really makes it I sold a chicken coop at a garage sale and now I could kick myself….you are so clever. I LOVE your blog!!! Thanks for all of the ideas!!! Now if I could just put them together in my house!!!
OH! I had one of those wooden chicken coop-crates when I was a teenager, we ended up getting rid of it, darn it! Such creative ideas, LOVE it!!!
I love your attention to detail when you are making things. Your instructions are so clear, I almost think I could do it myself. Well done. Ann
You can!!! 🙂
Love the rulers on the tabletop – cool idea!
So…did you spray the console and stool with polyurethane, too? We live in a humid city and painted out built in desk/shelf in the study with BM paint, and it gets “sticky.” If something a little heavy sits on the surface for too long or a drawer stays closed too long, things stick together. I read it was because of the latex paint. How’s the table outside? What kind of polyurethane spray do you use (if I can ask!). Thanks!!!
Love the vintage yard stick table! I have a collection of vintage yard sticks and have been trying to figure out a way to incorporate them into a table for my youngest son’s room. Great idea…….and I am drooling over that chicken cage. In my little town, they call them lobster traps, LOL! I have no idea why?! The porch redo was beautiful and looked so relaxing. Great job!
Ahhh..your coffee table project turned out beautifully!!! My husband and I have an old luggage cart that we use as a coffee table and we love the uniqueness that it brings to our living room=) not to mention how wonderful it is to have a coffee table on wheels…for all of the vacuuming fanatics out there like me=)
[email protected]
Luggage cart coffee table sounds awesome!
Love the redo! The video is adorable. Noticed Kev’s hat. War Eagle!!!!
War Eagle!!! 🙂
You inspire me!
“and there ya have it” — sounds very Minnesotan 🙂
Love the makeovers! I think my favorite is the “skull” table. The transformation was so creative and the little white table with wood top was so cute after!!
love the coffee table ………………..you guys make everything look so easy……….! Thanks for the inspiration !
paint = magic!
well done on EVERYTHING!
xo
elyse
The table looks awesome!! I loved the video and Mom’s reaction. 🙂 So sweet!!
I’m starting a linky party on Mondays called “Make a List Mondays”. If you miss Mondays, any day of the beginning of the week would be fine. Would love to have you!
Crystal
I love the chicken crate table, and how crazy, the day after you posted this I spotted one of those crates for $13 while checking out our local ReStore for the 1st time! Unfortunately I had to pass because as cute as the idea is, we just don’t have a spot for it in our current home. Someday I hope to have a screen/3 season porch that looks this relaxing!
Cool. What a nice and practical way to DIY the tables. In these times when money is tough to get by, I’m also thinking of DIYing some of my garden and home accessories. It can save me hundreds of dollars. Instead of buying something out directly from Pottery Barn summer collections, I could just redo and fixed some of my old furniture sets and fixtures.
The porch looks absolutely amazing. I’m in the middle of my porch redo and am loving the inspiration from this (and the last) post. Now I just need to find a cool coffee table for it and it will be perfect.
Incredible job, you guys!
Where do you find a console table like that for $20??? I’m in love with it!