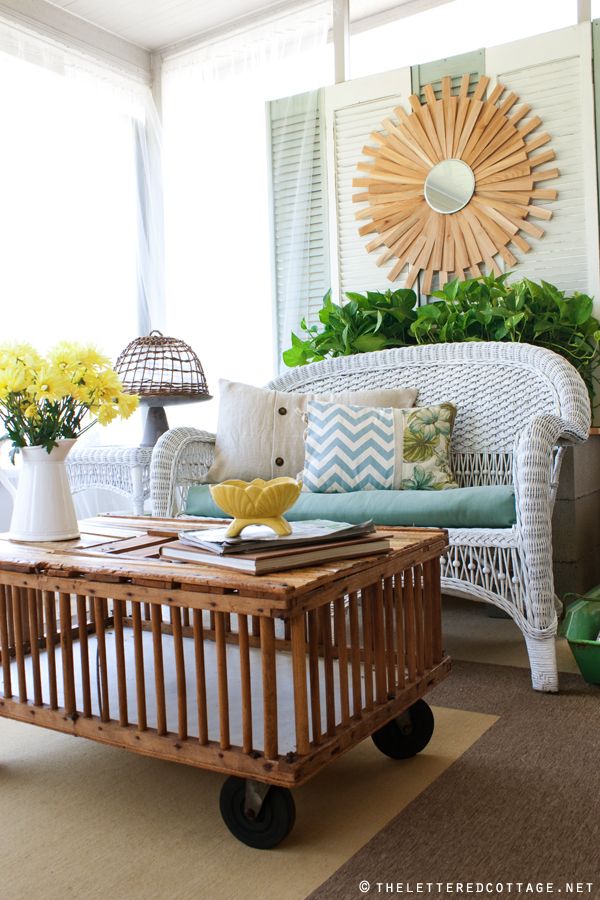
Hey there! Kev here. Like Lay mentioned in yesterday’s post, I’m here to show you how I made the sunburst mirror for my Mom and Dad’s porch.
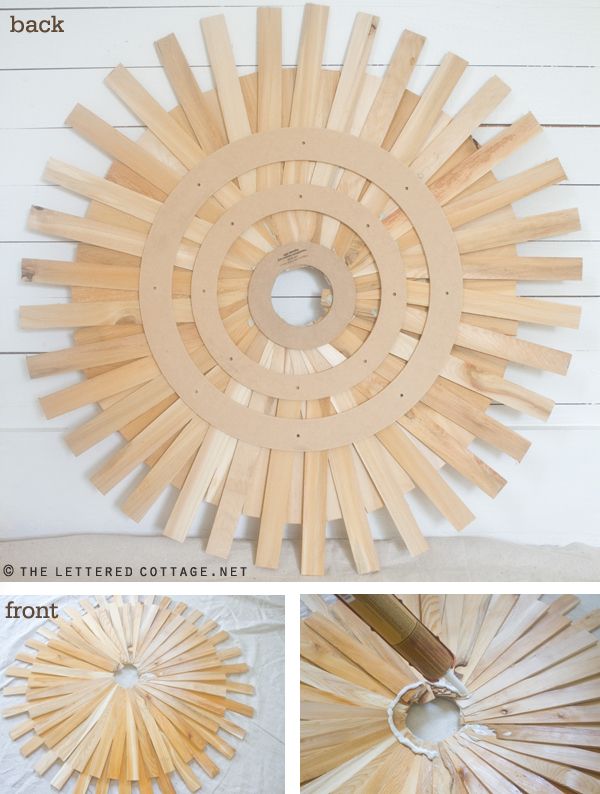
Thanks to Kate’s tutorial, it was really easy to put together. First, I went to Hobby Lobby to pick up three different-sized wood floral rings. Unfortunately Hobby Lobby didn’t carry them, so I got back in the car and headed to Michaels. They had them, but didn’t have any of the 8″ round, beveled-edge mirrors that I had just seen at Hobby Lobby, but passed on because surely Michaels would have them too.
Back in the car, and back to Hobby Lobby I went. After that I picked up two packs of wood shims from Home Depot and when I finally made it back home, I broke out the Liquid Nails and started gluing all the wood parts together.
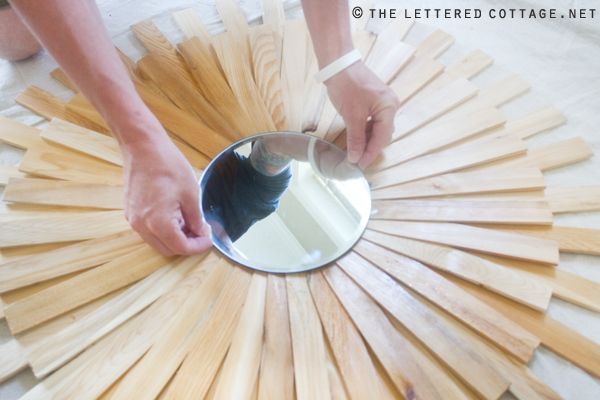
When the glue dried, I sprayed the whole thing with some polyurethane and attached the mirror with some more Liquid Nails.
It was an easy and inexpensive little project to put together, and thanks to my trusty nail gun, it’s now securely affixed to the blue and white shutters behind it on my parents porch.
The End!

PS- Before I started gluing, I cut both layers of shims down about 4″ using our compound miter saw so that the mirror was the size we wanted it to be.
——————————————————————————————————–
Join us on Twitter or Facebook!


————————————————————————————-
Need help arranging your furniture?
Check out Layla’s e-book!


Thank you so much for posting the tut!!! I’m gonna make one too! SO excited ~Tracy
Hey Tracy!
Can’t wait to see how it turns out! Thanks for stopping by!
I just finished my version of the sunburst mirror and was soooooo excited how it turned out! Thanks to the easy instructions, it only took me an hour or so from beginning to end! My shims had a slight pink tone but I think eventually I may use two variations of oak and mahogany stain to jazz it up a bit! By the way, your blog has truely inspried my entire house…from your fireplace redo to your horizontal striped wall, I tell everyone that thinks I should be a designer that I am just a good copy cat of TLC!:) Love your style!
Awesome! So glad you did it! Thank you so much for the kind words! 🙂
I’ve seen alot of sunburst mirrors but this is by far my favorite!!! I’m pinning it and putting it on my to do list! 🙂
Thank you! 🙂
Thanks for the great tutorial! I’d have to say this is one of my favorite sunburst mirrors I’ve seen too!
Thanks Laura!
How do you make it seem SO very easy. I just found a fabulous $1 round mirror at a yard sale on Sat and immediately thought of Sunburst mirror. Right now, it’s the base of my centerpiece on my table, but with your version, I actually think I may tackle this. 🙂
Hi Jen!
I was a little bit nervous before I started, but when I got going it all started to work out. I say go for it! 🙂
Love this!
What a fabulous idea!! So very cute:) Thanks for sharing how you did it!
Thank you for being so honest about your many trips to Michaels and Hobby Lobby. It made me feel “normal.” I have been putting together my mantel this weekend based on your summer mantel from last year and ran back and forth from Michaels to Hobby Lobby all weekend long. I love the mirror and am jotting down a list for Hobby Lobby this morning.
Hi Amber!
I do it all the time! Haha so frustrating… 🙂
Gotta make one of these, or a few.
hey Kevin very nice!! Did you make their table as well! Love it!!
xoxo
Karena
Art by Karena
I have an amazing Giveaway from the Artisans at Novica. You will love it!
Hi Karena!
Yes, Layla and I put some rulers on top and some casters on the bottom! Thanks for dropping by!
I’m a beginning DIY’er and I *might* be able to pull this off. Do the wood shims come in one length or did you cut these to your liking?
Hi Tina!
I did cut 4 inches off each shim to make it a little bit smaller. I went back and added it to the post. Thanks for pointing that out! Good luck with your mirror project, I’d love to see the finished product!!! 🙂
I have all my supplies after trips to said stores and am almost ready to start. My question is: Does it matter what end of the shim I cut to shorten to the right length? If I cut off at the narrow end I didn’t know if the mirror would lay as flat. Which end did you cut from? Thanks so much, big fan I am.
Hey Melissa,
I cut off the narrow end, I just kind of winged it and it turned out pretty good. Good luck!
Wow, I really like it. It looks so expensive but it really wasn’t. Love that. Probably cost you more in gas going between Hobby Lobby and Michaels. Thanks for sharing this.
Jessica
Ha ha, Probably so!
And I need to add that everytime I see you, it reminds me of my brother. You and him look SO much alike!
Wow! Must be a good looking guy! 😉
Thanks Kev! This looks easier to follow than some of the other tutorials! May need to get the hubs to try this!!
Blessings!!
Wonderful job, Kev. You made it look so easy. Enjoy y’alls blog.
Your trips to and from and back to supply stores while working on projects sound very similar to mine, LOL! Love the mirror, it really completes the space.
🙂
Your shims look nicer then the shims I have seen at our stores, Are these all stuck together and you snap them apart? and are pretty rough. I am not sure what I have bought called shims is the same thing that you are using.
LOVE YOUR MIRROR
Hey there Carla!
These shims were not all stuck together, they were all seperate and bundled together. They are thin on one end and thicker on the other end. Some of them were really rough and in bad shape. I picked through the bundles and found the best looking ones to use. I also sprayed a coat of polyurethane on it to seal it and give the wood a warmer look. Thanks for stopping by! 🙂
Genius!!!
I always wondered why people would buy those packs of shims! They must have been made just for this project. Who knew something so utilitarian could be so lovely. Cheers!
Loooove this!
LOL…How many times have we all done this – Would somebody pleeease open a chain of craft stores that sells EVERYTHING???!!! haha: )
Cute tute and mirror! :0) Your parent’s porch looks really good, nice job to you both!
Two quick questions – 1. How long were your original shims, and 2. how wide is the final mirror? This room looks fantastic!
Hey Shellaine!
I’m not sure how long the shims were to begin with, but Kev chopped 4 inches off them and our final mirror is 32″ from top to bottom (or side to side).
Thanks! 🙂
Great directions, and sooo cute. Thank you!
off subject, i love how the egg crate turned out. great upcycle, layla!
kelly
This room looks so awesome. The mirror just makes it!! Great job. 🙂
Love this mirror! Thanks for the little tutorial. I am all about inexpensive decor for when we get our house done. I had actually picked up a couple of mirrors at Hobby Lobby that I was going to use for a different project, but I think this one goes on my list first!
I loved this mirror. A sunburst mirror has been on the to do list, but I’m so glad that I waited until after I saw this yours. The shims make it look so much more expensive than using something thin like bamboo skewers.
eeep! i’m doing this this week! matt and i were looking online a few nights ago for an affordable sunburst mirror…and they don’t really exist in a large size.
thank you so much for the inspiration! i can’t wait to give it a go!
<3
Thanks Kevin, I really want to make one of these and now I think I will. Your instructions are great! Appreciate it!
Debbie
Kevin and Layla…love this! Thanks for sharing how you made it! I know Kevin’s Mom loves it, too. 🙂
Craziness!! I just bought a mirror the other day at random to make one, then see your posts today. Great work!!
Thanks to your very inspirational blog, when I was out garage saling today, I found a chicken coop like this one, and was able to pick it up for $16 , I probably wouldnt have known what to do with it had I not just read your blog. Keep up with the great work! Thanks, Sue
I want to try this out but do not have a saw on hand that well… Let’s just say my Fiance would not want me using alone 🙂 *I am a terrible clumsy person* Would Home Depot be able to cut them down for me or am I just out of luck?
OOOOOh. Nice. This has been on my to-do list for a while, but will have to wait until I finish the closet makeover I’m tackling this week!
Well done you!
I loved all of your cute ideas. You talked about living in your house for 10 months before redorating. I’ve waited 6 years.
I love your blog, and check it out often. I do have one suggestion, though, that might help your readers. On your DIY projects, I would recommend a ‘Supplies List’ to give us an idea as to how much of a particular product/part we will need to make our own.
Other than that, you guys are great, have really cute ideas, and I always look forward to seeing what projects you have to make my house beautiful 🙂
Cool project! People used to say you could do anything with duct tape, but give me my liquid nails and pneumatic nail gun anyday!
I love this mirror. I recently featured http://decoratingcents.blogspot.com/2011/11/trends-sunburst-mirrors.html. Would love for you to stop by and grab a button.
I saw you on CBN today and found your website..awesome!!! Now if i can just get over my nausea, i will attempt someday to try one of your projects. Thanks for sharing and making!!!
I loved this idea so much I made it myself. Im a orange county face painter and can never have too many mirrors. this added the pizazz I needed to my booth space when im painting faces for children!
how much did the wood floral rings cost you. thanks
Genius!
Great tutorial! I featured your blog on my blog. Check it out http://www.lulustangledyarns.blogspot.com
Thanks again for the great tutorial 🙂
Love your mirror. I made one with my own spin on it but featured yours as a great tutorial to follow! <3
Hi! did you glued piece by piece? Or all of the pieces together to the rings?