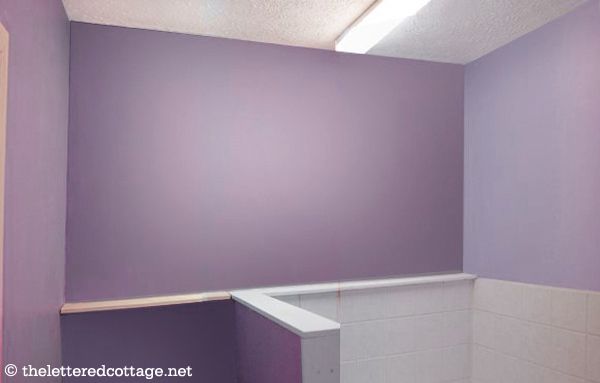
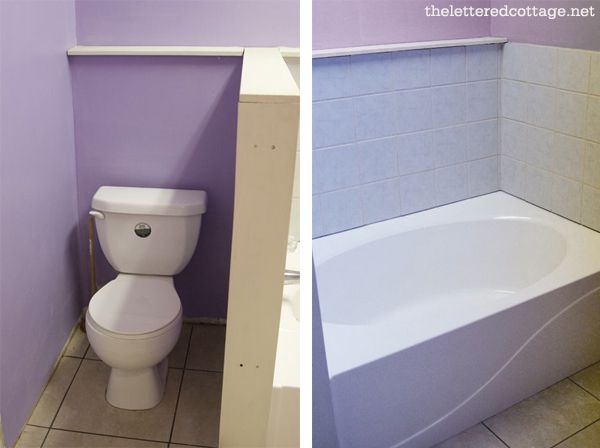
Once upon a time there was a guest bathroom. Half of it was finished…

…and half of it WASN’T finished…
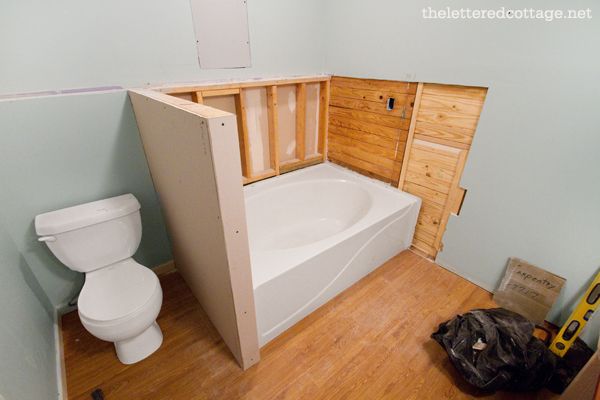
One day, waaaay before it’s owners had saved up enough money to re-do it, SOMEONE got ants in her pants and attacked the wall above the tub with a hammer while SOMEONE ELSE was at the home improvement store…
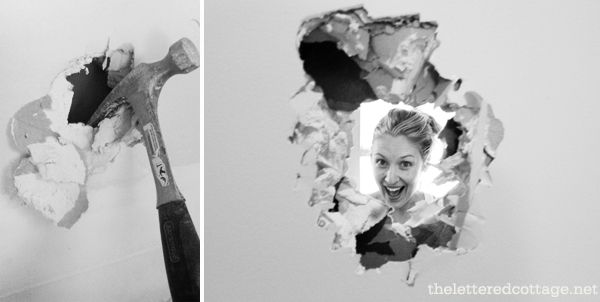
Oopsie daisy.

I was originally thinking we could put some (partially frosted/salvaged) windows in that wall so the bathroom would get a little more natural light and still have privacy…
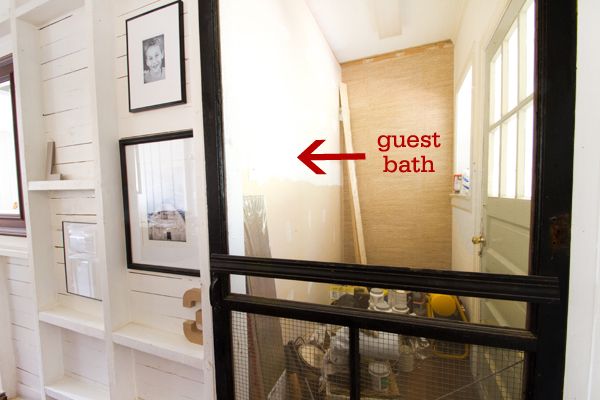
Well, for multiple reasons that plan has been scratched, and a hole has been patched, *ahem*, and that side of the room is finally getting a facelift week…
We’re super pumped to blog all about how everything turned out when we’re done with the project next week, but in the meantime, I can’t help but wonder…will I ever learn to hold my hole-makin’ horses?

Ha!


oh please don’t hold back. not ever. we love you and your hole making self. always an adventure!
Smiling BIG! 😀
can’t wait to see the other half! half 1 looks so great! 🙂
I love the transformation, what a difference! In both our master bathroom and kids’ bathroom have the old recessed lights from the 60’s – squares in the ceiling. I’m looking to replace them and think what you have installed might work. Would you mind taking a picture of the ceiling/light over sink? And where did you find it? Thanks!
Hi Lindsey!
I think we got that light at Lowes for around $25 if I remember correctly! 🙂
I have the same light in a hallway and yup, it’s from Lowes. It’s Allen+Roth. I think it’s more than $25 but not by much. Maybe $35-45 ish?
We had the same problem of the square recessed soffit light from the ’60s. The problem was that removing the light left a huge hole in the ceiling, and it was impossible to find a new fixture to cover it up. So we improvised and bought a pre-finished white wooden shelf from Lowe’s ($16-18, I think) that was wide and long enough to cover our hole. We cut a hole in the shelf for a new electrical junction box, and mounted the shelf to the ceiling over the hole (with the routed edges of the shelf facing the room – technically I I think this means we installed the shelf upside down from how you would if you used the shelf brackets). Pulled the wires from the soffit through the shelf and connected the new junction box. Viola! No more hole! New J-Box is easily covered with any kind of fixture that you can hang from the ceiling. We used a simple Portfolio mini-fitter pendants from Lowe’s ($18 plus globe about $8). This worked because our soffits had wood trim and the wooden shelf just fit the look. Our “new” house was built in the 70s and all the square soffit lights are recessed into drywall only. Very blah. Our electrician says to tear the whole soffit out but you never know what else you will find – soffits hide all kinds of electrical, HVAC, plumging, etc. So I’m still mulling how to handle it.
You’re right, Sarah! It was $39 now that I think about it!
What is the room with the grasscloth? Just storage? I’m dying to use grasscloth somewhere in my home.
Hey Elizabeth!
Click on the link I just added to the post up near that picture and it’ll take you to the post about it! 🙂
HOLEy (ha – couldn’t help it) that is a cute post. I love how it is progressing and can’t wait to see the finished product! 🙂
Layla you just crack me up. I ADORE all the work you’ve done and you have such wonderful taste! I noticed you put wood down in the bathroom. I’ve been considering putting some leftover engineered hardwood in my little used upstairs bathroom. Everyone I speak to is appalled at the idea. Can you share your reasons for putting in wood? How you over came the wood vs water hang up everyone seems to have?
Thanks for including us in your journey!
Ha! Thanks, Connie! 🙂
Here’s a link to our “plastic wood” post! 😉
https://theletteredcottage.net/guest-bathroom-reno-day-74/
(We got it at Lowes)
I saw some porcelain tile this week at Lowes that looks like handscraped wood flooring. It could be a great answer for anyone who wants the wood flooring look without the worries of water damage. Here’s a link I found of a couple who used it in their house!
http://littlehousebigplans.wordpress.com/2011/05/05/our-hand-scraped-porcelain-tile/
just adding in my 2 cents here….ALL of our bathrooms have REAL wood floors and we have lived here for 16 years with no problems. We use mats by the tub, and all of our sinks (3 of them) are pedestal. We do have Pergo flooring in the laundry room and in the closet with the water heater since those things have been known to do strange things (like leak water everywhere.) Our builder told us we were crazy (about several things!) but I have never been sorry for putting in the real wood.
I saw those too. Trying to convince my brother in law to put them in his new carriage house. I’ve seen them on the home improv. shows and they really look like wood.
Layla, never change…that’s why we all love you!!
Connie, we have engineered wood in our half bath and kitchen and have had no problems with it. As long as spills are cleaned up and not left to sit, there should be no problems. However, if you leave a spill, the water will seep into the grooves and swell the boards. Over time a missed spill will eventually shrink back up and hardly be noticable (that’s been our experience so far). I have a two year old who has had many spills, two cats who like to dip their paws in water then walk around, and my floors still look great. If it makes you happy, it doesn’t matter what anyone else thinks anyway 🙂
THANK YOU THANK YOU!!!!! Have a great week end and I believe your husband hid the hammer! : )
Ha! That’s the best part — tearing things apart! I need to get better at putting back together. Can’t wait to see the finished space. Oh, Layla, I sent you an email a few days ago. I found a picture on pinterest of a storage unit (actually looks like only the front half, like it’s been cut in half) up against a wall. It’s white with compartments that look like drawers that tip outward (maybe to store shoes?). Clicking on the pic took me to your site but not to where it had been posted. Any idea where that might be?
That is too funny. I was just this morning looking at the post when you put the hole in the wall in the first place and thinking, “I wonder if they did anything with the hole yet…” I am sure the “hole” bathroom will turn out just lovely. I am so excited for every project you complete. Now to convince my husband we need to do a little fixin’ up…
Ha- I did the same thing to my bathroom wall last night….I have an old fireplace that was sealed up and I got a bright idea to expose the brick, as it was the back wall of my bathroom…..imagine my surprise when i ended up coming out in the bedroom closet…oye! wine + hammer= bad idea!
Don’t ever stop makin’ holes in your home, it makes the anxiousness and the excitement even more bigger because we all know what will come next: the big reveal! And it always looks GORGEOUS! 🙂 Love the first half by the way… Can’t wait for the second half!!
Inge x
The ‘after’ picture has me nuts about seeing the process! I SOOO wish you and Kevin could come to my house and make some beauty like I see in your home. You are remodeling rock stars!
I’m sure it will look great! I stumbled upon your blog the other day- just in time to get some ideas for my budget kitchen remodel- and I’ve had a lot of fun reading your posts! Your house looks awesome 🙂
I’ll “watch this space” to see how it’s coming. I love your “Inspiration” photo. Very nice! 🙂
Love your projects! :o)
Amazing! I love that you didn’t even seem phased by knocking the hole in the wall OR patching it up. 😀
That has been my trick for 50 years to get a project started. While husband is away, wife will destroy. Works every time. Sally
You were just trying to be helpful! 🙂 Can’t wait to see more!
Sometimes you just need to make a hole.
i love your “oopsie daisy” attitude! this is the way to go because almost anything can be fixed, so…no worries!
I remember when you hammered that hole in the wall, and have been wondering what you ever did with the bathroom! I can’t wait to see how it turned out! :I know it will be gorgeous…everything you and Kevin do is so tasteful and beautiful! 🙂
I think what you have done is so lovely. My favourite bit is the exposed studs. Just lovely.
Carolyn
Hi Carolyn! That’s actually what the room looked like right after we got our demo job cleaned up, but we look forward to blogging about the tub area once the new tile and paint are good to go! 🙂
I love love love the side of your bathroom that’s been redone. . .can’t wait to see how the other half turns out!
I guess I mean the bit with the paintings displayed.. They look great and I hope you are keeping those as I love them.
Carolyn
Oh dear…I have the same problem. Just when I think I have it under control………..oops!
I was just looking at this post with my 2 1/2 year old drew sitting next to me, and when I scrolled past the photo of you smiling through the hole in the wall he said “mommy, who’s that girl’s name?” and I said “that’s Layla…” He promptly replied “Mommy, “ayla” is real cute and real nice!” 🙂 I have found him to be en excellent judge of character in his 2 1/2 years…. thought that would make you smile 🙂
Part 1 looks incredible – so I can’t wait to see how the rest turns out even if the hole making lead to a dead end! Yikes! Anytime I attack something like your hole in the wall I worry that I’ll find that linchpin that brings down the roof! LOL
Shame it didn’t lead to a way to bring in more light – maybe one of those solar light tubes some day? Holes in the roof, the sequel! 😉
Oh, come punch a hole in my bathroom wall, pretty please!
what’s more fun
than smashing a hammer
through a wall?
alison
Hahaha…you are too darn cute. Why no glass??? Can’t wait to see this one done!
Ha! I know someone else in our house who has ants in her pants too! Can’t wait to see how the other side of your bathroom comes out. The side that is finished is just beautiful. I love shelves and the tiles.
This reminds me so much of our master bath right now! We painted it that exact same shade of purple and now I hate it 🙁 We call it the purple people eater!
Hole in the ceiling instead? Mark is on to something there to introduce natural light into a bathroom without a window. We’ve done that before with a solar light tube on a master bath project, and our clients loved it! Now I’m not suggesting any hammers-gone-wild happening here…whoa, nellie! Save that for another project for sure! 🙂 Oh, and I love the tiled wall…where did you find the tile? Thanks!
Layla, don’t feel bad…sometimes you have to break a few eggs to figure out, you really want pancakes for breakfast instead. 🙂
Heh, it’s always great to start making DIY changes on your home, but its so easy to underestimate the amount of time and work it takes!
What you’ve done so far is amazing, beautiful. I admire you to be brave to make that hole. 🙂 If you guys ever decide to move, you will have one happy new homeowner, with one lovely home.
Best,
Gloria
Can’t wait to see it! It will look great!
We are renovating a cabin, and also have a windowless bath sandwiched between two bedrooms. I am thinking about a transome, similar to one you posted about earlier. This way the bath will get light with out bothering the folks in the bedroom with unwanted night time light. Your blog is a wonderful resource!
I love your blog and just I caught up on a few posts and wanted to say THANK YOU from the bottom of my heart. You changed my life today. Your post about palindromic rheumatism may be the answer to my son’s mystery illness.
It all started around Feb. 2007 when he was 16 and his finger was swollen and then a toe or two. The doctor ran a blood test and an x-ray of his hand and ruled out arthritis and gout but had no answers and didn’t suggest doing anything more about it. At one time the middle finger was so swollen he couldn’t open his hand. Every year around Feb. and March it comes back and I always try to make light of it to him but inside I would be terrified and so uncertain about his future.
Thankfully it is affecting him less and less each year. This winter it was one finger and one toe for a few days.
I have been so worried and have googled endlessly with no answers. I panic every time he isn’t feeling well (even when it has nothing to do with those symptoms) but had pretty much buried my head in the sand afraid it was something horrible and life altering and I didn’t want to face it.
For a girl that rarely cries, I can’t seem to stop the tears because I will be forever grateful to you.. This is the closest I’ve come to anything representing the symptoms my son has had in the past 5 winters. I do hope he has a mild case that won’t change his life as I’m sure none of us reading your blog would have suspected you were anything but healthy 100% of the time. It gives me both hope and peace.
THANK YOU SO MUCH! God bless, Fran
I cannot wait to see what happens! We have a bathroom that I’d like to take a hammer to….but then I’d have nowhere to shower. 🙁
There is not anything you do that doesn’t turn out to be so beautiful I want it for ME,! Btw, what color white and lt taupe did you use when you had striped the reading/guest room?
Thanks. Love reading you guys adventures
You are too funny! Love what you did on the one side of the bathroom and can’t wait to see the other.
it completely cracks me up that you had a purple room – soooo not you! can’t wait to see what lies ahead – i’m sure it will be pure gorgeousness!! xo
I love the finished side! Can’t wait to see the rest.
I’ve always loved this before & after transformations. This bath area feels so cozy and perfect. I cannot wait to see what you do with the bathtub/toilet side. It hadn’t occurred to me that the other side was not finished. 😉
Haha! I never would have guessed that’s what the other side of the bathroom looked like! Too bad you couldn’t have made a window work there, but I can’t wait to see what you guys do!
I thought the hole in the wall was a great idea, but I know you guys will come up with something awesome.
Layla,
I’ve been following your blog for 3 years now. You are amazing. I too have the decorating itch and have been blogging about it for 4 years. Unfortunately it was poorly designed, had poor photography, and I didn’t blog often enough. I just jumped on the Blogging bandwagon 1 month ago, and now that I’m taking it more seriously, I am seeing the rewards. I had my site re-designed, I’m a regular blogger, and I’m making sure to site my sources of inspiration. I wanted to let you know that later this week, I’ll be siting you as a source for my drop cloth draperies that I’m hanging in my front living room. Thanks for that idea. I’ve been recovering chairs and headboards with drop cloth for years, but had never thought of it for drapes. Duh me!
Thanks for you ever inspiring words and posts.
Wendy Jones
Ah hah! Sounds like an adventure. Have fun! The sink side of the bathroom looks amazing! Well done!
This is so exciting! Can’t wait to see the other half of the guest bathroom 🙂 Have you considered using water saving faucets in your own home?
Hammers can be creative. I once woke up on New Years day to hammering and found my hubby taking down our kitchen ceiling. It was right under one of the bathrooms and one of our kids ran the tub up and over while playing in the water. Unfortunately Hubby for some reason had not covered anything in the kitchen before he started. I can assure you that never happened again and we restored a lot of houses. Our love was two story Victorians so we hung a lot of sheet rock. He is gone now and I am living in a restored one story Arts and Crafts Bungalow. I get that hammer itch from time to time but talk myself out of it. This house has all the original built in china closets and a buffet plus two original stained glass windows in the dining room. I’m so happy to have all this to enjoy as I grow older. Even the laundry is on the main level although I have a basement so it’s an easy house to live in. I’m so enjoying what you are doing to your wonderful home. Thanks for sharing.
Ha! You are too funny! I once did this to our back porch while the hubs was at work. Oops! Well…two years later when we had the $ to finish my demo it was my favorite room in the entire house. And please never stop being you. That’s why we all keep coming back for more:)