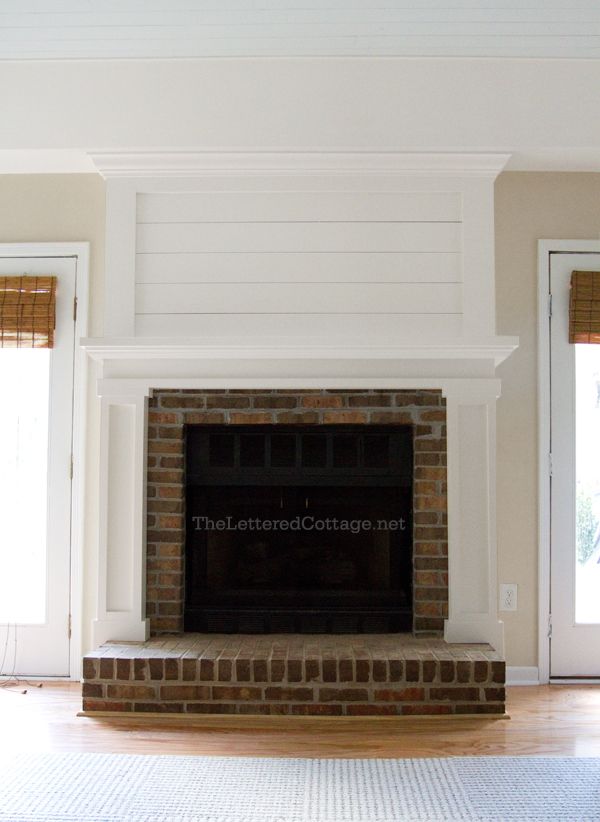
We worked on a budget-friendly fireplace makeover at Kevin’s brother’s house a few weeks ago, and we’re so happy with how it helped to update their existing brick fireplace.
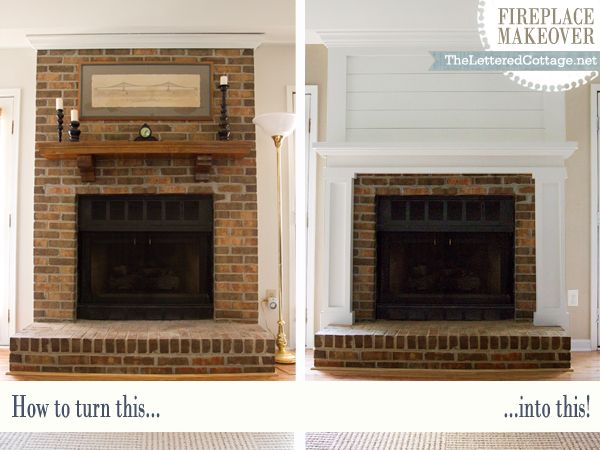
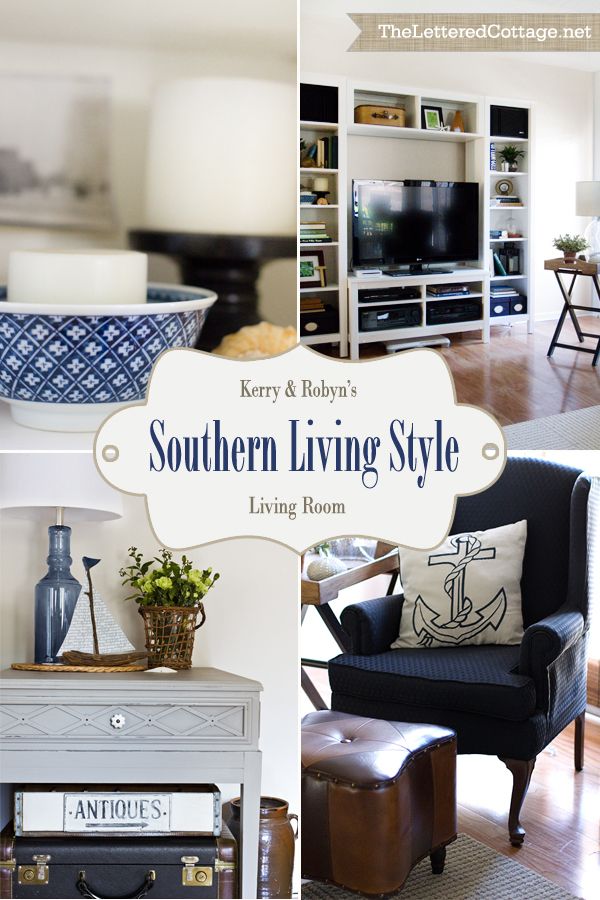
We’ve been slowly helping Kerry and Robyn redo their living room over the past few months, and it has been SO MUCH FUN “sneaking” into their house while they’re at work (and school) so that we can surprise them with updates when they get home at night!
We have a few more projects to tackle before we blog about the “full reveal”, but I wanted to share the fireplace makeover project here in the meantime.
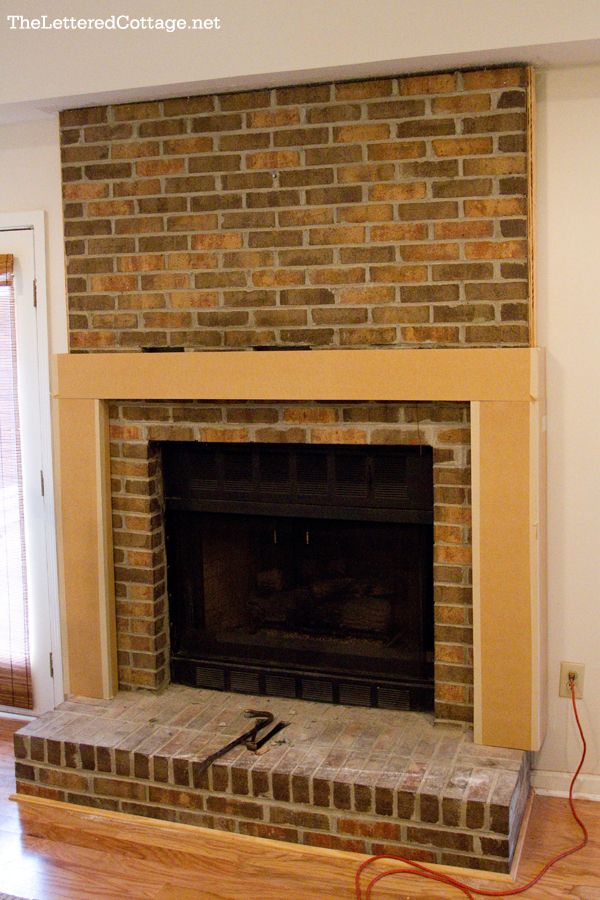
We recruited our friend, Brian the Carpenter, to help us get the fireplace makeover job done right, and we used this photo we found on Pinterest as inspiration…
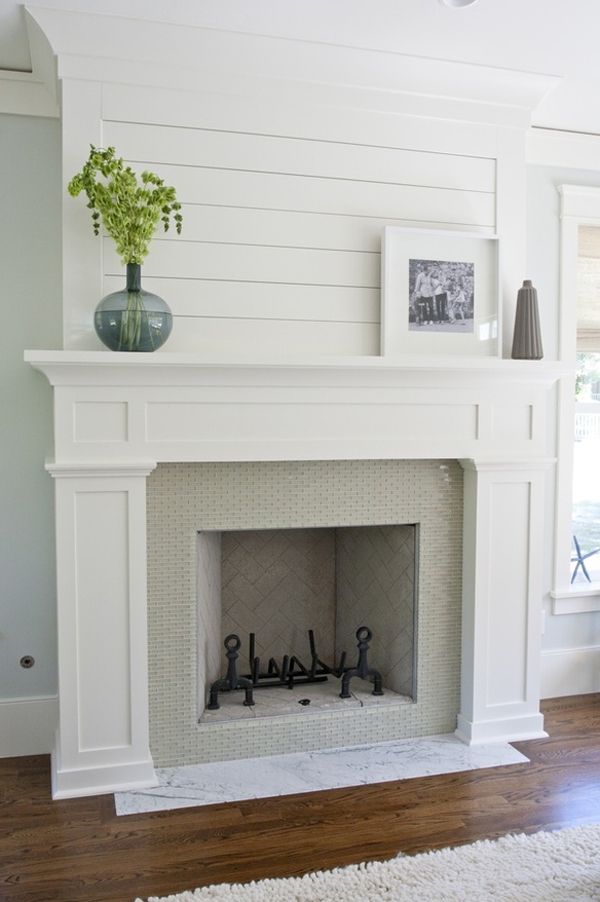
(Source)
Here are the steps we used to complete our project in case anyone out there would like to try something similar:
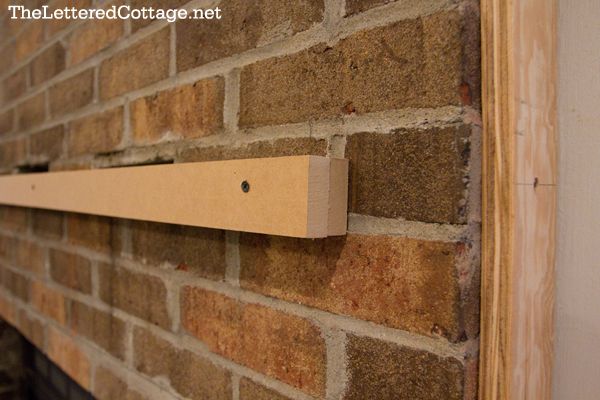
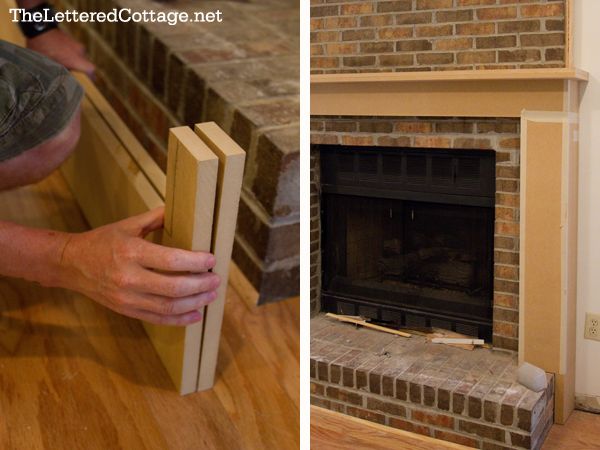
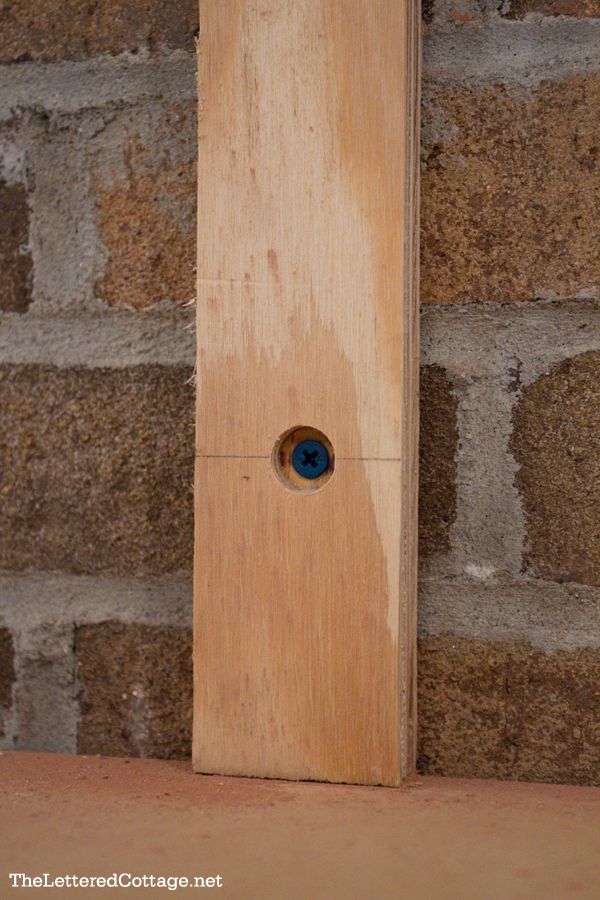
Step 1- Use screws to attach a strip of plywood down the sides of the fireplace, then create a mantel out of MDF or whatever kind of wood you’d like…
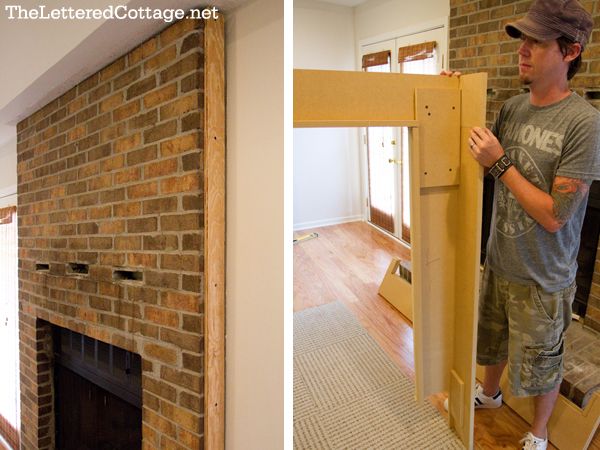
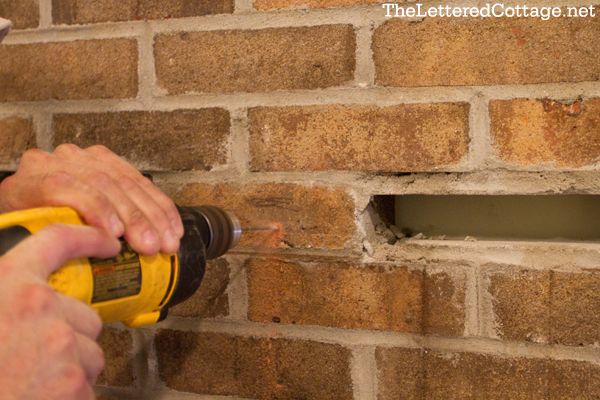
A masonry drill bit makes for easy brick drilling, so make sure you have one before you start this project.
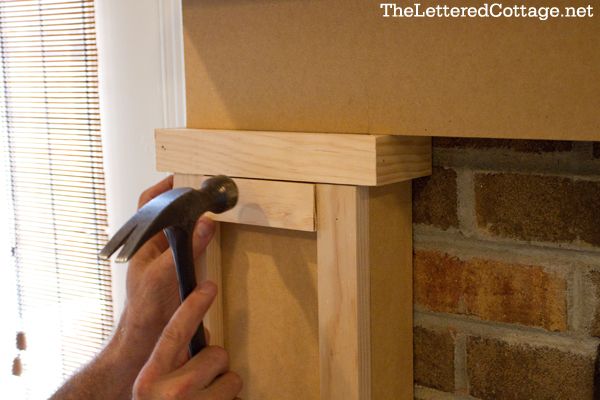
Step 2- Attach a wood “cleat” to the front of the fireplace. We used two pieces of MDF to create ours, but again, it doesn’t matter what kind of wood you use…
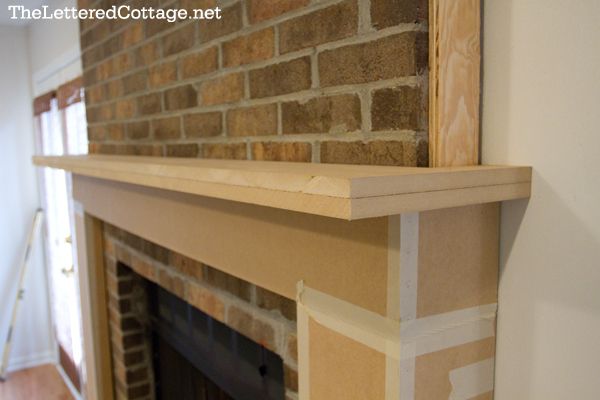
Step 3- Use screws to attach your mantel to the cleat and to the wood strips running down the sides of your fireplace…
(Note: The masking tape on the edges of the mantel is just there to add extra security while the construction adhesive between the seams was drying. As you can see in the photo with Kevin in it, the pieces are held together with screws, too. Brian said the tape just makes it a little easier to move it around.)
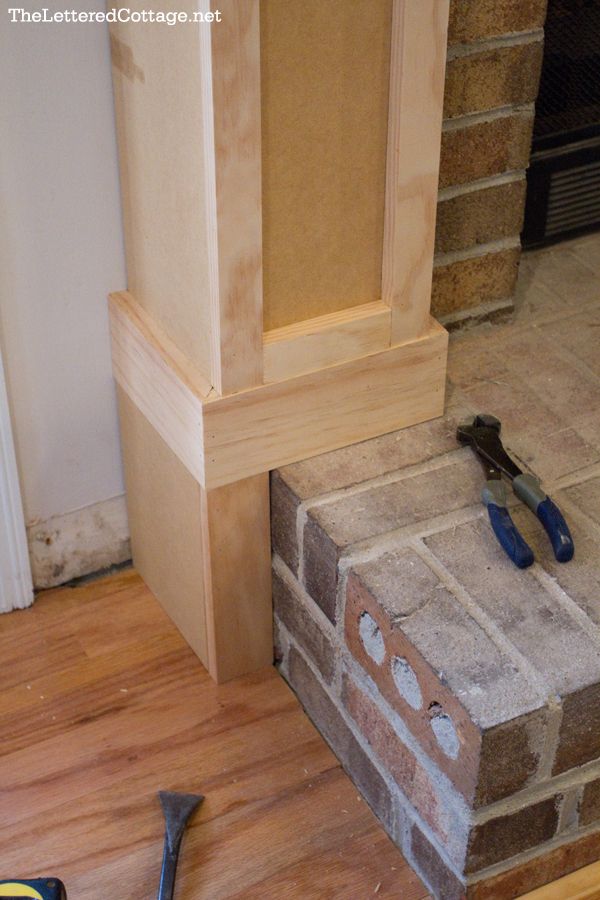
Step 4- If your mantel hangs off the edge of your hearth like ours did, you can make it look like it’s always been there by adding a two-sided box down each “leg”…
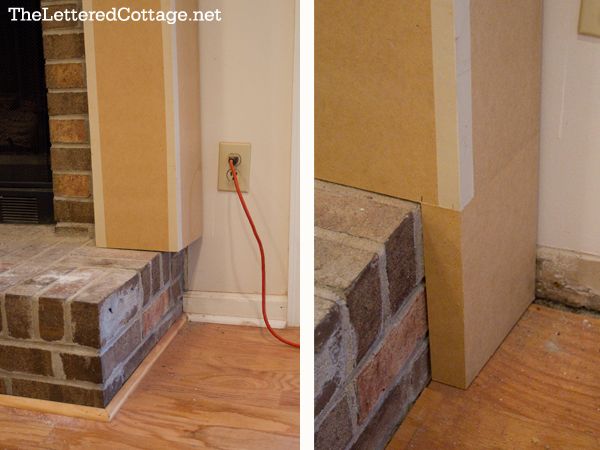
(Note: You could also cut your mantel “legs” down to the floor from the start if you didn’t want to go back and add this part.)
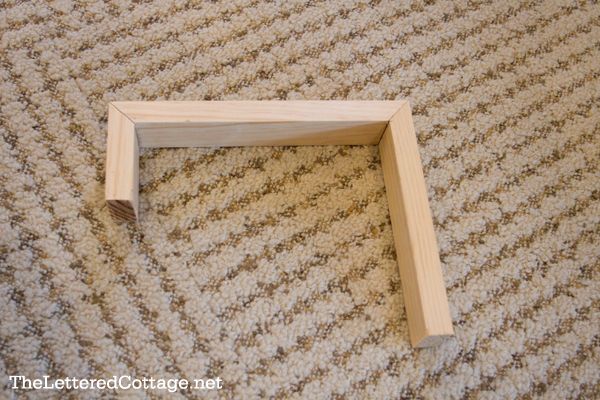
Step 5- Kerry’s mantel shelf was made from a double layer of MDF (for cost and smoothness reasons), but you could also choose any type of wood for this step. I really just wanted you to see the shape of it…
Here’s what it looks like all secured to the cleat underneath it…
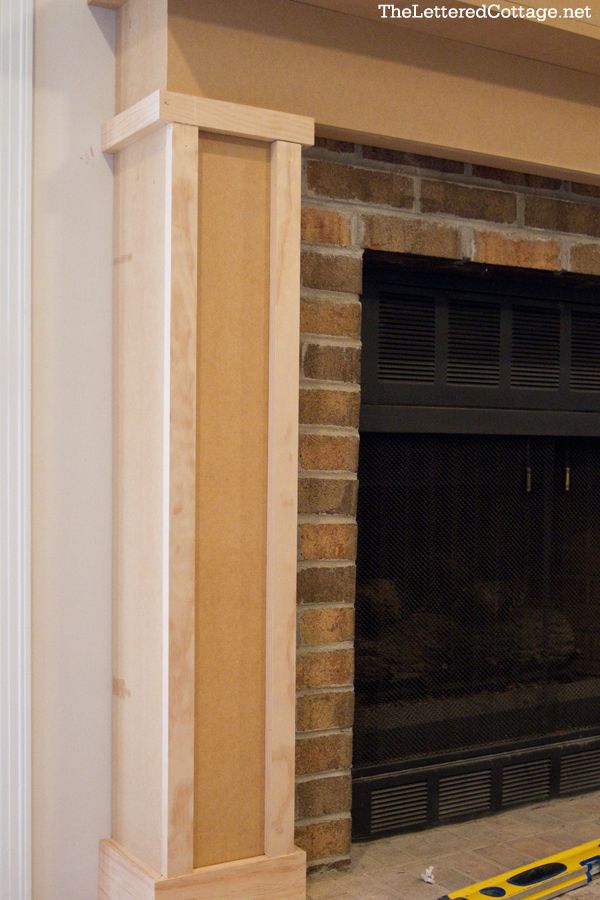
Step 6- Attach some strips of wood to the brick above the mantel, like this…
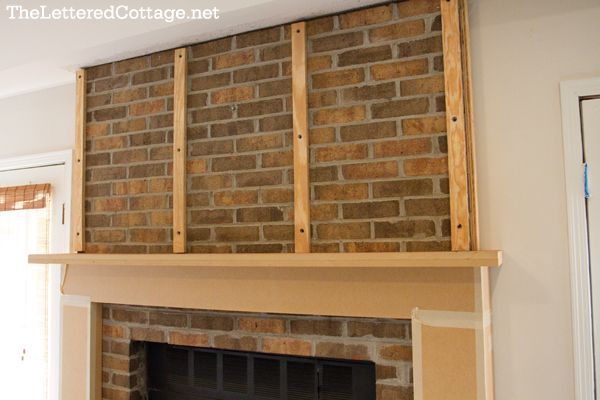
Make sure to counter sink your screws so that the wood you use on top of them lays flat…
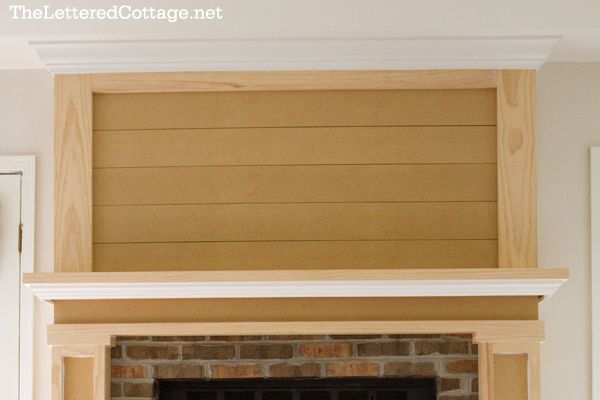
Step 7- Attach your planks. We used MDF because of it’s “straight and smooth” factor, but again, you can choose any kind of wood for this step. We used a nickel between each board to make sure they were all spaced apart evenly…

Step 8- Frame out the area above the mantel shelf with a few more pieces of wood, like this…
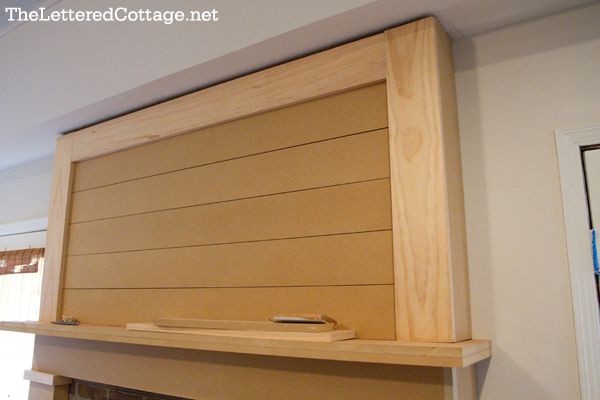
Step 9- Begin trimming out the edges, and covering up the seams, on the mantel below the mantel shelf…
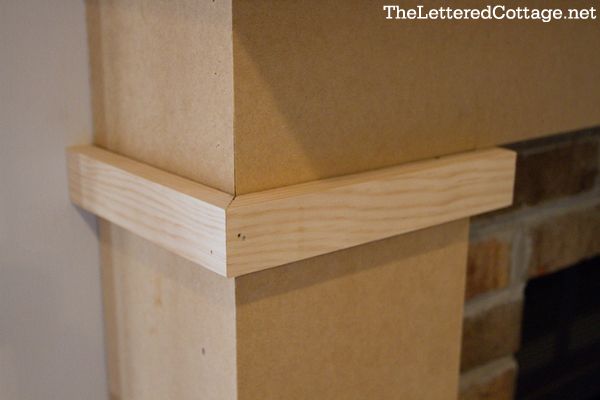
Here’s a closer look at the simple trim we used to cover the seam in the photo above…
The trim sort of came together as we went. We just added pieces here and there until it looked like it was finished…
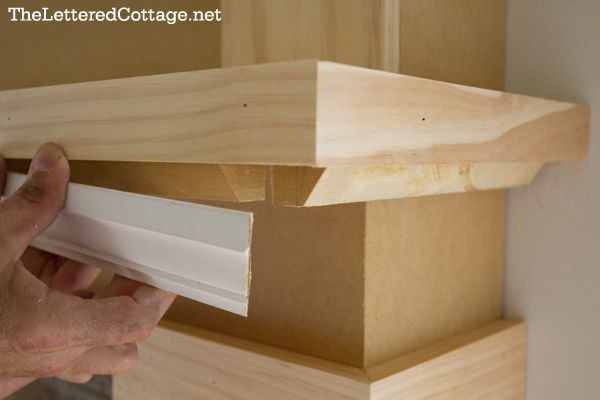
Step 10- To finish off the mantel shelf, we secured a piece of 3″ crown molding to a couple of angled pieces of wood underneath it…
Step 11- Add crown molding to the very top edge of your fireplace so that it’s capped off nice and neat at the ceiling…
Step 12- Prime and paint.
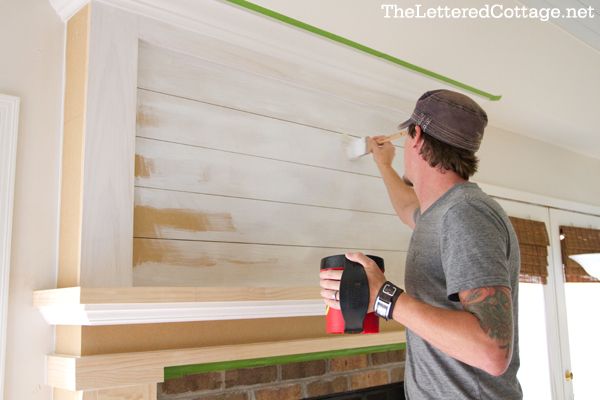
We used Kilz primer and “Moonlight White” paint from Benjamin Moore.
Step 13- Sit down and take a break for a couple of days because your fireplace makeover is DONE!
We snuck back into Kerry and Robyn’s living room the other day to do some Fall mantel decorating, and we look forward to sharing those photos and decorating ideas during our “It’s Fall Y’all” link party series starting next week. Hope to see you there!

![]()

Looks wonderful!! I can’t wait to see the final reveal, you guys are amazing!! The designer of your inspiration picture is Caitlin Creer. Here is a direct link for you! http://www.caitlincreer.com/2011/09/spring-lane-family-room.html
Keep up the great work!!
Love and Prayers,
Sarah
Thank you, Sarah! I’ve updated that link and I sure do appreciate your help finding that source! 😀
Thank you for an EXCELLENT tutorial! Yes, I am yelling.
I think brick belongs outside, unless painted, so three cheers for you for not listening to the brick-is-sacred-and-should-be-left-alone people.
Lovely work. Looking forward to your Fall Tablescape Linky.
Layla, Thanks for this tutorial! We have a great fireplace in our den, but the stacked bricks seem like a faux finish. They only stick out about 1/2 from the back wall. We’ve tried putting bookshelves on either side and it was ok-ish. We thought about doing built-in shelves, but were afraid it would be odd looking to have a fireplace sunken in” between the built-ins. Any ideas? We are currently using the room as a play room for our kiddos, but want to have ideas ready when we eventually put the house on the market…we’re outgrowing this house fast! I”m happy to send you a picture if you want to see it. I still have the photo from last time it was on the market and several of it as our den/playroom for different perspectives. I’ve been looking for ideas on the web and Pinterest for eons…
Really nice job!
I love the color palette of their living room. The gray, blue and brown is really handsome.
You guys continue to amaze me with your creativity and skills! I wish we lived closer to each other! xoxo, Melaine
A gorgeous change as always. Congratulations… I love it!
Your inspiration fireplace is one of mine too! I’m dying to copy this idea in my living room. I LOVE what you’ve done – you are the best brother and sister-in-law ever!!
Seriously Layla, you guys are amazing. I can’t wait to move to a place with a large ugly fireplace so I can imitate your beautiful fireplace make overs.
so um, how exactly do we get on the adoption list? 🙂
i love the way it turned out! if ya’ll are looking for another home to “sneak” into I’ll send you my address…can’t wait to see the final reveal.
From drab to fab! I see Brian the handyman still doesn’t like to be in pictures! lol
LOVE LOVE LOVE it! You’re my planking idol! 🙂
Seriously, it turned out fantastic!!! Off to share on our FB page!
Well, thank you Shelley! I can’t wait to see y’alls plank-y project too! XO
you’re coming to my house next, right??
😀
LOVE it!! Boy do I wish you were my in-laws!!! You’d have a field day in my house…so many “opportunities” for projects! 😉
Thanks, Angela! Gotta love those “opportunities”! 😀
You guys are just genius! I want to adopt you and put you to work on my house 🙂 Just what you always dreamed of right? Looks fabulous, love your blog!
Thank you, Alicia! 😀
Love it! I have a horribly boring fireplace that I have been clueless about revamping. My one issue is that I have three bricks that are sticking out from the flat face of the fireplace wall. Someone thought it would be decorative, to me it is only a nuisance in my attempt to jazz up a boring 1965 fireplace. I noticed that the fireplace you did over has three holes in the brickwork. Were bricks removed from there? I hadn’t thought of removing the bricks that stick out in order to enlarge the mantlepiece. Thank you for always inspiring me!
Amanda
Hi Amanda!
We found the three holes behind the original mantel shelf. I don’t know why they were there. (?) Maybe there’s a way to have your protruding bricks broken or sawed off? #SledgehammerToTheRescue ? 😀
I saw a makeover on TV years ago where they used a mallet and chisel to break off the protruding pieces so they could cover the brick with wood. Also, if they don’t stick out too far, you can mount your wood cleats next to them at the same depth and just mount the wood right over top of them.
could they have been original “vents”. I know our fireplace had them too. I think way back some people did this thinking it would let more hot air transfer into the room?
Hi! I had those bricks on my fireplace too. My dad, who is a bricklayer, sawed those off for me. They’re still white, but I’m going to paint the fireplace so they all match–eventually 😉 I was actually lucky enough to have Layla “pick my presto” once, though I still haven’t moved on the makeover yet. But, anyways, YES, there IS hope for your odd bricks!
You. Are. My. Goddess. This is exactly what we need to do in our home. What was the final cost after the makeover was done?
Thanks, Jessica! 🙂 We spent around $250 in supplies and wood.
This is great! We have a fireplace just like this in our living room and have been hemming and hawing about what to do with it. Problem solved! I’ll have to put our before and after on my blog and credit TLC of course! Thanks for sharing this!
Yay! Please keep us posted…we’d love to see your before and afters! 😀
Wow what an amazing transformation. One of the best I’ve ever seen. I’ve been following along with each project and all the projects are turning our so well and really transformating this home. Great job.
Thanks, Shelly! We feel very blessed to be able to work on their room with them. I couldn’t ask for a better bro and sis-in-law! 😀
I with I had a fireplace so I could make it over to look like this one! Great job! It’s amazing how much better it looks now.
This is exactly what I want to do with my fireplace, which looks exactly like the one you started with!! Thank you for this! I am coming right back to this post when it is time to start the renovation.
This post could not have come at a better time! Thank you so much for sharing such a thorough tutorial, Layla. We have a brick fireplace in the basement that we have been scratching our heads about because the top half was painted blue by one of the previous owners (hidden by panelling until last Winter) and the remaining original brick is crumbling so much of it is not salvagable. This gives us a way to keep some of the brick while updating the rest of it.
I’ll keep you posted!
It looks absolutely amazing! You guys did a fantastic job!
Beautiful! We did something similar to our fireplace and what a huge difference in makes to the entire feel of the house!
Thank you, Mandy! Off to check out your makeover, too!
Can you leave us a link to it here if you blogged about it? We’d love to see it! 😀
Sure, I realized that I never added it to my new website, so I just now added it so you could see: http://mandystansberry.com/cottage/fireplacemakeover
It looks great! Love the southern style look 🙂
Thanks, Debbie! 🙂
This is amazing!!! The solution for my fireplace I have been looking for!! Genius 🙂
That is gorgeous! Great job!
Amazing! They’re so lucky to have little elves like you and Kevin to help shape their dream room 🙂
xo heidi
What a gorgeous fireplace transformation! You and Kevin are so talented!
Question for you…can you burn a wood fire in the fireplace if you use the MDF (medium density fiberboard)? Thanks! 🙂
I love how the fireplace turned out! The sneak peak on instagram was a tease 🙂 We have the same setup in our home and I have been dying to add a traditional mantle to cover the brick. Thank you for posting this tutorial!
Beautiful job! How were the planks attached? I don’t see any screws.
Thanks!
Thank you! They were attached using a nail gun! 😀
That “before” firplace looks exactly like mine! I mean exactly. Now I have another project I want to do.
It looks lovely guys!
Such an awesome job! Your family must love coming home to all the updates. I know I’d probably be a crier every time if were me. What a great and selfless thing you two are doing. Keep it up! Can’t wait to see the final reveal of the house!
What a difference! It gives just a peak of the old brick.. but it no longer overwhelms the room, how nice.
Oh, I am IN LOVE with the fireplace! Amazing transformation! I am helping someone with their living room, and this would be such good inspiration for what they could do with their fireplace. Thank you so much for sharing (and thinking of it, and doing it, and explaining it, and…you know what I mean. )
you guys are so talented! not an easy job adding all that trim, but it turned out beautifully!
wow, wow, wow! just love it! they must be so pleased eith all the little (and big) changes you gys are making!
It looks wonderful! I love the planking. I wanted to do that to my entire fireplace wall, but my husband is DONE with woodwork after an entire first floor remodel. Maybe he’ll be recharged after a couple of months off. 😉
Our fireplace looks just like the before picture! Although we have bricks holding the current mantle up. I’ve been trying to figure out what to do to update it and I L-O-V-E this! It’s going on the to-do list! So it’ll probably be done in a couple years…haha
Anyway, you guys are amazing!
You guys seriously never cease to amaze me. I know I’m not a big commenter on a regular basis, but I read all your posts and I’m constantly telling my hubby about your most recent projects.
I love that everything you do is, doable, and it’s always runnin’ parallel to my same tastes.
Your rooms are all over my Pinterest boards. ;o) I’m tryin’ to talk The Dad into planking our dining room ceiling. Ya know, another project for the to-do list.
So glad I can follow along and can’t wait to see the new digs and all the projects that go along with a new house.
You’re welcome to sneak into my living room and do my fireplace, just so you know. Seriously, this was perfect timing for this post as it gives me inspiration for our yet-undone fireplace mantel. I knew I wanted to do horizontal boards above the mantel but I love how you’ve framed it all in. This gives me a better idea of what to do with ours. Thank you!
i am a huge fan of brick and am downright shocked at how much i love the fireplace after your redo! fantastic job.
Seriously!! You guys are so awesome, I love this make-over!! Great job! Can I leave you my address and a key? 🙂
One of my favorite makeovers! (Thanks for the tutorial.) I can hardly wait for the full room reveal.
This makeover is gorgeous! One question- how difficult was it to remove the old mantle? How do you demo that part without damaging the brick?
Thank you! The old mantel came off easy peasy with the help of a crow bar- ha! 😀
So much taste and talent !
Congratulations.
Wow, Layla – that is stunning! Can you please come over and sneak into my place and re-do my fireplace? (not an original comment, I know, but I started to type this before I read any other comments!)
I can’t wait to see how you have decorated it for fall!
Thank you, Susan! Can you believe it’s almost Fall?! #ILoveIt! 😀
This is simply stunning! If you’re ever in my neck of the woods and want to sneak into my house and redo our dated 90’s fireplace…
I should actually send you a pic for pick my presto. I have no clue what to do!
I like it. Very nice and clean looking.