If you sweep a house, and tend its fires and fill its stove,
and there is love in you all the years you are doing this,
then you and the house are together, that house is yours.
-Truman Capote
Well, after a couple weeks of work, the dropcloths are up, the floor’s all swept, and the stairwell makeover is almost complete.
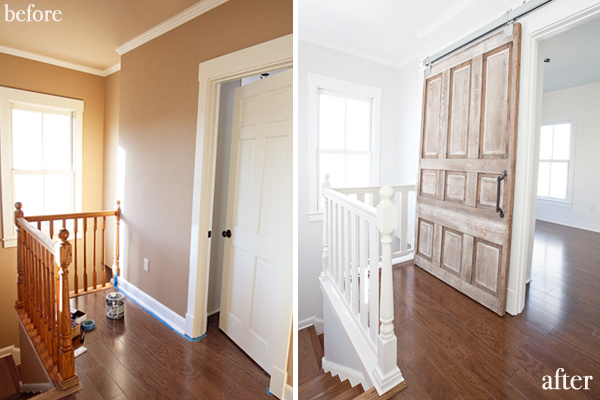
The only thing left to do is paint the sliding track hardware bronze. I played with the photo above in Photoshop and I’ve decided I like the way it looks finished in a darker color. Here’s my Photoshopped photo:
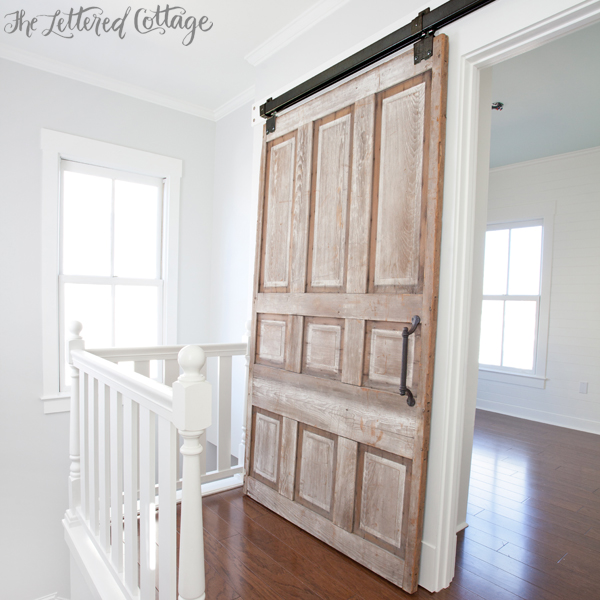
A gal named Karen wrote me recently and said she painted her sliding track with three coats of acrylic craft paint. She scuffed the track up with some steel wool before she started painting, just make sure it would stick. I’ll snap a pic and post it after I’ve got ours all done…although, hopefully, it’ll look just like the photo above! 😀
As for the banister, we decided to switch that up a little bit, too. In an effort to capture the charm of a white picket fence, we decided to replace our orangey-oak, turned spindles with a row of crisp, white, picket-inspired 1x3s:
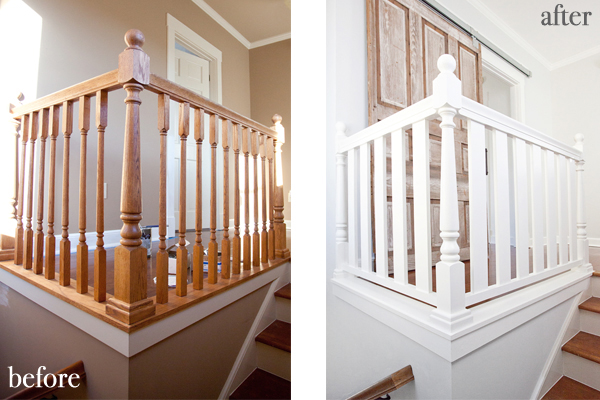
(I have plans for those orange-toned stair treads and handrail eventually, too!)
I’ve always been a big fan of raised spindles, so we covered up the old spindle holes with a thin piece of luan plywood…
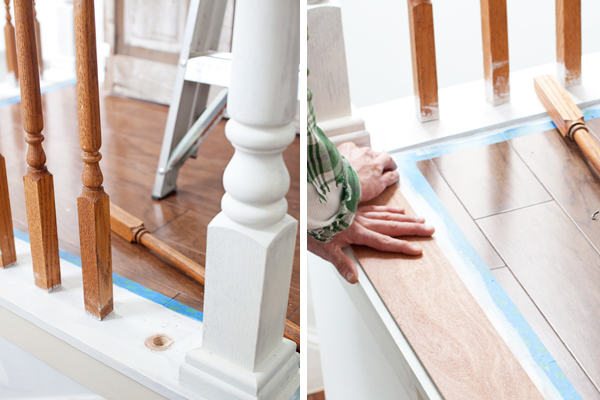
…and then used 2x2s to give our new pickets a little lift:
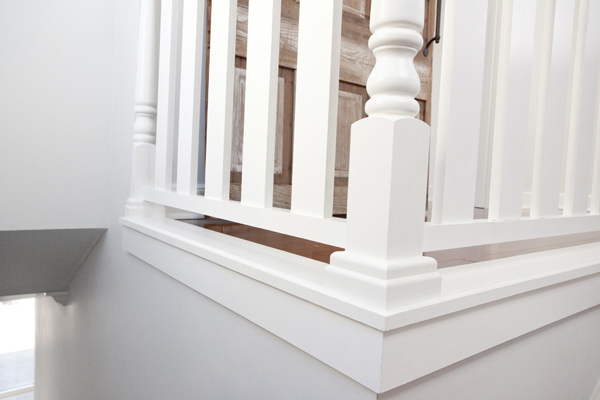
I painted the banister Simply White in a semi-gloss finish so that it would match all the other trim in the house, and as far as construction goes, Brian the Carpenter just routed out a row of little grooves on the top side of both 2x2s and on the bottom side of the 1x2s he added underneath each handrail.
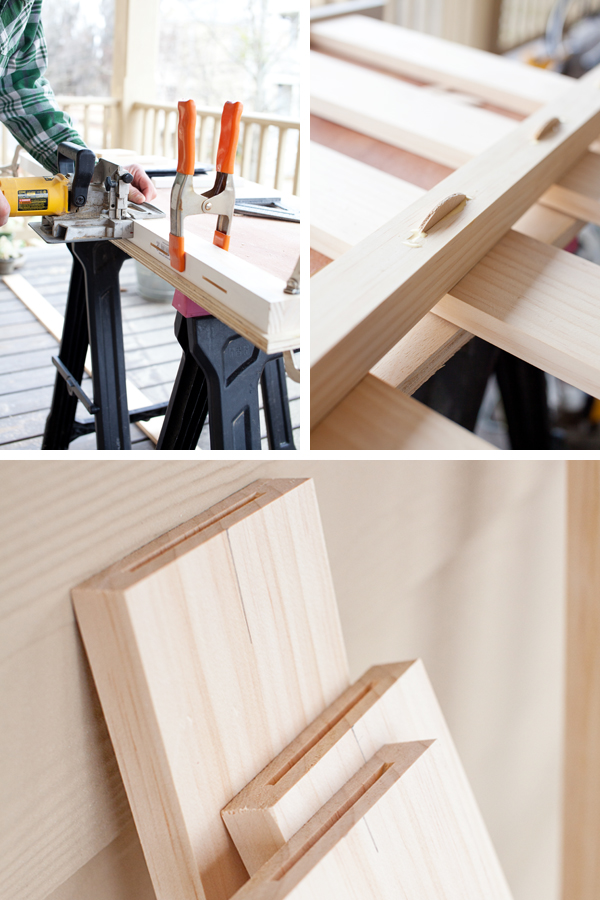
After that, he routed out some more little grooves on the top and bottom of each 1×3 picket, and used wooden biscuits to hold the planks in place between the handrail and the 2x2s. The new pickets are screwed, glued, and “biscuited” in place, whereas the old, spindles were only held in place with a small finish nail, so we’re very happy to have a much sturdier & safer banister now! 🙂
Off to tend the fire, fill the stove, paint that sliding track!


Layla
This is fantastic!!!!! Never thought that little spot would be my favorite spot but I think it might be!
Gorgeous!
Looks great!
wow Layla, the change is amazing…Who would have thought…
speaking of renovations, any news on Ashley’s Old Cloverdale House? What a cliffhanger! 🙂
I know I always say this, but I think this project is my favorite one so far! I LOVE the new planks vs turned spindles look. DEFINITELY warms up the place.
Good work, sweet and talented friend-I’ve-not-yet-met-in-person.
Beautiful, Layla! I love the barn style door and the white picket like fence. What a great idea!
Perfection! Your posts about your little man have brought me to tears lately. Your mama’s heart just seems to be ballooning by the minute, and it’s such a joy to see what the Lord is doing in you and Kevin!
Looks great! The railing details are very you! Could you please share how you painted the double height space at the stairwell? I’m stumped on how to do this!
Thanks!
We spray painted our metal track Oil Rubbed Bronze 2 years ago and it’s perfectly fine. Your updates look fantastic!
Love!
It’s very beautiful and calming! As I’m starting to do my son to come (in June) bedroom, I can’t wait to see what colors you will choose for your son bedroom too. I plan to do one planked wall and to paint the rest of the room a pale blue/grey color to match with his light stipped bedding. But, I’m wondering, did you paint the ceiling of the bedroom blue and will paint the room all in white? Thanks for sharing and sorry for my English mistakes as I speak French. You’re inspiring for me!!
I’ve been thinking about painting my stairwell.
How did you prep the banisters before painting?
Looks so clean and crisp, great job!
Thank you, Cheryl! I just taped off the floor and primed everything with Kilz. After that, I used three coats of Simply White paint in a semi-gloss finish. My wrist was aching by the time I was done, but I am so thrilled with the new look! 🙂
As usual Layla, absolutely gorgeous! I love how you changed the spindles to look like a picket fence. Ingenious! Very homey and cottagey looking. The standard of good home decorating is making it comfortable and cozy for the family and this house is going to be so welcoming for your new little guy when you finally get to bring him home!
I know you had said you were going to do something a little different with the stairwell banisters (other than just paint). I looked and thought “they look like she just painted them.” AHA!! You are SO VERY, VERY clever! I want Brian to be my go-to guy! Oh, the things we could accomplish with Brian. And no–not in the area or I’d be a callin’! I hope his business is going well! Love your stairway redo!
I’m in awe of your vision and transformation of your home. It is just beautiful and fresh and welcoming. I love it!!
Love the pretty, fresh, clean look of the Stairwell! I’d also like to know the prep involved in painting the rail, and the type of paint you used. That’s the next thing on my list to do!
Thanks, Rhonda! I just taped off the floor and used Kilz to prime the railing. I followed up with three coats of Simply White paint in a semi-gloss finish. 🙂
I LOVE everything! Hope you don’t mind, but I am totally stealing your stair railing idea!
Hi,
You are so creative and talented. I love all your décor… especially the new “picket fence” rail. Thanks for the information on how to build it.
I was wondering about safety with the sliding track barn door: I want to put one somewhere in my house, but can it be opened by a child from the inside of the room in case of a fire, etc.?
Hi Michele! Here’s a link to my post about the (very easy to open) barn door:
https://theletteredcottage.net/library-pocket-door-on-sliding-barn-door-hardware/
https://theletteredcottage.net/sliding-door-tip/
🙂
This makeover looks beautiful! I’m concerned about the stability of the railing replacements. Do you have children? Are the thin biscuits enough to hold any weight thrown against the slats? They seem so thin and shallow that it wouldn’t take much to kick out one of the slats. Is this a safe modification you’ve made? Or should I consult a contractor should I decide to do a similar change in my own home?
Thanks, Stephanie! I probably should have mentioned how much sturdier the new spindles are compared to the old ones. The old ones were only held in place by a tiny finish nail. The new ones are screwed, glued and “biscuited” into place. MUCH safer and less rickety than before. 🙂
Oh good! I’m glad to hear they are safe. Thank you for the quick reply!
Sure thing! We’re having fun whippin’ this place into safer (and sunnier!) shape little by little! 🙂
I know I’ve said it before but holy moly what a difference some paint makes! And I Love the change of the railing! Genius! Your hard work has surely paid off . . . It looks really beautiful up there! You need to do a couple whoohoooo’s for the mail that’s coming-right????? Blessings to you both . . . xo
LOVE LOVE LOVE the sliding barn door! And the white railings look fabulous! Absolutely love it!
where did you get your railing from?
It came with the house, Lydie! 🙂
Layla – the railing looks great in white! I have the exact same oak railing, posts and spindles, and I can’t wait to paint it white soon. The door turned out good too, I like the bronze look.
Oh I love it! It’s very rustic and very country chic! I have always loved sliding doors.
WOW!! LOVE IT!!
Sorry if I missed this part – but did you prep by sanding? I want to paint all of mine white but not sure the best way to go about doing it without making a HUGE sawdusty mess!
Nope! Just taped off the floor and primed away! 😀
Hello Layla,
Your new stairwell looks so fresh and airy! Great job!
I have the identical orange-toned spindles and banister and have a quick question for you, please.
Did you have to sand the orange oak a few times before applying the Simply White, and did you need to prime the oak before painting?
Blessings to you 🙂
Hi Tonja! Nope- I just taped off the floor and primed away! I used one coat of Kilz primer and three coats of Simply White latex paint. I may wax everything with Miss Mustard Seed’s clear wax one of these days, too. 🙂
Wow. What a fun change! Yes, this definitely looks more more like “Palmer-style” now. Much brighter and fresher looking. You did a terrific job.
It looks amazing!! What a great before and after! 🙂
Your changes just brighten up the space. I am so in love with that new door! I just keep trying to figure out a place to copy your idea in my house. Love, love, love!
Love it Love it Love it…..
I could not have imagined how changing out those spindles would have made that much of a difference, I would have been so tempted to just paint them and would have missed the WOW factor by a mile. Love it so!
BTW, I see a future matchbox crash-derby raceway in that hall with the winning cars jumping the ledge yet squeezing under the rail to make the crash jump down the stairs. Fun days ahead in that stairwell!
It looks fantastic Layla. A nice little nook too & can’t wait to see what you put there (if anything) to decorate that spot.
I want one of them biscuit joiners…the machine that created the slots… and biscuit joins…that’s the technical term for what Brian used for the bannisters I think,.. love the colour…
Wow. I adore that space..I’ve got the orangey rail and hate it, too. Painting is on the list. I’m curious if you posted somewhere the color of the walls in the hall and stairwell? I love it. Looks like a very pale grey on my screen?
Love it!
I totally love the banister! And the wall color – Love!
Love the makeover- you have a gift that is for sure! You mentioned the hand rail being next on your list- what are your ideas for it out of curiosity? I have an ugly orange oak handrail and am not sure whether to paint it white or if a nice grey would be best. I’m sure you will post about it but thought I would ask 🙂
I like that you switched out the spindles…I think they compliment your whole feel of the sliding door better. Love it!!
What a transformation! I love the new railing.
Hope you don’t live to regret this. After living with white spindles and hand rails, I finally stripped just the hand rails and stained the wood the same tone as the floor. So much easier to keep clean when little hands hold on going up and down the stairs.
Nah…the paint I used is scrubbable, and I’m going to wax it with clear wax to add another hard top coat. It’s sort of weird, but because of where this banister is positioned, you don’t really use it to go up or down the stairs. If anything is going to get dirty, it’ll be the wall below the banister and spindles- LOL! 😀
Lovely! Is this also Owl Gray lightened by 50%?
🙂
Nevermind, Layla! I answered my own question by reading some comments. And it’s Gray Owl…not owl gray. 🙂
WHAT?!!! Switching out the spindles is such a BRILLIANT idea! Love!
This is gorgeous .. I love reading your posts.
The transformation on your stairway and landing totally rocks! Love your results!
Debbie
Looks so great!
We have white trim and it needs to be repainted, but I’ve been hesitant because I was worried about brush marks. What did you use to apply the paint?
Beginning my oak staircase makeover today. Did you sand and prime the oak first????
This looks awesome! I want to do the same with our stairway (which is basically an identical twin to yours), but I’m hoping you can help me better understand a couple things:
1) How are the lower 2×2 boards attached to the newel posts? pocket screws? biscuits?
2) How did he attached the upper 2×2 boards to the existing handrail?
Thanks a ton! I want to make sure I don’t mess this up 🙂