Happy How To’s Day!
Today, I thought I’d show ya how we make our photos move with a mouseover how to!
First up, you’ll need to choose which two photos you’d like to use.
(Tip: The key to really making your “presto change-o” dramatic is to shoot your before and after photos as close to the same angle as possible.)
I’m going to use the following two photos of our (work-in-progress) master bedroom as an example.
Photo #1 is saved as: master_bedroom_before.jpg

Photo #2 is saved as: master_bedroom_after.jpg

Once you’ve decided which two images you’d like to use, you’ll need to upload the them to some kind of image hosting site so that they both have their own URL addresses.
We store our images on Photobucket, so I’m going to show you how to do it using their site, but a site like Flickr or Picasa would work the same way too.
————————————————————————————————
Here is the rollover code you’ll need to post into the html section of your blog post:
<img onmouseover=”this.src=’BEFORE PHOTO URL ADDRESS CODE GOES HERE'” onmouseout=”this.src=’AFTER PHOTO URL ADDRESS CODE GOES HERE‘” src=”BEFORE PHOTO URL ADDRESS CODE GOES HERE” alt=”” />
You will be replacing the words BEFORE PHOTO URL ADDRESS CODE GOES HERE, and AFTER PHOTO URL ADDRESS CODE GOES HERE with the newly-created URL addresses of your before and after photos.
(Tip: Sometimes, in WordPress, if you’re jumping between html and visual, the code will change and the rollover effect won’t work. Make sure you hit “save draft” while you’re still in HTML mode, before you preview it in VISUAL mode. That seems to stop it from changing the code. If you’re still having trouble, click on this link to open the code as a separate text file. Mouseover Code)
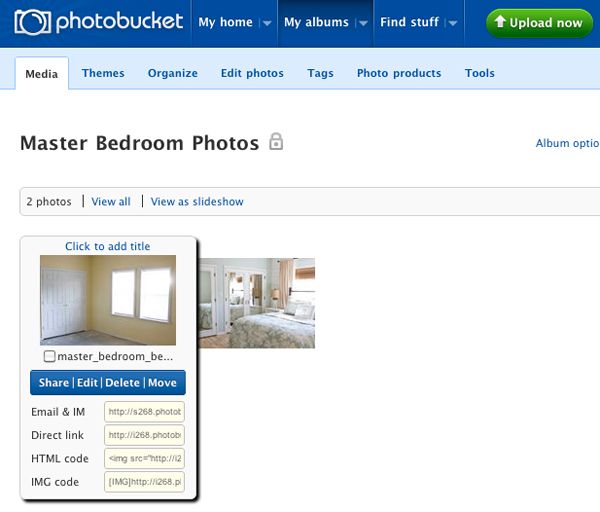
First, upload the two photos you’d like to use to the photo hosting source of your choice. In Photobucket, you can hover over the photo once it’s uploaded and four different code options will pop up…
You want to copy the direct link code of your before picture…
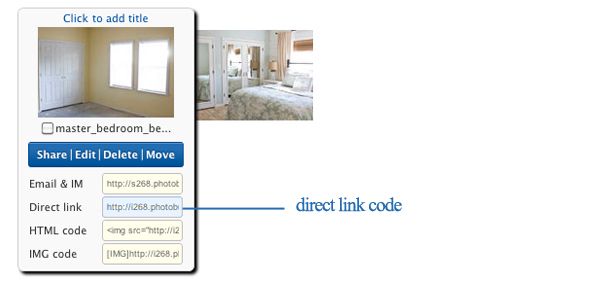
…and replace the words BEFORE PHOTO URL ADDRESS CODE GOES HERE with it, like this…
<img onmouseover=”this.src=’http://i268.photobucket.com/albums/master_bedroom_before.jpg’” onmouseout=”this.src=’AFTER PHOTO HTML CODE GOES HERE’” src=”http://i268.photobucket.com/albums/master_bedroom_before.jpg” alt=“” />
(Tip: Make sure you replace both sets of the words BEFORE PHOTO HTML CODE GOES HERE. And, if you replace any of the quotation marks, the presto change-o will not work and you’ll have to start over.)
Notice the AFTER PHOTO URL ADDRESS CODE GOES HERE text is still there in the middle of the paragraph above. You’ll want to replace that text with your after photo direct link code, like this:
<img onmouseover=”this.src=’http://i268.photobucket.com/albums/master_bedroom_before.jpg’” onmouseout=”this.src=’http://i268.photobucket.com/albums/master_bedroom_after.jpg’” src=”http://i268.photobucket.com/albums/master_bedroom_before.jpg” alt=”” />
Again, make sure you don’t replace any of the quotations or apostrophe’s or the rollover effect will not work.
And that’s it! You’re images should now flip back and forth when folks move their cursor over them, like this…
One last thing I wanted to mention was that an easy way for me to remember that the after photo goes in the middle of the rollover code is that you usually want that photo to be a surprise. In other words, you want it to be “hidden” in between your before photos. That way, when your blog post loads, readers will see the before photo first, and once they hover over it, pow! It switches to your after photo!
_____________________________________________
Now it’s your turn!
If you already know the link party drill, feel free to scroll on down and link away!
If you’ve never linked up to a link party before, here’s how it works…
1. Scroll down this page until you see the “add your link” button. Click it, and create a super-descriptive name for your link. Something like, “How To Make Carrot Cake”, or “Spring Wreath Tutorial”. That’ll make it easier for folks to browse through all the links.
2. Make sure you link directly to the How-To post you’d like to share– not to the main page of your blog.
3. If you’d like to invite some more folks to the party, feel free to slap this button at the end of your how-to post on your blog. Just copy and paste the code in the box below into the html part of your post, and voila!

<div align="center"><a href="https://theletteredcottage.net/?p=6662" title="The Lettered Cottage"><img src="http://i268.photobucket.com/albums/jj29/LaylaPalmer/How%20To/How_To_Linky_Button.jpg" alt="The Lettered Cottage" style="border:none;" /></a></div>
Thanks for partyin’ with us, and hope you have a Happy To’sday!


I am first!!!! Yeow!
That bedroom makeover of yours never seizes to amaze me. Speak about wow effect. It is gorgeous and a reminder that I should go and get on with my own little bedroom makeover project.
Thanks for the party. I am so glad I had something to link up.
Hey Marianne!
Can’t wait to check out your project!
And thanks for the kind words about our bedroom….it’s still a work in progress, but at least we’re not sleeping on the mattress on the floor anymore! 😀
Thanks for the picture how-to! I’m looking forward to trying this out on my own blog sometime soon.
Very cool! I always wondered how that was done and now I know. Thanks for sharing! Have a great day!
Hi, I was so excited to link up a couple projects this morning! I love this Linky Party, I always get to see a ton of great project ideas! The pictures of your bedroom also inspire Alex and I to get moving on our own master bedroom makeover, we’ve been in an empty echo-y room for 2 years now! Thanks for the Happy Easter wishes as well 🙂 Hope you and Kevin are doing well!
THIS IS TOTALLY AWESOME! I can’t wait to try it! YAHOO! 🙂
Hi! I always love moving my mouse over your great makeovers! it does give a great visual. Thanks for the tutorial!!!
Amazing! Not sure I will ever need this info, but I love this feature. Just read your post about going to the beach, it’s snowing AGAIN here today, and I would love to get away! Soon… Also, we lost our dog Hershey of 12 years last year. Totally understand the hearing him thing 🙁 We had that happen for months, until I gave in and we adopted a new lab pup, Jack. Love your blog. Hugs!
Thanks for the kind words. 🙂
I always loved the roll-over effect! Ubber- coolio!!! Thanks for showing…. Also, love your linky parties, mine is how I made a simple inexpensive spring centre-piece.
Love all your projects!
Cindy
Thanks for the fun tutorial! When I see this done on your site, I always think it’s some kinda wizardry or something. 🙂 I can’t wait to try it out!
Thanks for great linky party! Love seeing so many great ideas.
Love your parties! LOVE your style {who doesn’t is what I wanna know}
Thanks for letting us link up!
That transformation in your bedroom is AMMMAZING!
Love it!
I am so frustrated! I’m now unable to see photos on my computer at work. I want to do this and will have to wait till I get home! ARRGGHH!!
Layla,
Thanks for sharing this “”how to” on your photo magic. I’ve been wanting to try this for a while…very cool. Your directions are great!
Layla – It’s so cool of you to share your presto-chango secret. I assumed it was really hard and required advanced photoshop skills. You broke it down so that it looks totally do-able. I love learning new computer tricks and can’t wait to try this out.
I also love your bedroom. I want to try the mirrored closets in our small master bedroom and add a plank wall to my son’s bedroom. I provide so many great inspirations – thank you!
um, I meant YOU provide so many great inspirations 🙂
Thanks for posting it! 🙂
Can’t wait to try it! 🙂
You made it sound so easy! Thanks for a great tutorial, and for hosting. I’m looking forward to seeing everyone’s tutorials!
Cheers, Andrea
Thank you for hosting this wonderful party!! I can’t wait to go check out all the other links
Layla,
Thanks for the tutorial on Mouse Overs! Will be using this soon. I will have a post linked up soon — something you and Kevin inspired!
Your Friend,
Deborah
Thanks for hosting the party and for the great tutorial! I’ll have to get going on some projects so I can try it out myself. Thank you!
Wow, something that seems really hard and intimidating is actually do-able! Thanks for the great tutorial!!
Thanks so much for the tutorial, Layla! This is A.W.E.S.O.M.E. It never ceases to amaze me how generous and giving bloggers are.
Hope you’re enjoying some Hubby time! We lost our house in Sept ’10 and Hubs now lives w/his mom and I’m w/mine. Both require care. But it’s been pretty rough on our marriage, even after 20 years. We’re looking for a house now in between the 2 towns where our moms live.
One thing, though – when we do see each other, it’s pretty magnificent 😉
Thanks again for the tutorial and party.
Awesome, thanks for the tutorial! Love your new bedspread…where did ya get it? Love the color!
That’s so cool! But I love you bedroom makeover. I just keep rolling over the picture. It doesn’t even look like the same room. I love the mirrored closet doors. Now I need to talk hubby into those.
That’s good to know! I love how smart people find ways to simplify stuff for us lunkheads.
Wow! Awesome tutorial!! You will make us all look like technical rock stars! Thank you so much – I am bookmarking this for myself and tweeting it for my readers – )
Great tutorial!! I had no idea how to do that and it doesn’t actually look that hard to do.
Thanks for hosting!! 🙂
Thanks for the how-to! Even though I’m a bit technically challenged–I think I can do this! 🙂
Blessings~
Hey Layla! Love your blog. Thanks so much for the tutorial!
Hello Layla,
My comment is much more about your after photo! I love those curtains in your new master bedroom. Any suggestion on where I could find some like that?!
Thanks! Love your stuff!
Diana
Hi Diana! They’re from Ikea. Here’s the post we published about them: https://theletteredcottage.net/window-treatments-for-the-master-bedroom
🙂
First of all, your home is beautiful and you guys always do great work. The bedroom transformation is stellar.
Maybe it’s just me, and maybe you’ve heard this before, but the rollover thing never works when I read your blog in my RSS feed. I use Google Reader and if I want to see the rollover I have to go to your blog. I think I actually miss a lot of what you do because I’m just rolling through Reader.
Layla I have a silly question. What if…… I don’t have a blog but would like to do your type of mouse-over before and after photos of some of our projects just for our own personal scrapbook kind of thing? Is there another online format that is just intended for the creators to enjoy? Or does this type of magic only work with a blog?
I now have my husband hooked on you and Kevin – he says you remind him of us when we were younger and had more energy! 😉
Apparently I have been living in a cave, under a rock, in Greenland??? THIS is my first time linking up! I have no excuses or explanations for how I haven’t been here for this before! I am even baffled! LOL Thanks for hosting!! 🙂
Hi Ami! Thanks for stopping by!!
Love that room Layla!! Thanks for hosting this great linky party. There are so many great ideas.
Thanks so much for sharing your mouseover how to! I love looking at these on your site and I’m excited to try them myself! Also…it’s my very first time linking here (I’m still very new to the blogging world) What a lovely place to share a project…thanks so much!!
Every time I look at pictures of your home re-do’s I can almost feel a fresh spring or summer breeze…so nice! Linking up for the first time, glad I had a recent project to share. Having fun checking out all of the ideas. I’m saving your mouse-over how-to for later – it’s awesome, thanks!
Hi Layla-
Thank you… thank you for providing us with such a detailed tute on how to do the rollover. I am still new at all this tech stuff and want to learn as much as I can. I can’t wait to try it.
My best- Diane
Layla, is there a way that you know of, once you’ve done all the steps you suggested, to burn it onto a CD in order to watch or show friends on the big screen? The way we save so many pictures now….a photo library of before and after but with that roll over shown here?
Unfortunately doesn’t work for us iPad readers since we don’t have a mouse to scroll 🙁 but great pics!
Thanks so much for the party and your post! I don’t have any before and after right now but I’m bookmarking this post to use later! Love your blog!
I love your presto change-o mouse rollover magic !! Thanks so much for sharing your secret !! *Becca*~
I am sooo excited to learn this! Thank you, Layla!
Xo, Meme
Come by and see my post about burlap!
I learned this in graphic design school but I swear, you and some other bloggers out there could very well be our instructors – it would save us tons of money! Plus, you have a great way of explaining things in detail without making it confusing for the rest of blogland. Keep rockin on!
\m/
(that was my corny rocker sign. 😉
Sofia.
\m/ love it! Ha ha 🙂
Thanks for the how to Mousover! My techy-husband is going to be SO impressed with me.
Thanks for making me look like a genius!!! wink-wink.
Thanks for hosting the party and for the photo tutorial!
So excited for this tutorial Layla, you are so awesome to share your super secret with us! Linking up my latest!
xo
Kate
Thanks for sharing this, Layla! I was wondering just yesterday how you managed to do that. 🙂
Thanks for showing us how to do the mouse roll over. I’ve always wondered how you did it! Mystery solved. Thankful for you tech savvy people!
Thanks for hosting the link party! As someone with a new home and a blank canvas, I greatly appreciate it! 🙂
Thanks so much for the tutorial! It is always so fun rolling my mouse over the pictures!! Makes me smile!
Layla, thanks so much for the code! I’ve always wanted to try this out with some of my blog buttons, too.
And thanks for hosting this month!
Thanks for the info Layla. I don’t comment very much but I went shopping today and saw a beautiful white sailboat and thought of you!:)
the best part, it was only 5.99…lol…have a great day..
Silvia..