Happy How To’s Day!
Today, I thought I’d show ya how we make our photos move with a mouseover how to!
First up, you’ll need to choose which two photos you’d like to use.
(Tip: The key to really making your “presto change-o” dramatic is to shoot your before and after photos as close to the same angle as possible.)
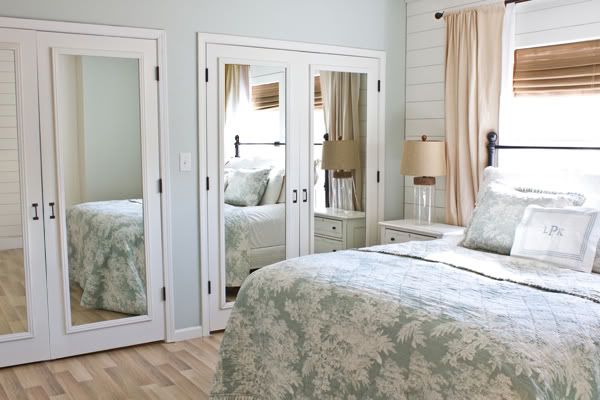
I’m going to use the following two photos of our (work-in-progress) master bedroom as an example.
Photo #1 is saved as: master_bedroom_before.jpg
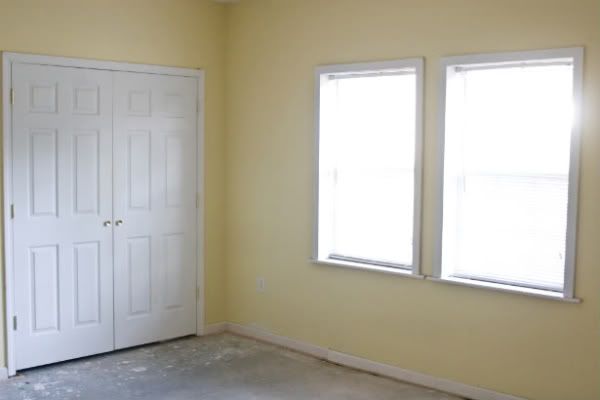
Photo #2 is saved as: master_bedroom_after.jpg
Once you’ve decided which two images you’d like to use, you’ll need to upload the them to some kind of image hosting site so that they both have their own URL addresses.
We store our images on Photobucket, so I’m going to show you how to do it using their site, but a site like Flickr or Picasa would work the same way too.
————————————————————————————————
Here is the rollover code you’ll need to post into the html section of your blog post:
<img onmouseover=”this.src=’BEFORE PHOTO URL ADDRESS CODE GOES HERE'” onmouseout=”this.src=’AFTER PHOTO URL ADDRESS CODE GOES HERE‘” src=”BEFORE PHOTO URL ADDRESS CODE GOES HERE” alt=”” />
You will be replacing the words BEFORE PHOTO URL ADDRESS CODE GOES HERE, and AFTER PHOTO URL ADDRESS CODE GOES HERE with the newly-created URL addresses of your before and after photos.
(Tip: Sometimes, in WordPress, if you’re jumping between html and visual, the code will change and the rollover effect won’t work. Make sure you hit “save draft” while you’re still in HTML mode, before you preview it in VISUAL mode. That seems to stop it from changing the code. If you’re still having trouble, click on this link to open the code as a separate text file. Mouseover Code)
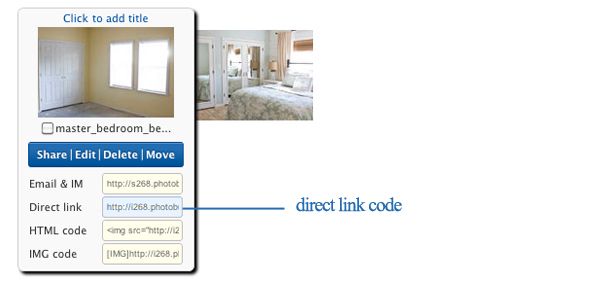
First, upload the two photos you’d like to use to the photo hosting source of your choice. In Photobucket, you can hover over the photo once it’s uploaded and four different code options will pop up…
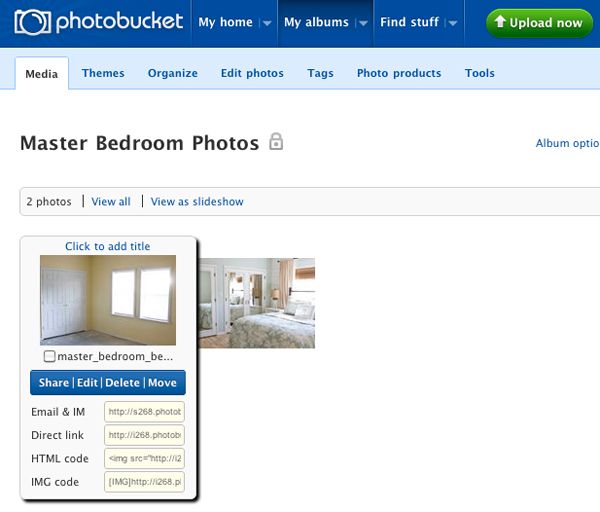
You want to copy the direct link code of your before picture…
…and replace the words BEFORE PHOTO URL ADDRESS CODE GOES HERE with it, like this…
<img onmouseover=”this.src=’http://i268.photobucket.com/albums/master_bedroom_before.jpg’” onmouseout=”this.src=’AFTER PHOTO HTML CODE GOES HERE’” src=”http://i268.photobucket.com/albums/master_bedroom_before.jpg” alt=“” />
(Tip: Make sure you replace both sets of the words BEFORE PHOTO HTML CODE GOES HERE. And, if you replace any of the quotation marks, the presto change-o will not work and you’ll have to start over.)
Notice the AFTER PHOTO URL ADDRESS CODE GOES HERE text is still there in the middle of the paragraph above. You’ll want to replace that text with your after photo direct link code, like this:
<img onmouseover=”this.src=’http://i268.photobucket.com/albums/master_bedroom_before.jpg’” onmouseout=”this.src=’http://i268.photobucket.com/albums/master_bedroom_after.jpg’” src=”http://i268.photobucket.com/albums/master_bedroom_before.jpg” alt=”” />
Again, make sure you don’t replace any of the quotations or apostrophe’s or the rollover effect will not work.
And that’s it! You’re images should now flip back and forth when folks move their cursor over them, like this…
One last thing I wanted to mention was that an easy way for me to remember that the after photo goes in the middle of the rollover code is that you usually want that photo to be a surprise. In other words, you want it to be “hidden” in between your before photos. That way, when your blog post loads, readers will see the before photo first, and once they hover over it, pow! It switches to your after photo!
_____________________________________________
Now it’s your turn!
If you already know the link party drill, feel free to scroll on down and link away!
If you’ve never linked up to a link party before, here’s how it works…
1. Scroll down this page until you see the “add your link” button. Click it, and create a super-descriptive name for your link. Something like, “How To Make Carrot Cake”, or “Spring Wreath Tutorial”. That’ll make it easier for folks to browse through all the links.
2. Make sure you link directly to the How-To post you’d like to share– not to the main page of your blog.
3. If you’d like to invite some more folks to the party, feel free to slap this button at the end of your how-to post on your blog. Just copy and paste the code in the box below into the html part of your post, and voila!

<div align="center"><a href="https://theletteredcottage.net/?p=6662" title="The Lettered Cottage"><img src="http://i268.photobucket.com/albums/jj29/LaylaPalmer/How%20To/How_To_Linky_Button.jpg" alt="The Lettered Cottage" style="border:none;" /></a></div>
Thanks for partyin’ with us, and hope you have a Happy To’sday!


Thanks for the tutorial. I always wondered how that was done. Your bedroom turned out beautiful. Thanks for hosting!
Huh? 😀
Great how-to, such a fun trick!
Such a helpful tutorial! Thanks for hosting the party, too!
This is amazing. I love your mouse overs. Thank you for sharing.
I didn’t know you could do that! Huh 🙂
Love that you call your site your “playground.” That’s how I described my too. Though you were way more clever with the swing line!
-Stephanie
henry  happened
Just discovered your blog and love it! Could you please share the paint color you used in the made-over room?
Hey Becca!
The blue is Blue Hubbard from Sherwin Williams
The white is Moonlight White from Benjamin Moore
Thanks for stopping by! 🙂
Thanks for hosting! I always enjoy what you and Kevin are up too. I will have to try this mouse over sometime. Thanks for hosting.
What a great tutorial. And what a very pretty room. LOVE it!
I have to admit that I’ve never ventured into the HTML view in WordPress… always so much to learn!! Thanks for the demo!
Hi Rosa!
I don’t feel very comfortable in the HTML tab either. Layla spent a lot of time learning some HTML a few years ago and she is teaching me more now. It does seem like there is always so much to learn!
Not a comment about the Mouseover How To…I just wanted you to know how much I L-O-V-E your decorating style and the “after” pics of your house. A few times I have even gasped out loud. Seriously. Love, love, love. Thanks for sharing them with us.
Awesome!!! Thanks so much for sharing!!!! I’m a photographer and didn’t even know that!!
Thank you for explaining this. i’ve been wondering how you do that!
Great tip, Layla! Can’t wait to try it!
Poo! We didn’t have anything good to link up this week! “Life” has taken over! 🙁 Hopefully next week! As always thanks for all the awesome inspiration!!!
Layla, I have been watching your blog almost from the beginning. And watching your careers grow. It is very generous of you to share your presto chango picture technique. Then I discovered your DIY list. It is amazing. I am not even into crafts but I couldn’t resist some of these. You and Kevin deserve the success I am sure you will enjoy for many years to come. You provide REAL VALUE and INSPIRATION in your posts. Best of luck to you. You are both so talented! Shari
Thank you so much for your sweet comment, you made my day! 🙂
Love that bedroom! Thanks for hosting this how to party!!! Are you guys O.K?…..I saw the tornados and I hope you guys are safe!!!
I was so sorry to hear on the news this morning about the terrible storms in Alabama yesterday and loss of life. How sad. I was thinking of you guys since I think you’re the only people I know there. Anyway, just wanted to let you know that I’m thinking of you all down there and hoping you and your family and friends are ok.
Take care,
Elisabeth
I’m stopping by make sure you are all okay…I remembered you lived in Alabama. My thoughts and prayers are with everyone effected by this terrible tornado. I hope you are both good.
Thinking of you all too with the bad storms in Alabama. Hope you and everyone that’s near and dear are safe. All the destruction is just heart breaking. I am waiting to hear from friends in Tuscaloosa…
kelly
Thanks for the tutorial. I tried it on my wordpress blog, but I could not get it to work. Can I send you my code to double check that I didn’t get any of the quotes wrong?
-AZ
Hey Aaron-
We’re having trouble getting it to work with that code too! So strange because it works every time we create one in a blog post from scratch.
Try the link to the Mouseover Code so that the code will open in a separate window. That seems to work the way it’s supposed to! 🙂
I figured it out. On Flickr you have to click on the photo a few times and then get to the link that actually provides the jpg location. What you initially see on the website is not the real jpg file. It was tricky to find, but then I figured it out. Thanks for the tutorial.
Hey Layla and Kevin,
Hope you’re both okay!?!?
Another great tutorial. 🙂 However, I’m actually writing for a different reason. I live in Iowa, but have been sick to my stomach over the devastation caused by the tornadoes that have swept through your part of the country. Through your blog, you’ve really touch the hearts of a lot of people’s lives that you don’t even know. You make us feel like you’re one of our great friends. Because of that, I’m really worried about you, and hope that you, your family, and friends are all okay. My heart, my thoughts, and my prayers go out to all affected. Please be safe.
Hello Layla & Kevin,
I have been thinking about you all day re: the tornado news.
I hope you are okay
Cindy
We had devastating winds here too, (in fact I just finished a post on it) but nothing like Alabama! Praying for folks there!
Beautiful blog. Featured this on my blog today.
http://sweetfloweret.blogspot.com/2011/04/fabulous-find-friday_29.html
Thanks so much for sharing your presto chango tutorial. I can’t wait to give it a try! Now how about sharing how you do the photoshop portion. Where do you get the photos of furniture and accessories for your afters and how do you adjust the perspective to make it look right?
Glad y’all are ok, I’ve got lots of folks in Middle Tennessee and North Georgia that I was worries about too.
Hey Sarah!
I get the photos mainly from Google Images and PotteryBarn.com. Anything that’s easy to cut out and paste in works the best!
As far as adjusting the perspective, it would be hard to sum it up in one comment (or even one blog post), but it’s really all about distorting the cut outs how I need them to be distorted.
It does take a full day or two to complete one, but it’s so much fun to play around with those photos!
You are awesome thanks for the tutorial. I love your site. Is it a wordpress? You guys need to be on some of the TV shows like the Younghouselove couple. Such a great site.
Just started mine and it is so much fun! Just a hobby but I love it.
Thanks so much. Hope you get a chance to stop by..
Thank you so much for sharing this …I’ll have to try it one of these days.
Just know that no matter how many people start doing it… you guys will always be the King and Queen of Presto change – o !!! xo
Thank you for the Rollover Tutorial – I tried it and love it – so much fun!
Thanks for sharing!
Hi guys! I am playing around with the mouse-over and can’t get my images to be sharp… they are for some reason blurring after it’s all said and done. I don’t have a crappy camera, and I haven’t changed the size of the files or anything… do you know how I can fix it? I wanna post my mudroom re-do! Thanks so much!