Now that the floor is done in the living room, it’s time to trim everything out and put the room back together.
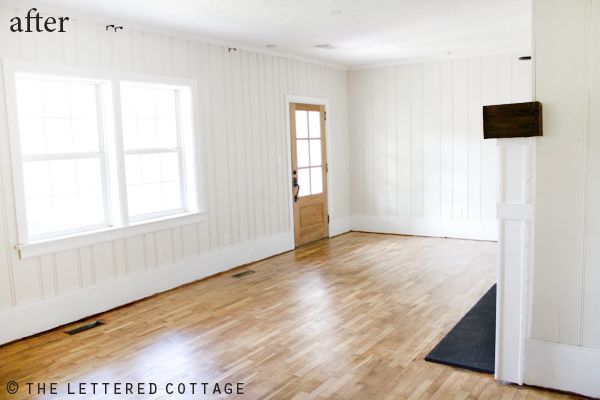
This is a photo of what the room looked like about a year ago:
Note: A lot of things have changed since we snapped that pic, and we’re looking forward to adding some more current photos to the Our House tab on our Home page soon!

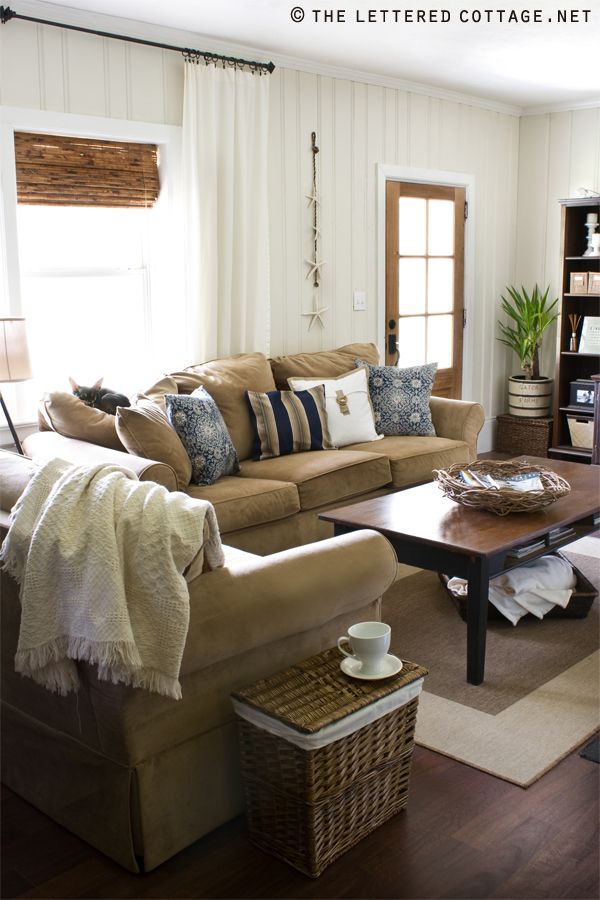
See how those blinds we got at Bed, Bath & Beyonce a few years ago were mounted inside the window frame in the photo above? Welllll, I’ve been itchin’ to hang ’em up a little higher since….oh….I don’t know…the day after we hung them up a few years ago. But since that sounded about as fun as a kick in the shin, I just kept putting it off, and putting it off. Then finally, a few weeks ago, I just decided to get it over with. Barefoot and determined, I crawled up there on the back of the couch and fought with those blinds and my power tool for the better part of an hour mounted them to the wall above the windows…
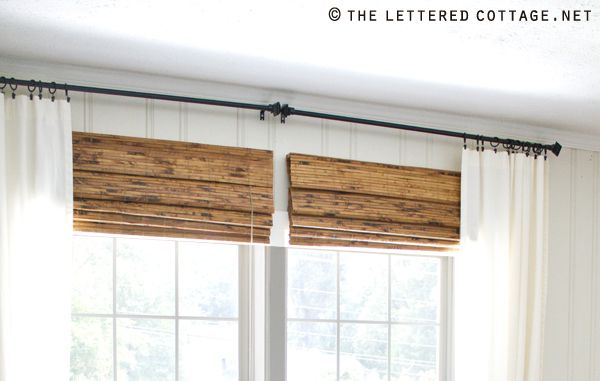
And wouldn’t ya know it- exposing that top row of glass made the room so much brighter! It’s basically it’s like we added another half a window if you count up the panes. (There’s 6 more of those suckers showing now!)
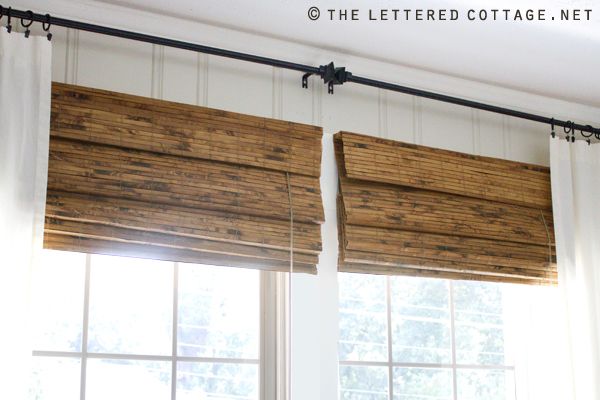
I got another burst of energy yesterday, and decided to complete the obstacle illusion. (Sorry, I heard a guy say it that way one time, and I’ve been sayin’ it that way ever since! Ha!) I used a piece of scrap wood to make it look like the windows are actually taller than they really are, and so it doesn’t just look like two blinds mounted to the wall anymore…
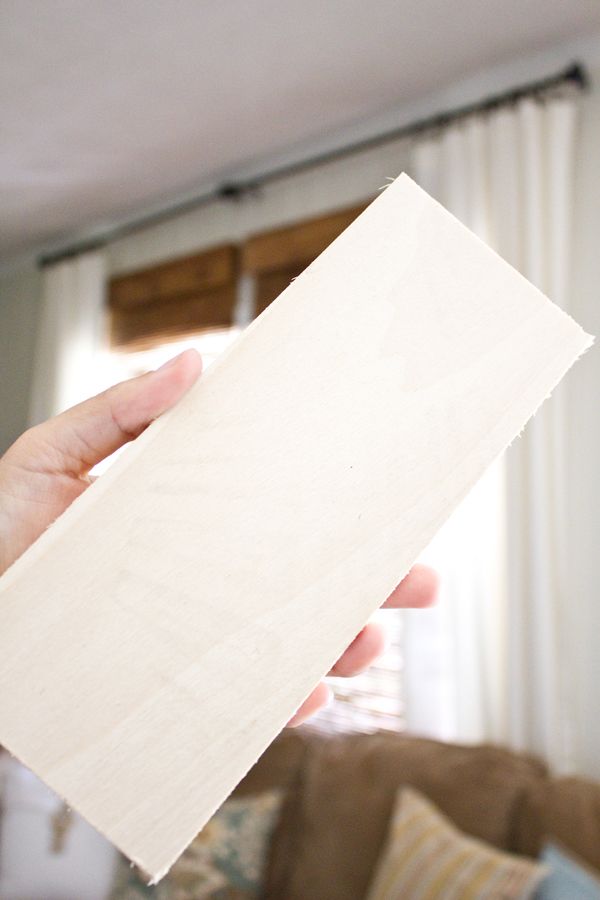
(Pay no attention to the footprint mark and rough edges…all that stuff sanded right off with the help of my handy dandy sanding block.)
First, I painted the piece of wood the same color white as the rest of the window trim, (just regular ol’, off-the-shelf, white paint in semi gloss from Home Depot that we had laying around the house) and while the paint was drying, I climbed back up on the couch and took down the blind on the right…
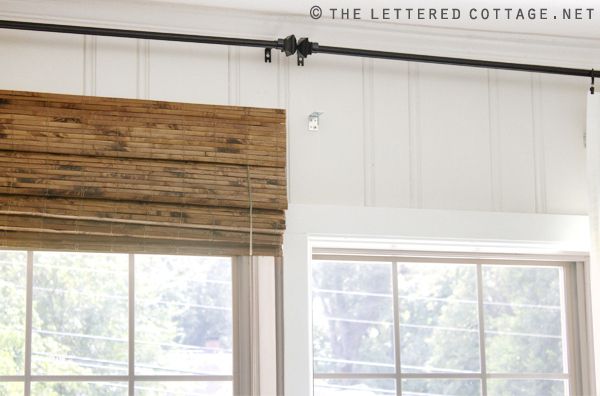
I ended up having to remove that little silver bracket mounted to the wall up there too.
After that, I used a hammer to coax the piece of wood into place behind the blind on the left so that it lined up with the window trim running vertically down the wall between the two windows. Then I filled in the crack between them with non-cracking, paintable white caulk, touched everything up with a little more white paint, and voila- taller looking windows!
Total cost: $0! And my secret’s safe with you, right?


Wow, Great job! I especially love the fact the you pretty much used what you already had to make such a big difference in the room! This is definitely a great post that a lot of of us could easily implement in the home. Thanks!
Thanks Susana! I was pretty happy that we didn’t have to spend a penny for this redo!
😀
I love the twig basket on your coffee table in the old photo! Where’d you get it?
Thanks Melissa, I got it a local flea market for $4.95!
That’s so smart! Yeah… your secret saved me! 😉
Have a blessed week, you two!
xo
Luciane at HomeBunch.com
Gosh… I meant, your secret is safe with me… my pregnant brain, I tell ya… 🙂
xo
Luciane at HomeBunch.com
I’m gonna have to steal the “obstacle illusion” phrase from you…love it!
That is awesome and just in time. I have some of those blinds to put up on a double window and want to give the room some height. Thanks for the awesome idea!
Discovered your cool blog from a fellow Facebook pager whose house we photographed for the new magazine Fresh Cottage. LOVE IT and the work you & your husband do together. Great idea (if you have the room) to hang the blinds higher than the window to let in more light (a big MUST in the light-starved Pacific Northwest where we’re located.) We have a lot of window & door clients, BTW. Which window company did you use when you added the second double hung? Check out our blog @ http://www.blackstoneedge.com/blog to see a FEW of the images of Portland, Oregon’s 2011 Street of Dreams house – Con Amore and Philip’s “Tales From The Road” series, which is a comic report of our tales while on the road.
You’re tricky (Run-DMC) tricky, tricky, and smart by adding that fake trim piece. Thanks for sharing.
LOVE your living room. oh-so smart. 😉
This is pretty clever. I like the way my bamboo shades look but I don’t like that I can’t retract them all the way to the top of the window. If they were hung higher, then then could be pulled all the way up. Sneaky!
I did that in a house we used to live in!! Awesome and your living room looks beautiful!!
we recently purchased new curtain panels for each lving room window but didn’t want to open and close morning/night. I got them 96′ so they hung right under the crown molding and then measured and ordered wood blinds so they were the right length when closed….we hung those right under the curtain rod making the windows appear so much taller. When the blinds are up I can leave them down just to the top of the window so I get all the light and the windows still appear tall. Now the panels stay where they are framing the window and the blinds go up and down morning/night. That was a clever trick you used.
I like the way you think! Free makeover, more light and secret tricks!
I love that obstacle illusion!
I wish I had thought of that at my last house!
So clever….I love it!!
You are brilliant my dear! I have been staring at my windows, wondering what to do.I know we wanted match=stick blind, but my view is so incredible, I didn’t want to hide it.Thank you, Thank you, Thank you.
Hugs to you both,
Carolyn
I love your living room! Forgive me since I’m kind of new to your blog but I’m blessed/cursed with an abundance of paneling in my new house and I absolutely LOVE how you’ve used it to your advantage. What color is on your walls???
Natural Choice, by Sherwin Williams! 🙂
Layla,
It took me a minute to figure that little sliver of wood out. Kind- a- like not getting the joke and laughing anyway. But a few scrolls back and fourth and i got it:) I do the same things with my windows when I can. Trying to convince the hubby I’m not nuts is the hardest part. Now I can show him this post and say, “See it’s perfectly normal, Layla does it.”
Genius. I tell ya.
love it!! have been looking at my bedroom windows that are exactly like your living room windows and thinking….WWLD? The extra piece will really finish off the window and make it look finished!! I did your mirrored closet doors in my bedroom and I LOVE them!! Check them out in your free time–right…free time???what’s that?!
http://midwestcottageandfinds.blogspot.com/2011/08/master-bedroom-mirrored-closet-door.html
thanks for all you do to keep us all doing!!
chris
I never would have thought of something like that. That is fantastic!
I am SO doing this in our bedroom! Thanks for your sneakyness.
I have loved this room and the colors since seeing it in the Sept. 2010 Cottages and Bungalows. I loaned that magazine to a friend who “misplaced” it. Since I needed your room as an inspiration I ordered another issue online.
In the past year my room has been evolving using your color scheme.
I have just recently ordered a sofa similar in color to yours. I already have the Pottery Barn blue pillows like yours (love the reversible sides) and hope to find others to complete the look. You may be updating your room but thanks for sharing your original.
That is genius! I’ll have to remember the trim trick.
I love the obstacle illusion. It really looks great in your living room. I love all the natural light and how open it looks.
Golly gee, you are so stinkin’ clever! Love it!
Do you use a liner on the side of your blinds that show outside?
Dang girl…you’re so stinkin smart!! :0) Dont you just love it when a plan comes together?! I’ll admit, I wasnt sure where you were going with the trim, and when I scrolled up and down a time or two it was like a light bulb went off!!
Genius!!! What an awesome idea!!! I love it!! Im’ thinking of where I can do that in my house now!!! 🙂
I LOVE it–I absolutely love natural light–what a great way to let more in. 🙂 (And really love that bowl on the coffee table!)
~Gini
Love it! I’ve been wanting to do this in my living room for awhile now (the curtains are hung so high they look a little weird) but was afraid it’d look goofy. Thanks for the push, I’ll be doing this now!
I’m very impressed, great job!
I’ve been wanting to do the same thing in our bedroom, but haven’t dared engage in a fight with my power tools (or my husband who would say he hung them right the first time…cute thing!). But at least I tackled some floor to ceiling bookshelves recently! No power tools required!
Xo,
Linsey
So much better. Before you added the wood trim in the middle….I was like hmmmmm…..then after adding…yes…taller window. I am so going to try this in my own house.
oh! oh!!! how cool is that!!! Thanks for sharing such “secrets” with me – or US!!!!
I am so excited that you have posted something about your own house projects again! I have missed seeing the interior of your home!
Layla,
Where did you get these blinds? I really want to do this kind in our living room and having a hard time finding the right color. Love your idea of hanging them higher. Thank you for all your inspiration. I love The Lettered Cottage.
Danielle
Bed, Bath & Beyonce! 🙂
Shazzam!
Love it! The room looks so comfy! This just proves why you deserve your own show!
We just put down new laminate floors and now need a rug. Where did you get your rug? It looks just like what I’m looking for – just a neutral plain rug.
Thanks,
Gena
[email protected]
You are a genius! Pinning . . .
A painting question–I have a medicine cabinet (inexpensive) that I would like to paint black from white…….it is made from melamine and I was wondering what you would recommend–spray or brush–and should I use a primer as well.
Thanks so much,
Kathy
Your living room looks great! I am wanting to go with a more neutral rug in mine and I was wondering where you found yours? It looks like a nice flat weave. Is it soft? Oh and also, your front door. Did you refinish it? I would love to replicate that type of finish. Mine is stained a funky tone right now. Thanks 🙂
totally brilliant!
I love your pillows…in your living room and your reading room. Where do you get them?
Love it!! I’ve been thinking of doing the same! Did you just use the same hardware? I think I’m making this much harder than it needs to be. 😉
Love it! I love the extra light!. Great idea!
Saaaaweeeeet! Definitely using this idea. Scrap wood finishes it nicely. Thanks for sharing!
Great idea with the little piece of wood! Brilliant!
Love this idea. I also like your curtains. I never thought finding the perfect white curtains would be so hard. Where are yours from?
LOVE IT! It is the exact thing I need to do in my dining room. I was looking for inspiration and go figure Id find it here!
THANKS!