
True Value approached us about being on their DIY Blog Squad again this year, and we were thrilled to give it another go. Working on this old house is my passion, and I never imagined a company like True Value would come e-knockin’ when we moved in 5 years ago!
They sent us a gift card so we could take on (and blog about) some more home improvement projects again this year…
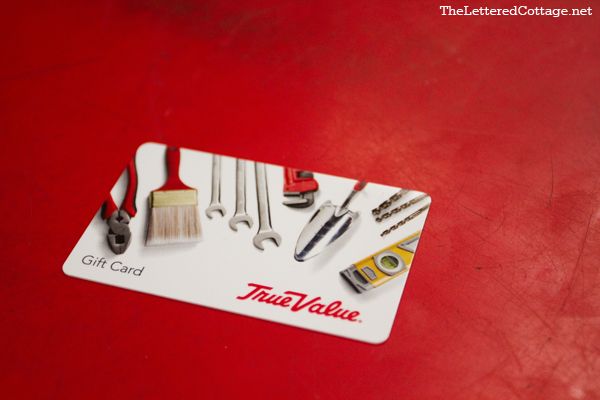
…so we’re going to do our best to choose projects that will be helpful to the folks that are sweet enough to swing by and read this thing each week. (If that’s you, thank you and let us know if there’s a certain project you’d like us to take on and blog about!) We’re also going to give away 2 more True Value gift cards over the next few months, so stay tuned for all the sweet deets about that, too!
We’ve been a part of the DIY Blog Squad since 2009, and while we have certainly appreciated the opportunity and gift cards- Kev and I are picky/sensitive creatures, so if the stores weren’t fun to visit, we definitely wouldn’t keep going back! Our favorite True Value is in Tallassee, Alabama…

We made a trip there this past weekend to pick up a new circular saw (our old one finally bit the dust) and we were stoked to see that they carried some DeWalt ones…

Rumor has it DeWalt ones live longer.
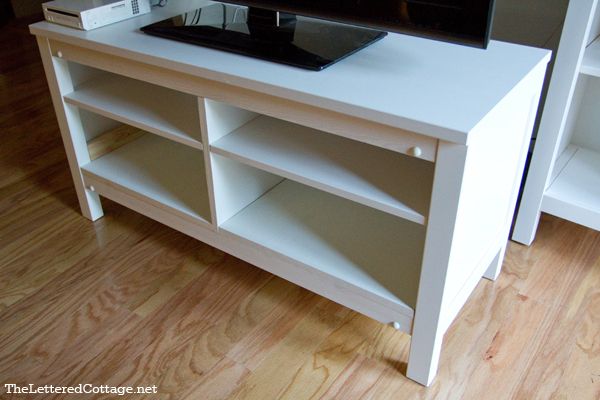
We used it to help Kev’s brother, Kerry, alter his new TV stand. It’s part of the Hemnes line, from Ikea…
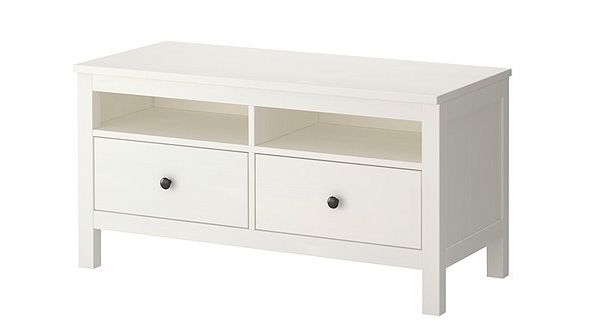
Kerry wanted to put his electronic equipment in the spaces below the TV, so he opted not to use the drawers…
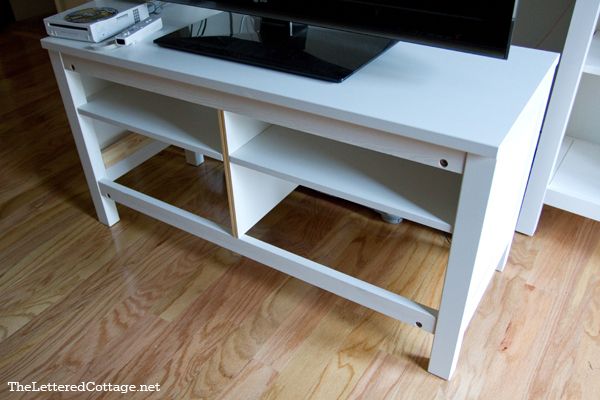
Which, as you can see in the photos above and below, left him with 2 open bottom “shelves” and 4 uncovered, counter-sunk screws.

But before we fired up the circular saw and cut out some new shelves, we used some iron-on melamine edging tape to cover up the exposed particle wood strip that ran down the center of the unit…
Kerry made the same mistake I did one time when he was assembling his TV stand- he put the middle piece on backwards. Oops! And since it’s kind of a pain in the booty to take the whole thing apart once you’ve got it all together, we suggested using the melamine edging tape instead…
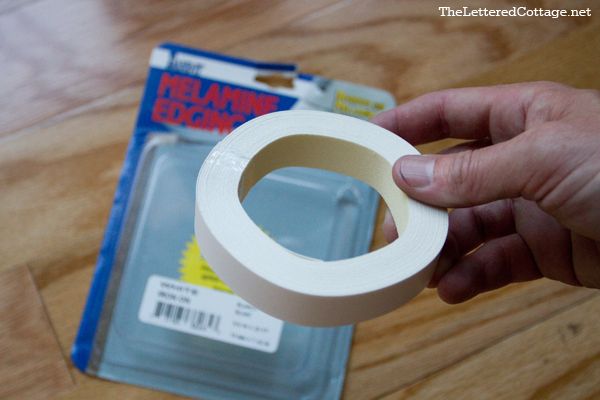
Hey- that’s what it’s for, right? Here’s Kerry and Kev applying the edging…
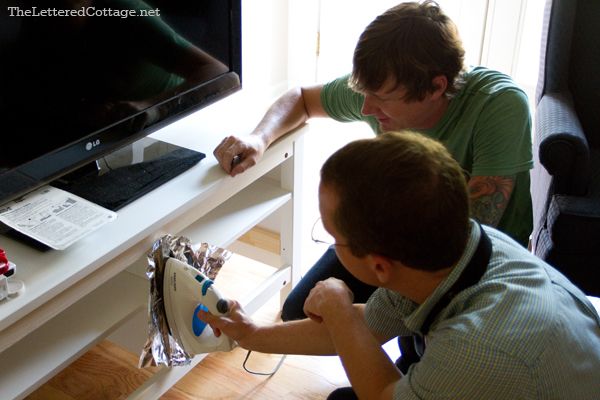
The instructions suggested using a piece of tin foil to protect the iron. Here’s a pic of how it looked when they were done…
Ahhhh. All is right with the world again!
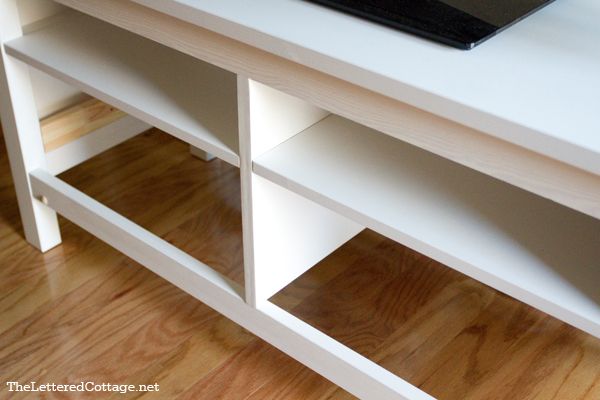
Next up, Kev cut out two shelves to set in the bottom of the TV stand. We painted them with some leftover Moonlight White paint.

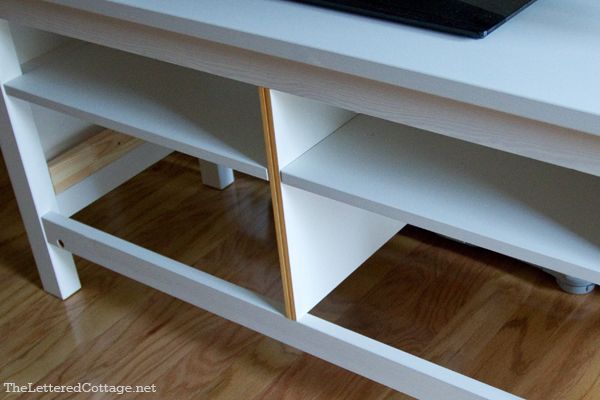
We added more melamine edging tape to the front sides of each shelf…
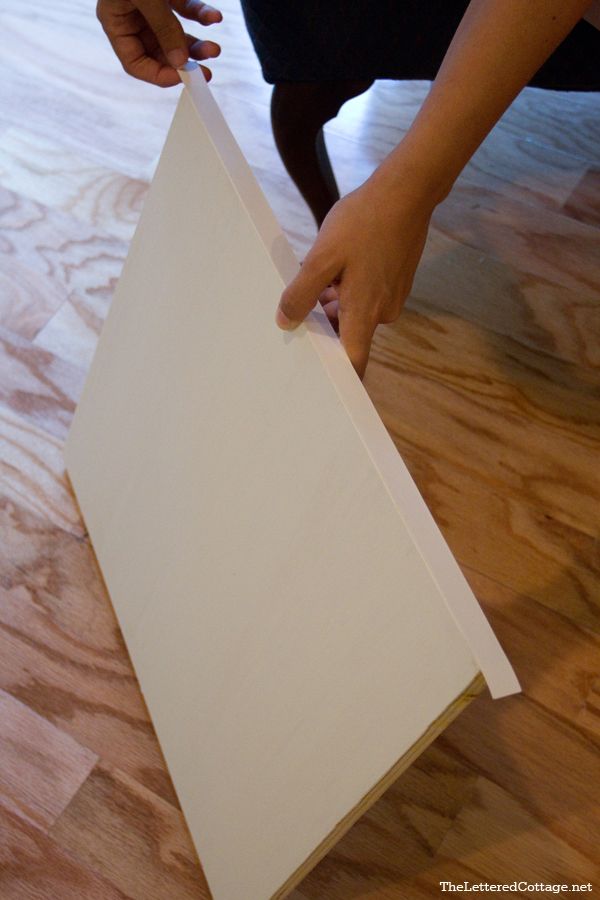
The instructions suggested leaving at least an inch overhang off each side when you’re applying it this way. When we had it ironed on, we just flipped it upside down and cut the excess off with a razor blade.
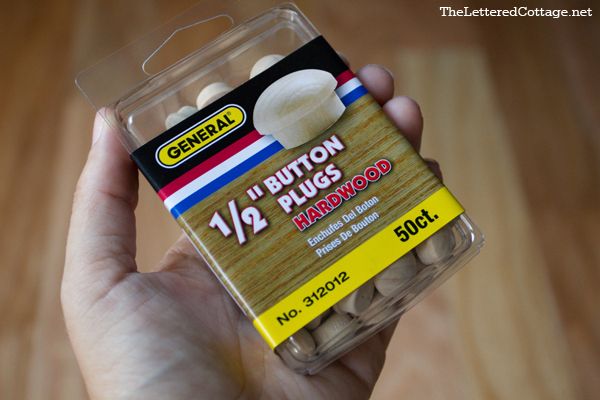
Next, we painted and plugged all 4 counter-sunk screws (that normally would have been covered up by the drawers) with these 1/2″ hardwood button plugs…
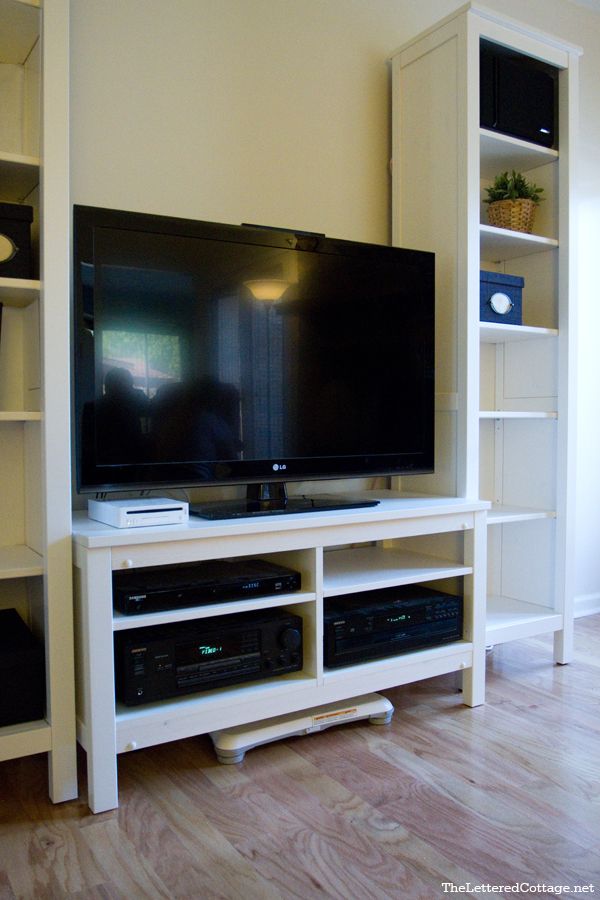
And, last but not least, here’s the finished product!
Kerry was excited to get all his equipment set up on the new shelves…
…and our nephew, Benton, was excited to get back to his video game smile for Aunt Layla and her camera…

Does that picture say “Sorry, Aunt Layla, I’ll smile for ya- but my eyes are NOT moving off this video game!“, or what? Ha!


This post is part of our 2012 True Value DIY Blog Squad series.

“Truly Valuable” links: Twitter.com/TrueValue, TrueValue.com, StartRightStartHere.com, TrueValuePaint.com, Pinterest.com/TrueValue, YouTube.com/TrueValue, and you can find more info about True Value DIY Blog Squad on True Value’s Facebook page. We’ll be hosting “Ask The Blog Squad sessions over there on July 17th, August 21st, October 9th, November 13th and December 18th!

Legal stuff: We were selected by True Value to work on the DIY Blog Squad and have been compensated for our time commitment to True Value-related blog posts. We were also given a gift card to purchase the materials needed for our True Value-related projects, however, our opinions are entirely our own and we haven’t been paid to publish positive reviews. Boom!

Great idea! Love your ideas! Also I love Benton’s tee shirt! My son is a USNA grad!
Thanks, Kathy! 😀
I would love to see how to make a lame basic,, plain, builder grade mirror turned into something completely awesome using cheap stuff.
Maybe I need to send you a picture and then you can pick my presto chango and help me convert a bathroom with beach counter and cabinet to something more awesome for a 30 something year old.
Yes! Send it on over, Amber! 😀
NEVER interrupt a boy and his WII !! =) Now, I have a question – I have a sewing desk that my DH made from MDF, painted a lovely green. Every time I try to move my sewing machine to another spot so I can do a different project, the rubber buttons on the machine bottom stick to the paint and pull it off. This desk is about two years old now, and things (even paper) stick to it if left too long. What ideas do you have, other than repainting the whole thing? I thought of glass or plexi, but it’s kinda expensive for me.
I had the folks cut me a piece of plexi once and it was VERY inexpensive. I’d try that! 😀
I’ll check into it. That seems to be my only thought also. Thanks for being there!!
Try one of those lint rollers….the kind where you tear off a new section of the tape. The back of this tape is like silicone and the sticky side may stick to your rubber feet. I use this on the presser foot on my sewing machine…works just like an expensive teflon foot.
True Value is a wonderful chain. We bought a Weber BBQ at True Value and were pleasantly surprised that they delivered and set up the unit for us the same day we bought it. Hassle free shopping. I didn’t realize one could buy wooden button plugs. I always learn something here. Thanks for the cute post.
I love that about True Value, too! And thank you for the kind comment! 🙂
We live in one of the oldest
antebellum homes in Prattville. Come over and take your pick of projects!! 😉 ANY would be appreciated but we’re actually about to start a re-do in the master bath! Good times!! Would love your input!!
Ooh! Kaye! That sounds exciting!!! 😀
Layla, love your blog! Have to ask where your brother-in-law got those tall side shelving units next to his tv?? I LOVE them. Didn’t check IKEA yet, but thought I’d ask you first. Great job on the conversion of that tv stand, and as always, keep up the great posts. I have learned so much from you and Kevin!! Hugs from Michigan!
Hi Karina!
Those bookcases are also a part of the Hemnes line at Ikea! 🙂
Layla,
As for as a project idea – what do you do about painting two rooms that meet at a corner different colors? Ugh. I don’t know if there is any way to get that situation to look professional, but if there is, you would know!
Thanks.
Amy G.
Hi Amy!
This is just my opinion, but I always take the paint around to the next “inside” corner. That just feels more finished to me, and I hope that helps! 🙂
This is an awesome tutorial on painting corners – I used it in my living room 🙂
http://www.houseofhepworths.com/2011/01/11/what-everyone-should-know-about-painting-perfect-lines/
Is Kerry a USNA grad ( noticed Benton’s shirt)? I wonder if he & my hubby know each other?
No, he graduated from Troy University. Kerry is a middle school principal and bought that shirt for Benton when he and his 8th grade class visited the Naval Academy earlier this year. 🙂
Cool! Tons of design inspiration in Annapolis. The USNA campus alone is enough to make you want throw a touch of nautical into your decor.
Ikea hacks are the best !!!!!!!!!!!!!!!!! I love Ikea 🙂 Great job guys !!!
DIY suggestions: (aka, things i cant seem to figure out) Outdoor/Patio curtains–these are so life changing on a patio and the merchants seem to know that when pricing, is there a cheaper resource or a way to EASILY make them?
How about making a cabinet that looks old, used & oil-rubbed, like this one at http://browndresswithwhitedots.tumblr.com/post/9509932640
I love your blog, thank you for all your sharing.
Thanks for showing us up close on how to make shelves vs the drawers. I didn’t even know that that tape existed. Have you ever thought about painting a piece like that and if so what color would you go with?
Liz
I have the exact same TV stand except mine’s the 3 drawer one. When we put ours together we put some of the pieces backwards too, but didn’t realize it until we nailed the back piece on and flipped it over. We put it back together the correct way, but now we have nail holes in the front. I’m going to have to try that edging tape! I didn’t think it would come in a similar enough color to the rest of the TV stand!
Love the Hemnes bookcases…I have 2 too. They are so easy to alter. I used Beadboard for the backing, painted it blue and added woven cane to the side panels.
Your nephew sure is cute…especially in that Naval Academy t-shirt. The academy is right down the street from me. Go Navy!
like this sooo much!
you’re welcome to visit our blog with a new new decoration post <3 http://www.aboutblackponies.com/2012/06/summer-balcony.html
I love IKEA hacks and this is a good one. I haven’t ever seen the malamine iron on strips either. Definitely easier than taking the whole thing apart.
Your blogs are the best! I learn so much. AND, I have told many friends about your site, they love it too. We all agree, it’s great! Keep up the good work.
I’d love to make something like this!
Love this post! Great idea making the drawers into shelves. I have never heard of the melamine iron on tape, what a great product! True Value is one of our favorite stores, we always find what we need and the people are so helpful. Looking forward to seeing your next project.
that was really good. you guys made it look like it came that way.
What great ideas you have! Can’t wait to see the finished room!
OH OH OH I have the perfect thing…PERFECT (I think) LOL
I have a awesome head board that was to one of my boys beds. It is a twin size…they broke the foot board:( But it was a beautiful sleigh bed and have always wanted to make something out of the headboard. I just cannot put a finger on what that would be. I am not positive of what type of wood it is. But no matter I can see a awesome shelf or “something” being made out of it.
Not sure what you two are looking for but this is the first thing I thought of after reading this post.
Your brothers TV table turned out great!!!
Sincerely~
Lisa Walters
What an awesome way to do-up that Ikea piece the way you want it! I have heard that you can really do things like this with any Ikea piece (my aunts have done this many-a-time with things they get for one purpose but want to use in a different way), but it’s neat to see this project step-by-step! Thanks for sharing! 🙂
I didn’t even know that Melamine tape existed. That changes everything. I love how the wooden plugs give a little something extra to the unit now. Can’t wait to see this room when you complete it.
Boy do I love a good IKEA hack. Brilliant idea to use melamine tape. This turned out great!
Love your blog. I don’t comment often, but I read it daily. I have so much that needs doing – I live in a 900 sq. ft. guest house that is covered in clutter due to a serious lack of storage space. Any ideas for how to fix that? Or just a whole house makeover?? : )
Like Debbie W. I do not comment either….but I LOVE to read your blog. I have always wanted to add desks on either side of my large brick fireplace and make them computer/printer-compatible. The room is currently a playroom, but I think it will be converted into a “study” as my children grow.
Going to a hardware store is like going to a quilt store… I love gadgets!
Hi Layla,
I’m tellin’ you girl, you are one talented young lady and if I could start all over again I would want to grow up and be just like you! Ii is always such a pleasure to receive my daily email from The Lettered Cottage. I sort of live vicariously through you, I think! The guestroon/study room you and Kevin redid is absolutely lovely! You are indeed an inspiration for a 62 year old grandmother who use to feel a lot better and who use to move around and get things done like you do!
Thank you for showing me that it can be done! I am going to try to do the table you showed today,,,we will see what happend!
You are precious..keep up the great work and thank you so much for your wonderful ideas! You don’t know it, but you help keep my life fun.
A Friend! Lucy
Hi,
Do you remember the size of the shelves? I’m trying to do the same thing!
Also, how did you fix the shelves to the tv unit? Did you glue them on? Screw them on?
Thanks !
What size TV did you use for this unit?
My setup left to right is 1x bookcase, 2x two drawer tv stand (and bridge shelves), 2x bookcase. This gives a nice wide gap for a big 70″ tv. I’m finally picking one up, but need to move the receiver and maybe more down into the drawer space.
I’ll be putting a full shelf in the bottom attached to the center divide and those bare pieces in the sides that the drawer runners usually connect to (with some spacers to bring them flush with the middle). What’s nice is there’s enough gap to keep the drawer or not, which will make the bottom drawers modular.
Your project came up in my searches and solidified my ideas on how to accomplish this. Thanks!
Hi Layla – Love what you did with that TV stand! We’re thinking of buying the same one. What size TV does Kerry have on there? Thanks!
Same question as above – i wondered what size TV it is? I came across this doing a google image search. Looks great! Thanks!
I have always enjoyed True Value and their great staff. This is one of the last stores that caters to your needs in a way that makes any home improvement job seem easier. They go above and beyond in helping their customers.
I am so inspired by your knack of decorating and DYI projects:) It really brings warmth and feeling into the home:)
I recently happened upon your blog and I ABSOLUTELY enjoy reading it. Layla, you’ve inspired me to choose my own “word of the year” (Confidence) for 2013. Thank you! Big hug to you and Kevin from The Windy City.
Amazing….your blog is a combination of creativity, inspiration and education! Love everything you do!
I would love to win the card for all of the project at home. LOve your site! Please come back to Tybee soon!
I need this to begin a basement Redo
Love the way your TV stand came out!! Passing it along to my daughter who is in the middle of a project! Speaking of being in the middle of a project! I have a bathroom that is in the middle of a re-do! $100 from True Value would go a long way to completion! How FUN!!!
I like to watch you all tackle things out of your comfort zone. I just finished painting 12 pcs of furniture various shades of purplr. Just got the furniture in my room back together last nite and into the morning. Pretty good for a 58 yr old disabled senior citizen!!!! Happy New Year to all and to all a good night!!!!
I would love the gift card for my old condo. It needs some love after 25 years!
Thanks for the chance!
Patricia
SUPER COOL! thanks for showing us this great in depth description of how to redo an Ikea piece of furniture. I’ve put dressers on backwards before my self and had no idea about the tape. who knew? happy nee year!