Ceiling Ideas
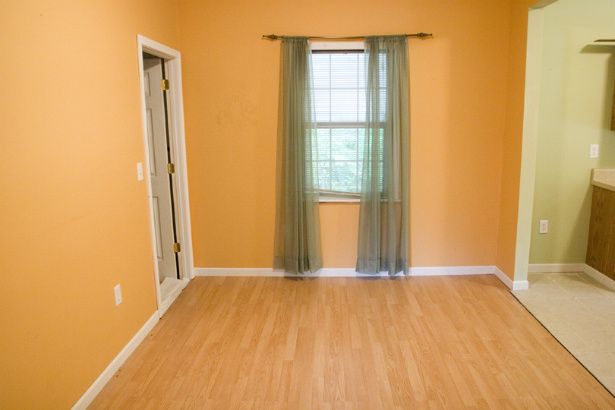
I haven’t added our dining room tour to the Our House tab in our menu bar yet because it’s still a bit of a work in progress. That being said, the room has changed a lot since we bought the pumpkin-colored place in 2007…

And boy have we had a lot of fun working on playing with it over the past few years!

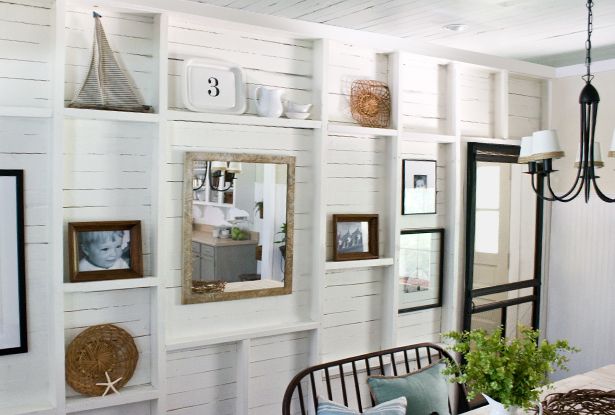
We had fun creating the “wonder wall“…

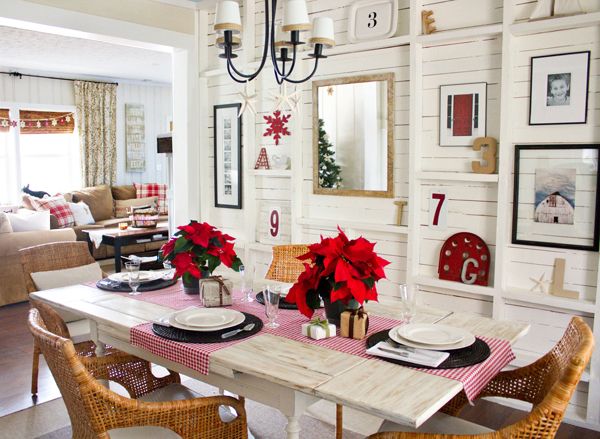
…and even more fun decorating it for Christmas last year…

We even had fun using the room as a bedroom, while ours was under construction…


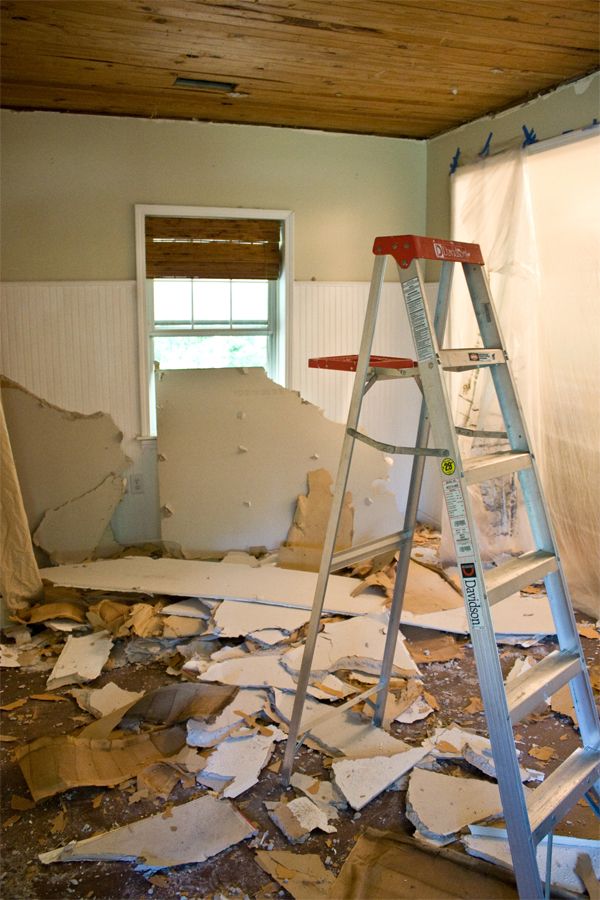
But at some point, we ran out of steam and never really finished the ceiling or the floor in there, so we took advantage of another burst of DIY energy a couple weeks ago, and went back to work on Project: Dining Room.
Kev started by taping himself in there one day and sanding back the original hardwood floor (that was originally covered up by laminate flooring)…

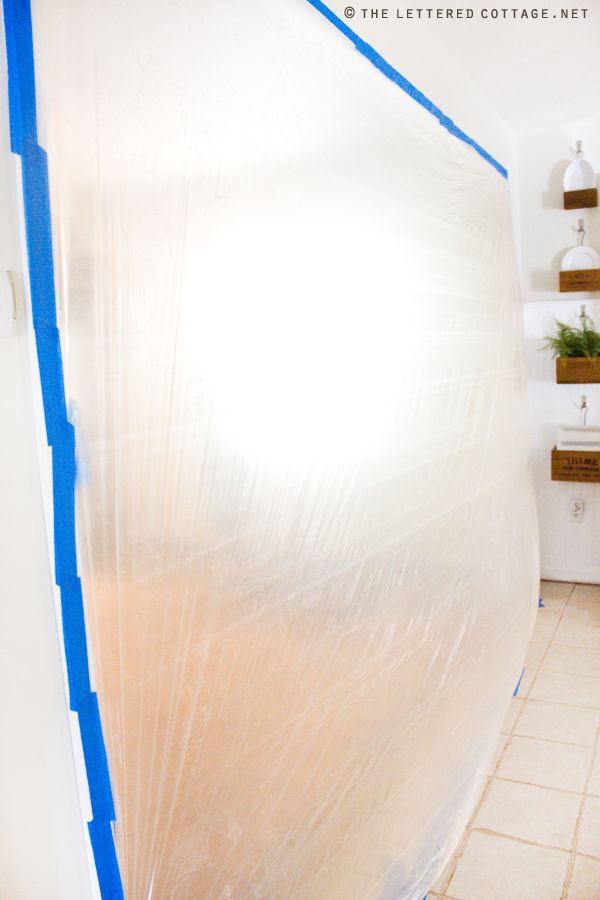
(That awful old kitchen tile is gettin’ the boot at some point too!)
Unfortunately, he sanded his palms back a bit that day too. Zoinks!

So while Kev’s pummeled palms healed up, I got down to business and sealed the floor with three coats of semi-gloss Varathane from Lowes, and after that, we turned our attention up to the ceiling.
Unlike the planks in our guest bathroom and reading room, the wood we uncovered up there was always just a liiiiiiittle too rustic for our taste.


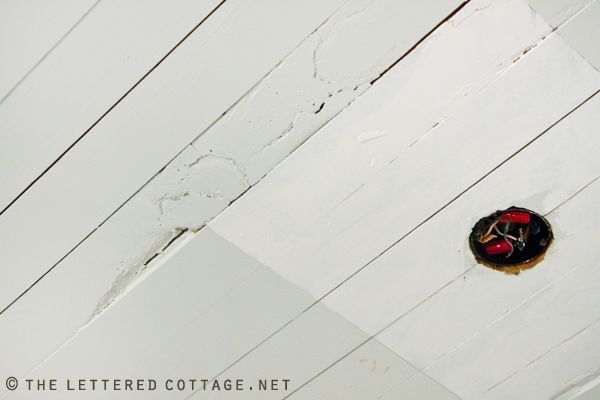
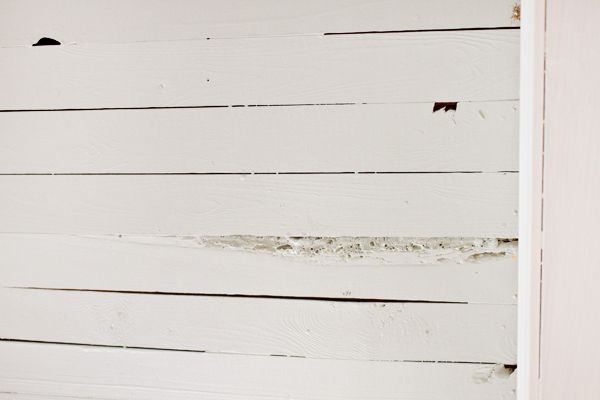
We didn’t have the funds or energy to deal with it when we originally uncovered it, so we just slapped on some primer and leftover blue paint (Sea Salt by SW).
It did the (temporary) trick, but last month I had one of those infamous “I can’t take it anymore” moments, so Kev and I put our heads together to figure out how we could fix it… for around a hundred bucks.
Our first idea involved attaching big sheets of something called eucaboard (from Home Depot) to the ceiling. It was thin, it was inexpensive, and it seemed like a great idea. Keyword: seemed. I thought we could attach them in a big grid-like pattern, and cover up all the seams with some kind of thin, wood trim. Keyword: thought.
Let’s just say that little project didn’t go quiiiiite as easily as planned, and that there may or may not have been some uncomfortably intense moments at the Palmer household as we tried to hoist and hold up the first 4′ x 8′ sheet of eucaboard while one of us nailed it into place. And let’s just say the intensity may or may not have intensified when said nails proceeded to slide right up on through that first 4′ x 8′ sheet of eucaboard at the exact moment someone’s arms turned to wet spaghetti.
Oh yeah….that was a real good time.
Anywho, our (intense) adventure ended with a 4′ x 8′ sheet of eucaboard out by the curb, and a trip to Lowes to see what else we could cover the ceiling with.
Here’s what we decided to try (the second time around)…

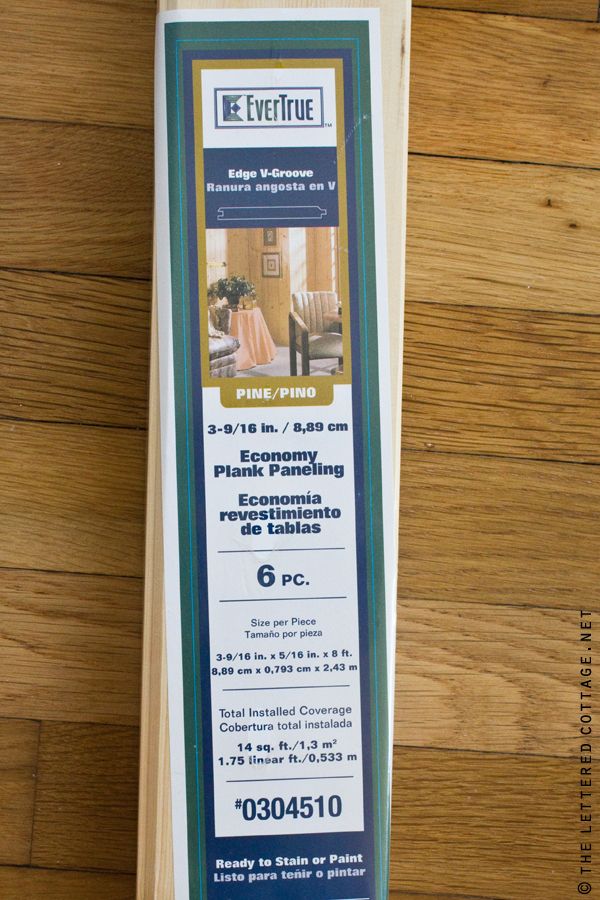
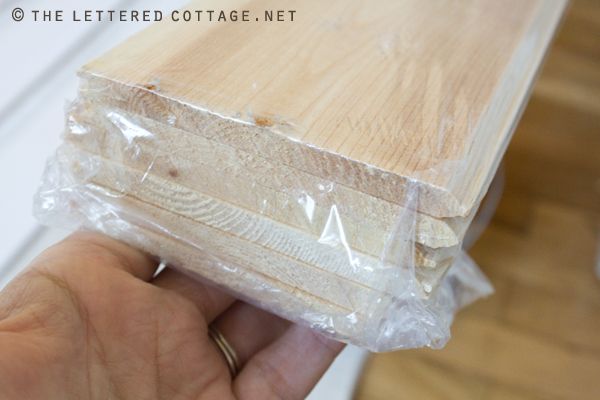
It’s a V-groove, wood plank product by EverTrue, and there’s six 8-foot long planks in each pack.

Each pack costs $10.93, and we figured we’d need about 10 of them to cover our entire dining room ceiling. (Much cheaper than any other ceiling plank option that we looked at.)
The planks are super thin, and very light weight. Keyword: light.
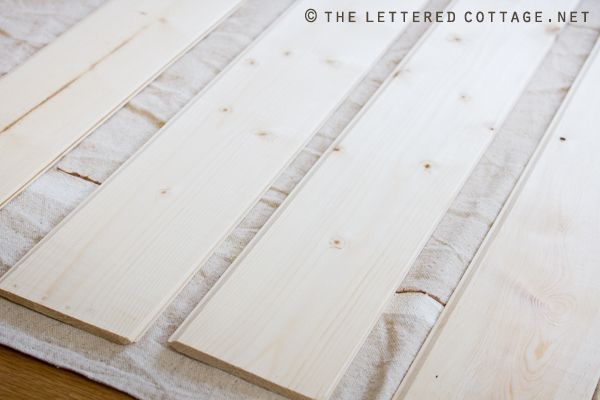
We didn’t buy all eight packs right away, because after the whole eucaboard debacle, we weren’t sure if anything was going to work and we were skeered. We took home one pack of planks that day, and I promptly laid them out on a drop cloth and gave them two coats and primer, and two coats of leftover Moonlight White (BM) paint.

Our dining room ceiling is 9′ – 7″ wide, and the planks are only 8 feet long, so we decided to do a little staggering of the seams.

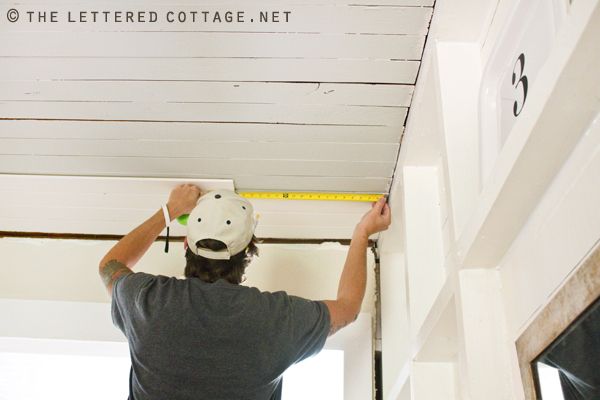
Using our nail gun, we attached one full-length board to the ceiling, and then cut a smaller one to finish off that “row”. Then on the next row, we did it the opposite way, so the “pattern” will look sort of like this when we’re done:

Turns out you can barely see the seams after all, but we just thought it would be weird to have all the shorter planks on one side of the room.
Here’s where we’re at today…

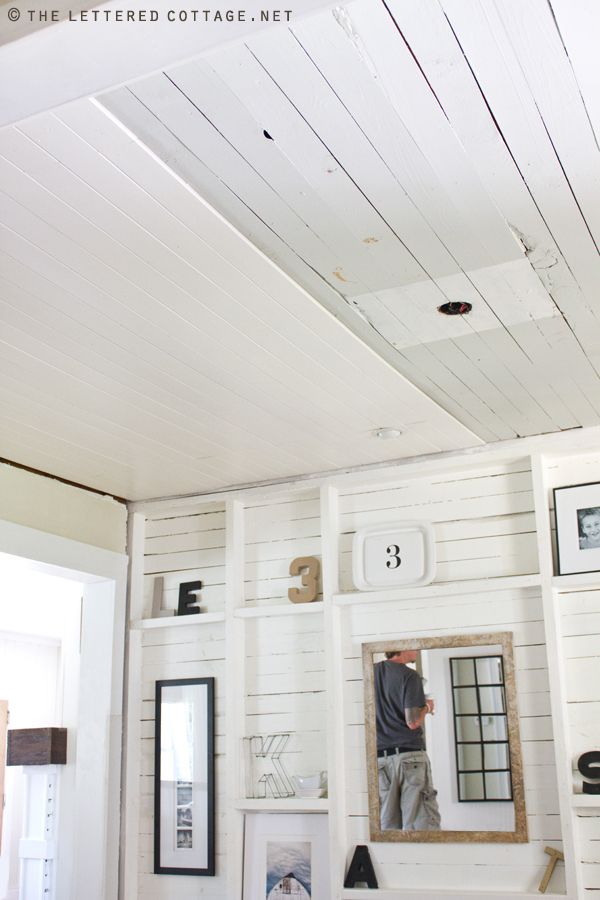
(You can still see some Liquid nails up there from the eucaboard experience…grrrr.)
We’re not quite halfway across the room, and there’s still LOTS of nail hole filling, touch up painting, crown & trim molding attaching, and wall trimming, painting or papering to do- but we’re okay with that. It’s the 4′ x 8′ sheets of eucaboard we have issues with.


PS- We’re hoping to finish the ceiling up soon so we can turn our attention back to the drywalled walls. We want to do something really different there too! (Just have to figure out what that is- LOL!)
tagged with: Dining Room, wood ceiling.
Leave a Reply Cancel reply
177 Responses to Ceiling Ideas
-
Bernie says:Aug 29, 2011 at 9:28 am
Love the ceiling choice you ended up with. I have to say, though, I am most impressed that I have the same wicker chairs in my dining room. Who would have thought that I would be on the same page as a designer I admire (and who is a lot younger than I)?
-
Pine Tree Home says:Aug 29, 2011 at 9:29 am
I was staring at this product the other day thinking I may use it in my guest room. Then I got all flustered in the Lowes aisle and kept walking.
-
leanne says:Aug 29, 2011 at 9:32 am
we did something very similar…but added an extra “frame” of mdf around the perimeter and also in the opposite direction of the paneled ceiling to hide our seams…hard to explain…but it finished it of nicely. ended up with 5 framed sections across the length of the room. i love your wall. i want one.
-
Layla says:Aug 29, 2011 at 9:45 am
Sweet! What a great ceiling solution, Leanne!
-
-
Suzan says:Aug 29, 2011 at 9:41 am
Oh my gosh! That would look so good in my dining room. Now I have to find a man and a nail gun!!
-
Layla says:Aug 29, 2011 at 9:44 am
Yes! A nail gun is a must-have for this project!
-
Dana says:Aug 29, 2011 at 9:57 am
a nail gun= must have
you didn’t say anything about a man, ha ha ha!
girl power!
-
Layla says:Aug 29, 2011 at 10:00 am
Oops! LOL! A nail gun wielding rocker boy is always a plus around here, too!
-
kit @ DIYdiva says:Aug 29, 2011 at 11:54 am
It might have been an unintentional omission but I have to say I agree … no man necessary, but you definitely need the right tools!
If you don’t have a nail gun yet, I would suggest looking at the cordless versions. They use little fuel cartridges instead of an compressor and they’re super easy to use (especially if you’re doing something like a ceiling).
-
-
-
-
Steve says:Aug 29, 2011 at 9:43 am
That’s a great product to know about! It would be perfect to put on walls for that cottage look. It looks thin enough that it would still allow casings to stand “proud” of the boards so you wouldn’t even need to take them off.
-
Layla says:Aug 29, 2011 at 9:48 am
Yes! The planks are only about 1/4″ thick, so I think they’d work great on walls that have casing and molding you don’t want to take off!
-
Jill says:Aug 29, 2011 at 3:34 pm
Just what I was looking for in the bathroom to be thinner than the moulding – thanks for the great idea!
-
-
-
Barbara says:Aug 29, 2011 at 9:49 am
I love what you did, it gives another meaning to the term planking. lol
I needed to be inspired…I just need someone elses elbows to do the work.
Thanks -
terrillr says:Aug 29, 2011 at 9:49 am
WOW! That looks great. And, such a nice surprise when the solution is on the less expensive side.
-
Layla says:Aug 29, 2011 at 9:52 am
Thanks! Working with a limited budget is definitely challenging, but where there’s a will, there’s a way!
-
-
Luciane At HomeBunch.com says:Aug 29, 2011 at 9:50 am
Gosh,
You guys are the most talented couple in this business! I love how creative you guys are!
Have a great week!
xo
Luciane at HomeBunch.com
-
-
Dana says:Aug 29, 2011 at 9:50 am
Thanks Layla, I have been wanting to put some kind of wood ceiling in the living room at our lake house that I am still waiting for you to come help with, and this product might be just the trick. Seems like it would also be good for a wall treatment.
Are you guys using liquid nails AND nailing it?
Now, can you tell me where I can buy a Kevin? lol!
-
Debbie says:Aug 29, 2011 at 9:51 am
It looking great, can’t wait to see it finished! I know y’all can’t wait either!
Debbie -
-
CherylK says:Aug 29, 2011 at 9:52 am
Nice job! We did the exact same thing on our downstairs family room and “spare” room ceilings (it’s sort of a dorm room when all the grandkids are here). Then we used it horizontally on the hallway walls and one of the family room walls. It looks great and was super easy to do.
-
Kay Pflueger says:Aug 29, 2011 at 9:54 am
Love the “wonder wall!” What a great idea.
-
Leah says:Aug 29, 2011 at 9:55 am
Yipeee! This is exactly what I want to do in a few bedrooms – thanks for this post!
BTW, is that chandelier from Ikea…? : ) -
liz says:Aug 29, 2011 at 9:55 am
Okay, I needed this. I still have NO idea what to do about our back porch ceiling. This looks beautiful! I might need your help though. ;P
-
Melissa says:Aug 29, 2011 at 9:59 am
I am so glad I read this post! I agree, what a way to really test a relationship! We had that exact experience with a ceiling project in our rental but we eventually got ours to stay after my poor fingers got pinched to death. Plus, it was 100x’s more frustrating since it is a rental and there was not another option we could do since our landlords are… shall we say, cheap. Love your solution though, may show the landlord and cross my fingers that they might consider something like that.
-
Layla says:Aug 29, 2011 at 10:03 am
Oh boy, that finger pinching stuff is for the birds, isn’t it!?

I hope you’re landlord is open to this easier-to-install solution! Good luck!
-
-
Michelle@Make 5dinners in 1 hour says:Aug 29, 2011 at 10:02 am
I love it! How much does a pack cost? I think my half bath needs this!! We have popcorn ceilings Gross, I know!
-
Layla says:Aug 29, 2011 at 10:03 am
$10.93.
-
-
andi says:Aug 29, 2011 at 10:04 am
Love it!! Just this morning as I got ready for work, I was thinking about doing this in the bathroom. Just not sure with moisture, but can’t be any worse than a drywall ceiling. Thanks for the ideas! LOVE TLC!!!
-
Layla says:Aug 29, 2011 at 10:10 am
Hey Andi!
Just make sure you prime it really good and use a semi or high-gloss paint and it should be fine!
-
-
Sara @The Fat Hydrangea says:Aug 29, 2011 at 10:09 am
Love this!! I have had designer’s block when its come to decorating our sunroom, and I think this would be PERFECT in there! I seriously think I will get started this weekend.. you’ve totally inspired me!
-
Layla says:Aug 29, 2011 at 10:11 am
Yay! Good luck and have fun with your sunroom, Sara!
-
-
Jess @ Little House. Big Heart. says:Aug 29, 2011 at 10:12 am
I love it! We have a sunroom with awful drop ceiling tiles. I want to rip those out and do a plank ceiling… that paneling just might work! Now to get the hubs on board.
Love, love, love your wonder wall!
-
Layla says:Aug 29, 2011 at 10:14 am
Thanks Jess! And I hope your hubs is on board too! I promise he’ll love the look…and the bottom line!
-
-
Sherri says:Aug 29, 2011 at 10:13 am
That’s going to turnout just awesome, Layla! Looks like it’s something I’ve been trying to figure out how to do for our family room. How are you guys attaching the strips, especially the shorter ones. To the ceiling joists? Thanks, and I’m really looking forward to seeing what’s going to happen with the walls. You guys are so very creative!
-
Layla says:Aug 29, 2011 at 10:17 am
Thanks Sherri! Since our ceiling was already wood, we’re just nail-gunning it directly to the existing ceiling.
-
-
Nathan RK says:Aug 29, 2011 at 10:18 am
Just curious, how are you fastening the planks to the ceiling?
-
Layla says:Aug 29, 2011 at 10:20 am
Hey Nathan! Since our existing ceiling was wood, and the new planks are super lightweight, we’re just nail-gunning the planks directly to the old planks.
-
Nathan RK says:Aug 29, 2011 at 10:22 am
Right! I just saw the comment above mine after posting my question. Facepalm!
-
-
-
Elisa says:Aug 29, 2011 at 10:21 am
The crispness (is that a word?! Hah) of those boards looks great! Can’t wait to see the finished product!
-
Ricki Jill Treleaven says:Aug 29, 2011 at 10:30 am
Layla, your ceiling is looking great, but you are getting rid of your Wall of Wonder? I like it because of the way you accessorize it
-
Layla says:Aug 29, 2011 at 10:35 am
No way, Jose! We’re just sprucing up the other walls in the room!
-
-
-
Deidra Dunbar says:Aug 29, 2011 at 10:34 am
I have been talking about using the same product for our living room/dining/kitchen area. I wasn’t sure how it would work out. Love it!
I am so glad you are always brave enough to take the plunge first…and make it through so you can tell about it!
-
Patti says:Aug 29, 2011 at 10:41 am
omgosh, I love when I come upon a timely post for something I’m planning to do. The sheetrock in my master bed ceiling is starting to crack and I was out yesterday looking at some kind of light wood to cover it! Thank you Layla! You had me laughing at your “intense” situation there … been it, done it!
-
Lisa sraders says:Aug 29, 2011 at 10:42 am
Hey, Layla – that is looking very fresh and snazzy! I would love to add something like this to our bowling alleyish kitchen/tv area, and am wondering how hard this is to do when you have potlights – do you put up the pieces then trace? I would have no idea how to do this…thanks if you can answer!!! Blessings!
-
Kevin says:Aug 29, 2011 at 11:00 am
Hi Lisa! I’m just kind of winging it when comes to cutting around our recessed lights. I used a jigsaw to make the cuts, and it did take some time to figure out. I measured over to the hole to get a starting point, then measured across to mark the width of the opening. I measured every which way I could, then used a string attached to a pencil as a way to draw my circle radius (caveman compass style). Probably not the most professional way, but it worked. You also have a little room to play with because the lights have a little metal collar around the bottom that will cover up any less than perfect cut lines. I hope that wasn’t too confusing!
-
-
Amy Johnson says:Aug 29, 2011 at 10:45 am
We did the same thing in our kitchen, bath and porch. I have LOVED the ceilings and get so many compliments. We are slowly going to use this solution in all of our “public spaces”. As an added bonus, any imperfections either don’t show up or just look like character, unlike the “popcorn” ceilings we covered up–YUCK! Enjoy your new ceilings!
-
Kelly says:Jul 11, 2012 at 10:30 pm
How did you attach the planks to the popcorn ceiling? This is exactly what we need to do in our new place, and I’m wondering if a nail gun will work on popcorn???
Thanks!
Kelly-
Layla says:Jul 12, 2012 at 9:30 am
Hi Kelly!
Here’s a post we did about “popcorn to planking”:
http://theletteredcottage.net/popcorn-ceiling-to-plank-ceiling/
-
Kelly says:Jul 12, 2012 at 11:45 am
Wonderful! We were hoping we wouldn’t need to scrape to attach them since our house was built in the 50s. This way, we won’t have to worry about testing for asbestos. Love your site!
Kelly
-
-
-
-
Ellen says:Aug 29, 2011 at 11:11 am
It’s looking good! I know the stuff you started with…. glad you didn’t finish up with it… the planks you ended up using will definitely give you the look you are after. We’ve used that on a ceiling and as wainscotting in a room too. It’s wonderful stuff!
Can’t wait to see the ceiling finished!! -
Allyson says:Aug 29, 2011 at 11:12 am
Wow! That looks so good I just had to comment! Wish I could figure out a place in our house to do that!
-
Joyce says:Aug 29, 2011 at 11:13 am
I’ve been wondering what I could do in my kitchen/dining area/family room. This is it!! I love your home and creative ideas, Layla!!
-
Susana of Montessori Candy says:Aug 29, 2011 at 11:13 am
Wow you guys! What a great solution! It is looking so good too! Thanks for sharing this with us. I’m inspired yet again!
-
peggy says:Aug 29, 2011 at 11:18 am
I love it and the price!!! You both are so creative!!!
-
Elizabeth says:Aug 29, 2011 at 11:25 am
That is so creative I have cottage cheese / popcorn…on my ceiling and would love to scrap it off and do something with texture. You guys are so talented it makes me dizzy…LOL PS Layla you have a stormy barn pic on your dining room wall would love to know how to get a copy didnt see it in your photos….Thanks for the great inspiring ideas…!!!
-
Kevin says:Aug 29, 2011 at 7:28 pm
Hi Elizabeth! The barn picture in our dining room was taken by Layla’s aunt. It is Layla’s grandmothers barn and was shot on film, so we don’t have it in our shop. Thanks for the kind words!
-
-
Monique says:Aug 29, 2011 at 11:30 am
This ceiling is going to be so beautiful but I bet it’s not an easy job. Remember slow and steady wins the race and you’ll have the ceiling completed soon. Love your house.
-
Frances says:Aug 29, 2011 at 11:36 am
Oh. My. Goodness!! This is EXACTLY what we need! We’ve been remodeling our dining room/sunroom (we made our very own Wonderwall as well!!!!), and we ran into the same dilemma with our ceiling! We were going to use 4′x8′ paneling but, like you discovered, isn’t the greatest option for a ceiling. So, here we thought we were going to have to fork out an arm and a leg for the more expensive planks. This post couldn’t have come at a more perfect time!! We may just have the same dining room, hope you don’t mind, ha ha:-). You guys are the best!! I’ll have to figure out a way to post a pic on FB or something when we’re done- it is looking awesome (probably because it looks just like yours, lol)!
-
maria costello says:Aug 29, 2011 at 11:37 am
First – a BIG thanks for the ceiling idea. We have been living with an ugly, cracked ceiling for the last couple of years – this is what I’ll use to finish that ceiling up!
And I used your holiday dining room idea to start a “holiday idea” board on my pinterest site!!
-
Susan says:Aug 29, 2011 at 11:38 am
Jeez, that looks awesome!! (thanks for telling the fail story too…)
-
kit @ DIYdiva says:Aug 29, 2011 at 12:02 pm
It looks fab, and I’m so glad you mentioned the cheaper option… I’ve been looking for something to use under the covered porches of my current house, and this might fit the bill.
Also, I’m totally sympathizing with the eucaboard experience… I have had similar experiences with hanging drywall on ceilings. Ones where the sounds I make are basically all consonants. However, if someone was trying to put 4×8 sheets of anything on the ceiling, I might recommend renting a drywall jack, which will hold a board up flush to the ceiling while you nail it… and keeps you from the dreaded spaghetti arms!
-
Sherri Langford-Farrell says:Aug 29, 2011 at 12:05 pm
Layla,
We’re using the same product in our kitchen above the cabinets and on our pantry. My husband loves the easiness of use. We also used it on our kitchen island under the counter where the barstools sit. Just haven’t come up w/how we’re going to paint/stain it. I’m thinking of using Annie Sloan’s Chalk paint w/wax to give it a glazed look. Great products!!! -
Wendi says:Aug 29, 2011 at 12:05 pm
I am luvin’ EVERYTHING you do! So here’s my question….My cozy, cottage decor guest room is available and I live 1.5 miles from the beach….When are you, Kevin and the nail gun coming for a visit?
-
Skuba says:Aug 29, 2011 at 12:13 pm
This post comes just in time. We are going to be redoing our breezeway which used to be the porch attached to the outdoor kitchen. We’ve got some of that grate v-groove wood up on the cealing now but it is in bad shape and when they added the kitchen onto our house it didn’t quite meet up with the house so Grandpa just slapped up a board going perpendicular to the rest of the boards. Well we are now going to put up old barn siding on the walls and looking for a cealing to match so our choices are wood planking like you have or old barn tin roof haven’t decided yet. I can’t wait it is going to be one big change.
-
Heather says:Aug 29, 2011 at 12:31 pm
YES!! We were JUST talking about how to tackle our kitchen ceiling when we redo it ( we’re working on that now.. argh) This is PERFECT as I was talking about plank ceilings. Now I want to go read the wonder wall story.. woohooo
-
Leen Curinga says:Aug 29, 2011 at 12:31 pm
Hi Layla and Kevin! I love the look of this! Do you think we could put it over textured ceilings…oh, what are they called??? you know…the stalactite looking stuff…
How many times did you have to say “Be Nice” during the Eucaboard experience?
Leen
-
Kevin says:Aug 29, 2011 at 7:55 pm
Hi Leen! We did have a few tense moments! haha I actually held a piece of the planking up onto some of our popcorn ceilings to see if it felt like it would work, and I think it would! We are going to give it a shot in one of our “popcorn” rooms, we will probably use a little liquid nails on the bottom side of each plank, along with the brad nailer, just to make sure it holds good. I think it will work because it’s so light weight. Hope you and the family are doing well!!!
-
Leen Curinga says:Aug 31, 2011 at 6:20 pm
awesome, I will let you try it first and you can let me know how it works
-
-
-
kathy h says:Aug 29, 2011 at 12:36 pm
It looks so good!! I’m impressed. And, thanks for giving such eachy to understand directions. I’m going to share this idea with the hubby and maybe try to tackle it in one of our smaller bedrooms. We are covering popcorn, so just wondering if you know or could find out a couple of things for me? With popcorn, would we just nail into ceiling like you did, or will be need to install some sort of base first? and with popcorn, will it won’t be flush, so that might be a problem, eh? (I HATE POPCORN CELINGS…UGH!!)
-
kathy h says:Aug 29, 2011 at 12:37 pm
Yikes! Just reread my post….sorry for all of the typos!
-
Sara says:Aug 29, 2011 at 12:38 pm
Any thoughts on how you would do this on a texturized drywall ceiling? I would LOVE to do this in our great room (huge space from living room to kitchen! Thanks for the tips!
-
Layla says:Aug 29, 2011 at 3:11 pm
Well, I guess you could either scrape them first, and then attach the planks, or if it’s level enough, you could just apply Liquid Nails to the back of a few planks and nail them into place to see if you’re happy with the look.
Fortunately one pack is pretty cheap, so it doesn’t cost too much to experiement!
-
kathy h says:Aug 30, 2011 at 5:55 pm
Thanks Layla and Kevin! I can’t wait until you guys try it out on your popcorn ceilings. I’m crossing my fingers it goes smoothly so I’ll be able to run it by the hubby!
Thanks so much!
Kathy H.
-
Suzanne C. says:Sep 8, 2011 at 2:53 pm
Wow! I just came upon this blog! It is great! And, I happened to start reading this discussion about covering the popcorn ceiling. I too have been finding out what to do with my popcorn ceiling. What a great idea. I have to go to Lowes and check out these planks. I hope to see some pics of someones finished project! Thanks.
-
-
-
-
Roy Merideth says:Aug 29, 2011 at 12:58 pm
I’ve been reading your blog for a while now. I wish we would have had more of your creativity when we lived in our old 960 square foot home. I would have used some of your ideas to update the place. We did plenty of restoring and reworking, I just like some of your ideas much better.
-
Julie M. ~ The Little Red Shop says:Aug 29, 2011 at 1:15 pm
Thank you for the tip! Is it like real bead board, minus the bead? The 1966 additions to my 101 year old house are entirely lined with barn wood/shiplap. Sometime, way back in the day….they put NASTY ceiling tile and paneling over it. Some of what I’ve uncovered has been poorly patched and I’ve been putting off dealing with it. Your ceiling is looking fabulous, so I will keep that product in mind!
Have a great week!
: )
Julie M.
-
Layla says:Aug 29, 2011 at 3:00 pm
Exactly! Beadboard minus the bed!
-
-
-
Nicole Heath says:Aug 29, 2011 at 1:16 pm
What a transformation. I LOVE the wall/shelf look – I pinned it myself. Definitely would love to have that someday.
The ceiling is looking great – can’t wait to see it complete.
-
Deborah says:Aug 29, 2011 at 2:02 pm
Looking great! I have wanted plank ceilings in my house for a long time, but the expense was holding me back. This product might just be my ticket to new ceilings!
-
wendy says:Aug 29, 2011 at 2:18 pm
Love it Layla and Kev. Although my husband will now hate you for putting new ideas in my head.
By the way, I thought you had laminate wood flooring in your kitchen.-
Kevin says:Aug 29, 2011 at 4:07 pm
Hi Wendy! We did have laminate flooring in our kitchen, but it was laid right on top of the old ugly tile. So when we ripped out all the laminate in the house we were left with that tile again.
Next up is “Project Kitchen Floors!” Thanks for stopping by!
-
-
debbie r says:Aug 29, 2011 at 2:20 pm
yall r so darn smart! never seen this before. thanks for being here to teach us all new things. It looks great.
-
Layla says:Aug 29, 2011 at 2:59 pm
Thank you Debbie!
-
-
TORCHONenCAVALE says:Aug 29, 2011 at 2:26 pm
Huge project!!! I do love your wonder wall… It is perfect!
-
Judy says:Aug 29, 2011 at 2:42 pm
Well Layla and Kevin, it was so nice to FINALLY meet both of you today. I really enjoyed our little chat and getting to know both of you. Here’s to a new friendship and hopefully getting to know each other more as time goes by. (Tell Kevin I’m saving him all my styrofoam cups!)
I’ll be e=mailing you those pics later today….thanks again!
Judy
-
Layla says:Aug 29, 2011 at 2:59 pm
Judy!
It was so great meeting you today too! I’m so glad we bumped into each other, and I can’t wait to see your pics!
-
Judy says:Aug 30, 2011 at 7:14 am
I hope you got my pics I e=mailed….can’t wait to hear your thoughts!
Judy
-
-
-
Linda says:Aug 29, 2011 at 3:19 pm
That looks fabulous!! Sorry you had a run in with the eucaboard
I am SO going to do this in my 1941 Saltbox house with the corridor kitchen. Had a water leak last year upstairs and since the bathroom is right above the kitchen and since the kitchen ceiling is wall papered… well, you get the idea. The ceiling is minus some wall paper. This will look fantastic in there. Can’t wait to see your finished product! -
Diana @ Our Vintage Home Love says:Aug 29, 2011 at 4:12 pm
Love it so far! Ceiling work is the pits. Not a fan of the neck and shoulder ache that always accompany it. Lookin’ forward to seeing the finished product! It will be beautiful, as always! Take care!
-
Trixi says:Aug 29, 2011 at 4:34 pm
Thank you for sharing this idea. We are about to start a big Kitchen redo and will need to do something with the ceiling! This will be perfect. Yours looks great.
-
Erin says:Aug 29, 2011 at 4:35 pm
Hey guys! The ceiling is looking fab-can’t wait to see what you have up your sleeves for the drywall! Hope to have my ceiling tear-out and redo done any day now-man these ceiling projects are hard work!
-
Cathryn ~ The Farmer's Trophy Wife says:Aug 29, 2011 at 5:28 pm
I was just thinking about doing this in our little bathroom. But the roof is covered in that “lovely” popcorn stucco. Do you think I could just nail this right over top? (I am 7 months preggo with #3 (=tired!) and so am looking for an easy fix!) Thanks!
-
Kevin says:Aug 29, 2011 at 7:43 pm
Hey Cathryn! I think it would work over popcorn ceilings, we’re actually going to try it over some popcorn ceilings too. We may use some liquid nails on the underside of each plank (in addition to the brad nailer) to make sure it holds since we won’t be nailing into wood. We’ll let you know how it turns out!
-
Cathryn ~ The Farmer's Trophy Wife says:Aug 30, 2011 at 1:58 pm
Thanks!! I might wait to see what happens with you guys…I don’t want to start a project and regret it!! (my husband might not let me near a nail gun again!)
-
-
-
Krystle @ ColorTransformedFamily says:Aug 29, 2011 at 5:50 pm
My arms got tired just reading this post! I think it will look great when you are finished and you will certainly appreciate all the hard work you will have put into it.
-
Heidi @ Show Some Decor says:Aug 29, 2011 at 6:03 pm
I have been itching to cover my awful popcorn ceilings in my kitchen with wood and this could be the answer!! Have to take it up with my “handyman”… can’t wait to see how the whole thing turns out!
-
Denise says:Aug 29, 2011 at 6:36 pm
It looks beautiful! Thanks for always giving us such great resources that don’t break the bank!
I have never heard of Eucaboard, so naturally I am curious. Can it be used for flooring? We’re redoing our attic, and since we are on a major budget, I don’t want to spend too much. I saw a floor made out of particle board, which was later “varathaned.” It looked REALLY interesting.
Thanks for the new resource. I can’t wait to check it out.
-
lizzie beth says:Aug 29, 2011 at 7:14 pm
Would love to do this in our home. We scraped the popcorn and are left with really ugly sheetrock. Would prefer this over re-mudding the rock, etc. I had my hubby read your post and he loves the idea but says it will only work on ceilings that are already wood – like yours. How can we do it when we are attaching it to sheetrock? Thanks for your answer in advance. LizzieBeth
-
Kevin says:Aug 29, 2011 at 7:37 pm
Hi Lizzie! Layla and I have actually talked about putting this over some of the popcorn type ceilings in some other rooms in our house. The planks are so light weight that I think they would hold when we use our brad nailer to put them up, but we talked about maybe using liquid nails on the underside of each plank so when it dries it will really hold. We’re going to try it out and see what happens. Our popcorn ceilings are so ugly that I’m not worried about messing them up, they’re already messed up! Ha ha Thanks for dropping by today!!!!
-
lizzie beth says:Aug 29, 2011 at 8:10 pm
Thank you Kevin! I so appreciate you took the time to respond. I can assure you if we’d thought there was some other alternative we would have left the popcorn alone and covered it up! I’m sure you’ve got a good idea what a tremendous nasty mess that was!
However, at the time, we thought redoing the rock was our only solution. I’m thrilled at learning about this. Thanks so much.
-
-
-
Dorothy Brown says:Aug 29, 2011 at 7:32 pm
Looking good-and I really appreciate you guys testing it all, since my “big ideas” generally end up with the same degree of success as your eucaboard experiment. Juat ask my husband. Hee hee.
-
-
Jane says:Aug 29, 2011 at 8:18 pm
I love it! It looks so great. You two are so amazing.
-
-
Ilke says:Aug 29, 2011 at 8:40 pm
Don’t worry about the intense moments during DIY sessions, there is apparently a whole new therapy experts just focusing on that: Renovation Therapy. Not joking! I found out after we drywalled the laundry room, spent two nights cutting drywalls, inhaling the dust, meanwhile arguing and crying! And after we were done, what did I see in the next issue of This Old House?: An article by a renovation therapists who focuses on getting the couples back on the track after a hardcore renovation:)
-
S says:Aug 29, 2011 at 8:54 pm
I had to laugh when I read this post. Some of the worst moments of our whole marriage have been when we are holding something up over our heads.
-
SandRa says:Aug 29, 2011 at 8:59 pm
Love it! Such a great idea. I can’t wait to see it with the floor.
-
Tracey Hewison says:Aug 29, 2011 at 9:32 pm
Cannot wait to hear back on the ‘popcorn’ experiment, if anyone gets it done before you guys and finds out it does indeed work, would LOVE to hear about it. Looks fabulous! Thanks for the great idea and post
-
Lisa W. says:Aug 29, 2011 at 9:58 pm
Looking awesome…hang in there, will SO be worth it. Been through LOTS of those remodel jobs. Will be so worth it.
-
Rhonda says:Aug 29, 2011 at 10:10 pm
I think your second time will be the charm – it looks fantastic already!
-
Karen says:Aug 29, 2011 at 10:17 pm
Wow, that looks great. I cracked up at your first go at the ceiling…not laughing at you but rather in complete understanding as in,…been there, done that. I can’t wait to see what else you come up with to create a wonderful, different look from drywall.
You and Kevin are always so creative and inspiring. I’ve been doing so much more DIY thanks to you two.
Karen -
karen says:Aug 29, 2011 at 11:37 pm
I put up heavy drywall with my husband we made these large T-shaped braces We would raise up the dry wall and the brace would hold it up while we nailed them up. it worked pretty good and the ceiling was a cathedral angled.
-
-
Beverly Palmer says:Aug 30, 2011 at 7:29 am
Love it! I see these planks over my popcorn ceiling in the near future. Thanks for inspiring (as always).
-
SuzieQ says:Aug 30, 2011 at 8:13 am
THANK YOU, THANK YOU, THANK YOU! I’ve been checking every day for this post ever since you mentioned it. I’ve been wanting this type of ceiling for months, and REALLY appreciate y’all ‘splainin it all so we can do it!!! YAY Kevin & Layla….looks fabulous!
-
Laurie says:Aug 30, 2011 at 9:09 am
FYI… For those of you who are wanting this look in your bathroom Home Depot sells a product almost identical only its vinyl. It is also reversible, plank look on one side and smaller beadboard on the other. It’s also great as a backsplash in the kitchen. And it’s white. Super low maintenance for the wet areas. You can practically just hose it down.
-
Jessica says:Aug 30, 2011 at 9:19 am
Are your rattan dining room chairs from Ikea? They look like their Majby chairs. I’ve been considering purchasing 3 of them for my kitchen nook, however since I’ve only seen them online, I have no idea how sturdy they are. Are you happy with them?
-
Layla says:Aug 30, 2011 at 9:21 am
Yes! And we’re totally happy with them!
-
-
Janita Gaulzetti says:Aug 30, 2011 at 11:15 am
This is the perfect solution for my super old/super tiny cottage that got a ceiling redo somewhere along the way. It may have been an improvement at the time but now doesn’t really match the beadboard I’ve used to cover fiberboard walls. The ceiling is that weird stucco-like texture that’s not very pretty and hard to paint. I like your idea WAY better.
Thanks for solving yet another problem for cottage lovers!
Janita -
Bonnie says:Aug 30, 2011 at 11:24 am
Ah yes, nothing like a good ol’ DIY project to bring you some moments of “intense fellowship” (at least that’s what we call them!) I can’t wait to see the finished project.
-
maria says:Aug 30, 2011 at 2:40 pm
Kevin -
What type of nail gun do you use? I am in the market for a new one and would like to know what you think of yours. I’ll be using it for similar jobs as your ceiling and a board and batten project. Thanks!
-
Kevin says:Aug 30, 2011 at 5:28 pm
Hi Maria!
I use a dewalt nail gun. I bought a kit that came with everything including a brad nailer, and a nail gun. It was a little intimidating at first, but it has been such a wonderful purchase! Projects are sooooo much easier and faster! Here is a link to a video tutorial I did when I first got it!
http://theletteredcottage.net/how-to-use-a-nail-gun-a-video-tutorial-sort-of
-
-
Calico Child says:Aug 30, 2011 at 4:22 pm
Ouch on the hands will be worth it once finished though!! Love the walls how you have the different shelving you have just given me some Inspirations for my lounge thanks heaps
-
suzyhomemaker says:Aug 30, 2011 at 7:39 pm
PLEASE come to texas and do this in my dining room!! i’ll even bake you a cake (or cupcakes or a pie or cookies or whatever you fancy in the way of sweets!)!!
-
Tina says:Aug 31, 2011 at 10:38 am
Looking Good. I think you will love the finished product… I love the coastal look…
Have fun… -
Christina says:Aug 31, 2011 at 12:49 pm
Thanks so much for this post!! I’ve been wanting beadboard ceilings for awhile now in my bedroom but I wasn’t sure what is good for ceilings. I kinda wanted to take beadboard sheets and nail em up there (how easy would THAT be?) but whenever I look at the fine print- “not for ceiling use”. Womp Womp. Out of curiosity, do you know what beadboard sheets people are using on their ceilings? Or should I never ever try it because the whole thing will fall on my head while I sleep at night?
-
Christina says:Aug 31, 2011 at 12:57 pm
Oh yeah, and duh- I know yours aren’t beadboard sheets- they are the wood plank things, just thought if anyone would know the answer, you guys would
-
Erin Meerzaman says:Aug 31, 2011 at 8:50 pm
Christina,
My husband and I just had an “intense” moment as Layla says when we attempted to put up beadboard panels on our ceiling. We were thinking the same thing easy just some liquid nails and a few sunken wood screws and good to go. Not so. We had the 4 X 8 boards and they were sooooooo heavy and the walls are not square in this 14 yr old house which presented a nightmare for those of us who are a bit OCD about straight lines. Needless to say the board went up and the board came down a few hours later as I continued to walk in and out of the room noticing the not so straight lines. If you made the boards straight then where it met the wall it was obviously (note here: hubby said mainly noticable only to me!!) that it was not square with the wall. I took the board down then spend almost an entire day attempting to get the massive amounts of liquid nails off the ceiling (also a “spaghetti” arm moment!!). I finally ended up getting some paintable beadboard wallpaper that I put on the ceiling and it turned out great. I could adjust it easily to look more even and painted white it looks like real panels. However, I do have a few spots that look like bubbles that are actually the areas that I could not get all the liquid nails off but I can live with that. If only I had seen this post a week ago I would have gone with this option!! Good luck with you project!
-
Christina says:Sep 1, 2011 at 7:09 am
Thanks, Erin for your reply!!! I was tossing around the idea of the beadboard wallpaper as well. I hadn’t seen it used in person so I wasn’t sure if it looked “real” or not. I’m thinking this would probably be my best option for now. Thanks again- it’s always good to know the good, bad, and ugly of a DIY adventure
-
-
-
Zsa Zsa says:Aug 31, 2011 at 9:34 pm
Hi Layla,
Love your ceiling choice, and I really enjoyed looking at your photos! Your “wonder wall” is amazing. I love what you did with your space last Christmas!
-
Kristen says:Sep 1, 2011 at 9:03 am
I know yall lucked in to having the wood plank for the wonderwall, but do you think this groove plank paneling would work for on the walls to create a wood plank wall??
-
Layla says:Sep 1, 2011 at 9:04 am
Sure! I think it would work great!
-
-
Tina says:Sep 1, 2011 at 11:04 pm
I love the ceiling! We have just uncovered under two layers of ceiling tiles, a pressed tin ceiling in our dining room. I can’t start tearing it down yet, as it is our bedroom at the moment, but it looks like they nailed pieces of wood up to put of the lovely mint green tiles. Has anyone revamped a tin ceiling, do ya paint em’, any ideas?
-
Karen @ The Quaint Cottage says:Sep 2, 2011 at 9:11 am
I love this!!! I was actually looking at these last week at the store. I’m going to use it in the upstairs hallway now that I know it looks that good. Thanks for sharing.
-
Priscilla says:Sep 2, 2011 at 10:17 am
do you have any tips for a sheetrock ceiling? install over? remove?
-
-
Laura says:Sep 2, 2011 at 3:07 pm
Love this! Going to use this idea too. Seriously, your blog is a gold mine! My all-time favorite!
I’m curious as to why you went in the same direction as the old planks. I thought that when resurfacing, you went in the opposite direction ?? Or is it that you just go in the opposite direction of the joists (which in this case would be the same as the old planks)? -
Shirley says:Sep 2, 2011 at 3:22 pm
This one of the reasons I appreciate your blog. You both are so creative and money conscious. We have an older home (100+) and while the main rooms have beautiful wood & character, the bedrooms are lacking a little. It takes a little more creative thinking to renovate when budget is part of your vocabulary. Thank you for sharing your fabulous ideas! I cannot wait to try on our playroom ceiling!
-
Kathy says:Sep 5, 2011 at 7:07 am
After a month of climbing ladders we just finished hanging the same product on our main room ceiling. We looooove how it looks! With some white paint and trim it goes a long way to making our house the little beach cottage we envision. Thanks for showing us your project!
-
Layla says:Sep 5, 2011 at 7:56 am
Yay! So glad to hear you’re happy with the finished product!
Did you hang it over a wood or drywall ceiling…or perhaps a popcorn ceiling? Inquiring minds want to know!
-
Kathy says:Sep 5, 2011 at 8:17 am
We hung it over a yucky popcorn ceiling. We started by finding the joists in the ceiling and screwing furring strips into them. That way we could use the pneumatic finished nail gun to hang the actual boards.
We have also used this product in our bathrooms, on the walls this time, to hide damaged drywall. It works if you hang it vertical and horizontal, because I cannot ever do anything the same twice! K
-
-
-
traci says:Sep 6, 2011 at 3:36 pm
Layla!
I love those wood planks. I am wanting to cover the walls in our new addition with wood, but hubby says we cannot afford it. Do you think those planks would look good on my walls?
Do have any other suggestions for inexpensive ways to cover walls with wood?
Also, I would love to get some old gymnasium wood flooring like you did in your guest room. Do you know where I could get some? And was it really expensive?
Okay, no more questions. I promise.
Love you!
Traci-
Layla says:Sep 6, 2011 at 9:21 pm
Hey Traci!
Those planks would definitely look good on walls! I think that’s actually what they’re made for!

As for the reclaimed gym flooring- click on the Our House tab at the top of our blog and it’ll take you over to the post we did about the reading room. You’ll find a link to Southern Accents there…that’s where we got the gym flooring!Love you!
-
-
Claire from HandmadebyClaireBear says:Sep 26, 2011 at 4:59 am
Your ceiling looks so much better, I can tell it’s going to look great when it’s finished. Well done for sticking with it.
I love your blog, I find you inspire me to get household fixing finished (I’m terrible for starting and then getting distracted, or tired), I’ve got some tiling in my kitchen that’s been half-done for (ahem) years. I’m going to finish it today (no, seriously, today).
love Claire from HandmadebyClaireBear.com -
The OutPost says:Oct 3, 2011 at 9:15 pm
OMG I have been looking for this post for days. I remember reading it but could not remember where. Long story short. We have 2 bathrooms and laundry room that the ceilings are a disaster and since we are remodeling the whole house and on wk 20, I am running out of steam. I was telling my husband about this wood for our ceilings and now I found the post and showed it to him. It is a go. wood plank ceilings..
Thank you . -
The OutPost says:Oct 7, 2011 at 10:12 pm
Loved your ceiling so we went to Lowes tonight and bought the wood to do our disaster ceilings. We got a great deal. some of the packs were opened and had a few chips down the side. They marked 5 packs down to $5 a pack and the other 11 packs they marked down to a $1 a pack. I could not believe our luck. looking forward to installing and thanks again for a wonderful idea..
-
Tina says:Oct 10, 2011 at 7:39 pm
Hi! I loved reading this post. I found this blog about two months ago and sat here to read all the posts I missed. It was like reading a book and I so enjoyed it. Now I’m all caught up and following you guys around in your cool journey. I really, really would like to know more about what looks like a screen door in the dining room. I want to put one between our kitchen and sunroom which use to be part of the porch. We always had a screen door growing up and I loved them. I have one on my back door but thought it would be cool having one going into the kitchen. So is the door in the dining room photo a screen door? Thanks! Tina
-
Erin says:Oct 25, 2011 at 9:35 am
What type of nail gun do you use and size of nails? We are about to attempt this project and want to make sure it goes smooth. We have a brad nailer but I don’t think this will be heavy duty enough?
Thanks for all your amazing ideas!
-
Kevin says:Oct 25, 2011 at 11:38 am
Hi Erin!
We used an 18 gauge brad nailer with 1 1/4″ brad nails (32mm) we were shooting into a wood ceiling and it held wonderfully!
Thanks for the comment!
-
-
Wanda says:Nov 8, 2011 at 7:06 am
I saw this on Traci’s blog and now on your blog (which I LOVE)!! I am wondering if I could do this in our kitchen that has an oval tray ceiling above the breakfast nook. I’m just trying to figure out how I would finish out the oval area. If it was rectangle I would have a clue but oval…I don’t know! You guys have such creative brains I know you would come up with something….LOL
-
Rhonda Vaudt1 says:Dec 5, 2011 at 3:48 pm
I just know found your blog and now I know what I am going to do in the future to our little place on the lake! Love that you took the wallboard down to the studs, love the look!
-
Lindsay says:Jan 17, 2012 at 2:17 pm
This is great!! Thanks for the product recommendation. I’ve been wanting to do this in our “dining room,” which is really an L-shaped enclosed porch/sunroom. In ours, I would miter the corner of the “L.” Does that make sense? Here’s my question though (maybe you can help):
I hate the placement of the light fixtures in that room (they’re not centered, etc.) I was thinking that by covering the ceiling, it would give me the opportunity to move the fixtures where I want them without having to actually move the junction boxes. Could I somehow leave the boxes where they are and just run the wiring behind the new ceiling planks? Do you know anything about this?…. Or should I just call an electrician when the time comes?
Thanks. -
Tracy says:Jan 19, 2012 at 11:27 am
This is fabulous, thanks for posting it! I’m dying to tear the drywall ceiling down in my kitchen, but hubby is skeered of what kind of mess might be above it. This would ease his worry!
-
Brandi says:Mar 2, 2012 at 11:38 am
Can the planks be stained? I want to do something like that in my kitchen but I wanted to do a warm honey wood.
-
Sharon Glanville of BeBetsy says:Mar 6, 2012 at 11:47 am
My husband and I are always doing projects around the house. I really love all of the great pictures on your post showing exactly what you have done. The ceiling turned out wonderful and it makes all the difference in the room. Thanks for sharing and we will both be checking back to see what else you guys are up to. Always looking for ideas! Sharon
-
Sandy says:Mar 28, 2012 at 8:17 am
I looked for these at Lowes and they have been discontinued, boo!(at least at our Lowes) Double boo!!
-
Nicole Beverly says:Oct 21, 2012 at 8:46 pm
Did you find another soloution? I’m not finding them at our Lowes either!
-
-
Ann H says:May 13, 2012 at 6:13 am
Do you think this product would work as flooring in a bedroom or would it be too thin?
-
Kaye Chastain says:Jun 6, 2012 at 10:34 am
Layla, you two are amazing! And you are so blessed to have a husband who is just as enthusiastic as you are about getting things done! Mine enjoys it to an extent, but then the golf course beckons, and he is gone! **sigh** The tip about the paint drips on the ceiling planks is awesome. No one else is going to tell you something like that, even the manufacturer. It’s called “Life Experience 101″!
-
Sandra says:Jun 7, 2012 at 6:30 pm
I love your site! I’ve been thinking about what to with my ugly “stucco’ed” ceiling in the kitchen since I bought my house 12 years ago. (I suspect there was a bathroom leak upstairs–and hey, why fix a problem when you can just slap a bunch of junk over it?) I’ve always wanted a “beadboard” ceiling but couldn’t figure out how I’d install it. This looks a manageable solution! Looking forward to seeing your finished project.
-
Flower Patch Farmgirl says:Jun 8, 2012 at 8:57 pm
Cory just sent me a link to this post. Ha ha! My man is stalking your blog.
-
Claire says:Jun 11, 2012 at 7:02 pm
You guys have given me the idea to cover my bathroom ceiling AND one wall in my master bath in planks. Then, I could do the floor in large tile, take out the long counter and put in two pedestal sinks and a center built in between the sinks. It would look lovely.
-
Anne says:Jun 21, 2012 at 10:44 pm
I’m planning a coastal rental reno and I think I might have a good option instead of the panel product you used. I really want a wider plank and to avoid the beveled edge, trying for a more rustic look. I order milwork from this company. Check out page 49, they have a lattice that is 1/4″ x 5-1/2″. The thin profile should keep down cost and make installation easier than using regular dimensional lumber.
http://www.mouldingandmillwork.com/pdf/IND6838_Chicago_Profile_Guide.pdf
Hope this helps you or your readers. Your work is very inspiring. Thanks
-
Wendy B. says:Jul 26, 2012 at 11:26 pm
Hi, Layla! Your ceiling posts inspired me to use the same product in our new family room addition. We’ve made it about halfway across the room with the planks and I’m kinda freaked out. I realize it will look better with fresh paint– I only primed before hanging because I figured they would get banged around during all the rest of the construction in there. But it’s the seams that are getting to me. When you look straight down the seams, it’s almost like they are a little wavy. Some of the planks were not in perfect condition so I’m guessing that’s what’s causing it, because we are halfway and it’s still all snapping together ok so I guess we are doing it right. I got back on to check your posts and I noticed you said something about caulking the seams, Will this help that problem. What kind of caulk did you use and did you use wood putty for the knots and nail holes? Any help you have would be greatly appreciated. I talked my husband into this…just don’t want to regret it. Thanks.
-
Layla says:Jul 27, 2012 at 9:12 am
Hi Wendy!
I’m not sure why the seams would look wavy, but I will say that caulk hides a multitude of imperfectness! I’d press on!

Just make sure you use a non-cracking, paintable caulk on everything and you’ll be good to go! (We didn’t use wood putty…just the caulk.)
-
-
joan says:Aug 24, 2012 at 9:22 am
I love that you show such creative ways to remodel – on a BUDGET. We are retired and most remodeling is so expensive. Thank you for all your clear instructions (even showing the oops!), while including details like where to buy, brand names and colors, etc. SO helpful. I LOVE your blog and so thankful that I found you.
You are both an inspiration. When can you come over for tea?
~ joan-
Layla says:Aug 24, 2012 at 9:27 am
Thank you so much, Joan!
I just did a bunch of landscaping this morning, so you probably wouldn’t want me to come over right now- ha! #PU #ShowerTime
-
-
Lee Wallace says:Aug 29, 2012 at 4:56 pm
I am so loving this idea. This is soooo beautiful. Great Job. I am so inspired by your ideas on your site. Thank You!
-
Nicole Beverly says:Oct 21, 2012 at 8:45 pm
I have been searching for these planks and can’t seem to find them at Lowes. Do you know if they’ve been discontinued?
-
Layla says:Oct 21, 2012 at 9:32 pm
Hi Nicole! I don’t think they’re discontinued. They’re always on an end cap at our Lowes.
-
-
Heather says:Dec 9, 2012 at 6:52 am
What size nails, how many nails per beam? Can we get some deets on how to actually do this project? Love it, great idea.
-
Layla says:Dec 9, 2012 at 12:11 pm
Hi! We just wing it around these parts. We just used whatever nails came with the gun and just popped em randomly wherever it felt right- ha!
-
-
Angeline says:Mar 16, 2013 at 10:04 pm
We want to do this in our kitchen but have a plaster ceiling. Any ideas?


I bet you are in person just like you write … so fun(ny)!
glad that even the best out there run into intense moments and bad ideas. thanks for sharing.