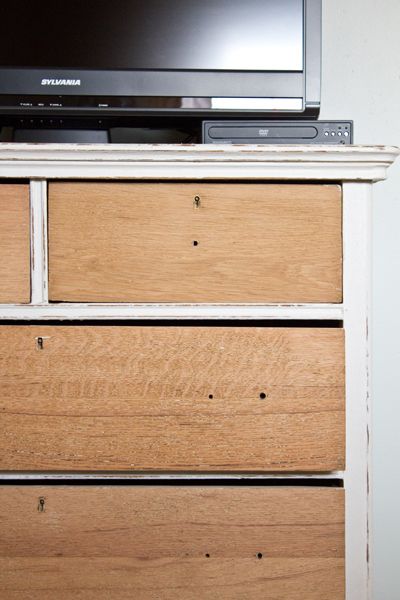
Remember that $40, oh-so-cute, but badly-water-damaged dresser we got at a flea market a while back?

If so, then you probably also remember that we initially took the top part of it off, painted it white, sanded back the drawer fronts for a super-distressed effect and added cute little blue-painted knobs and pulls…

Welllllllll…I saw a really cool $998 dresser on Anthropologie.com the other day and was immediately inspired to give our little flea market find another facelift.
I started by sanding the drawer fronts completely down…
But because they were a bit too “orangey” for our room, I picked up some Monterey Gray-colored stain (Olympic) from Lowes…
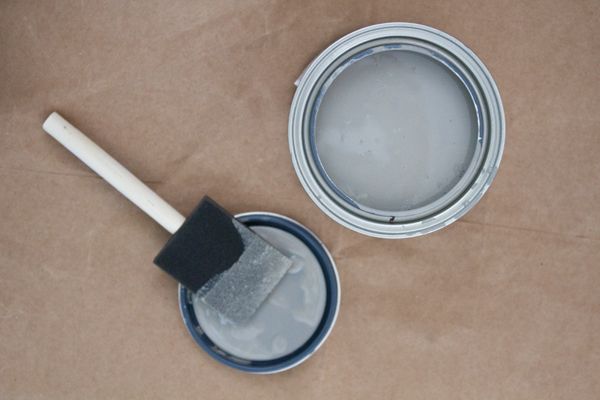
…and mixed a half of a foam brush full of it with a little bit of water in a Frog painters tape container….
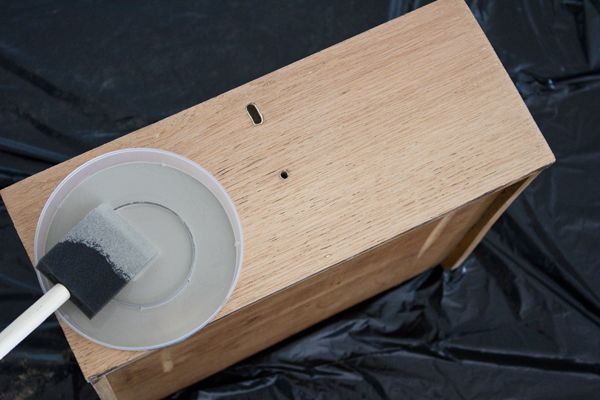
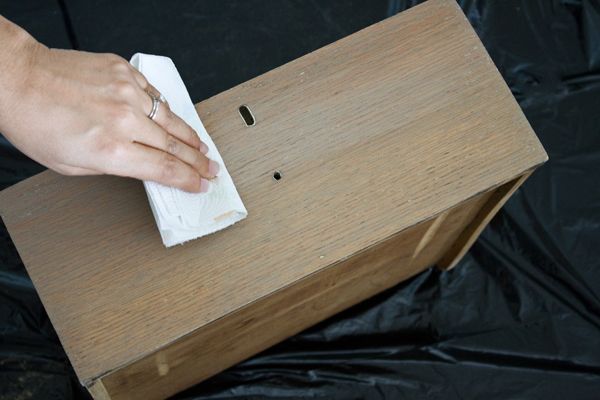
Then I brushed the stain/water mix onto each drawer front in the direction of the grain…
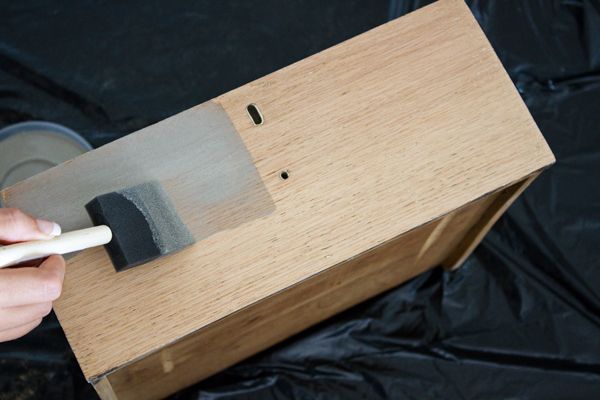
…and let it sit for about 20 seconds. Then I wiped it off with a paper towel (also with the grain)…
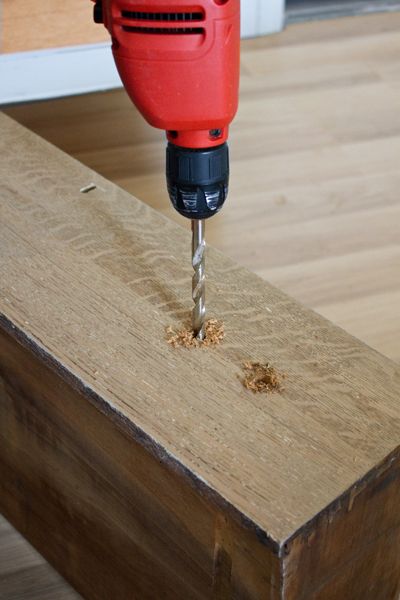
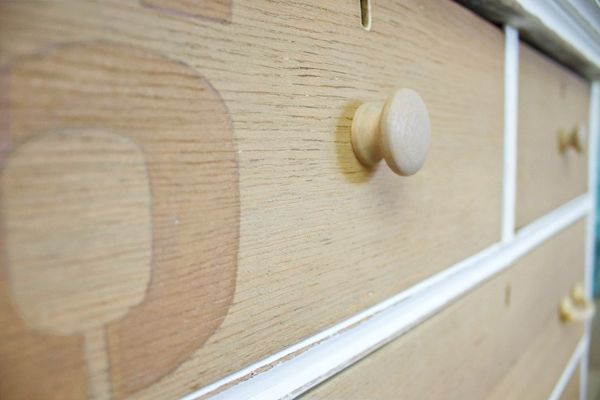
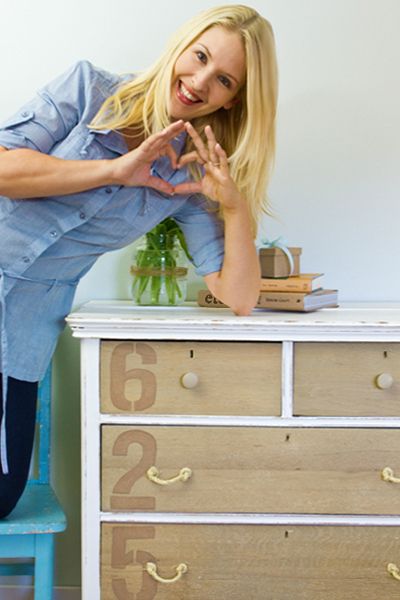
Once the stain was completely dry, I used the largest drill bit I had to route out the drawer pull holes a little more…
(You can really see how much better the gray-stained drawer fronts match the bedroom floor in this shot!)
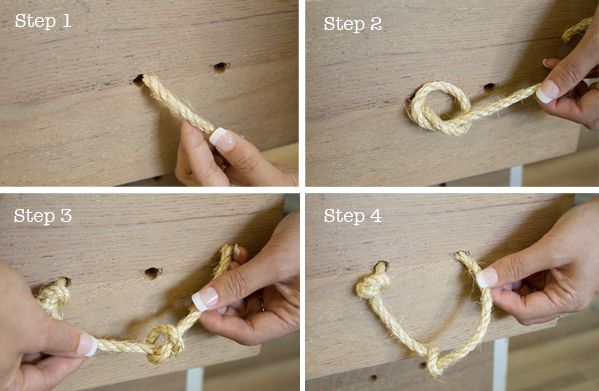
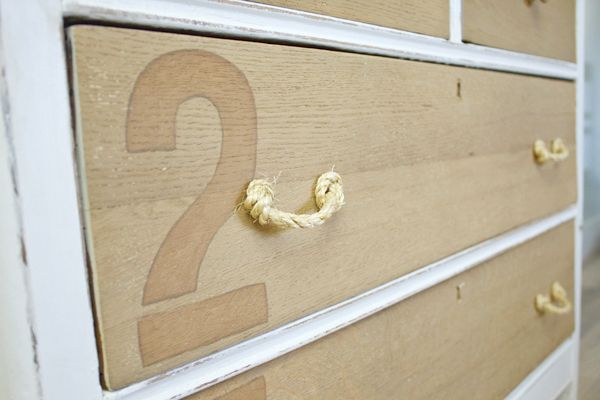
The reason I needed them to be bigger is because I used rope (from Lowes) to create new drawer pulls on the two big drawers…
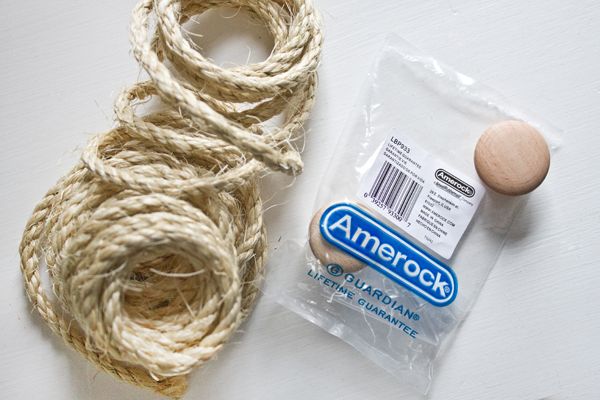
I used plain wood knobs (Lowes), also stained Monterey Gray, on the two smaller drawers up top.
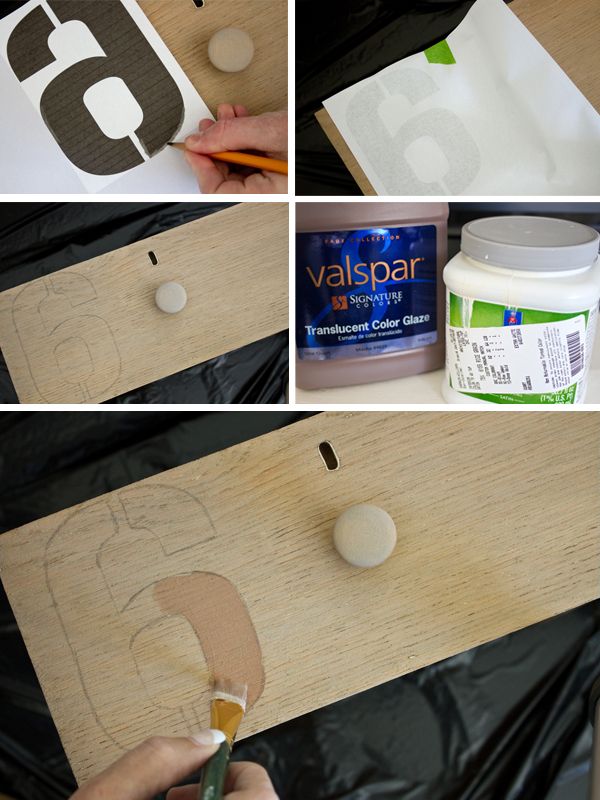
After that, I used Photoshop and a font called Gunplay to print out some numbers for us to choose from…

We tried out a few different combinations, and finally settled on our wedding date. Kev used a pencil and the “rub-lead-on-one-side, then rub-lead-onto-the other-side” method to transfer the numbers onto the left side of three of the drawer fronts. Next, I mixed up a little bit of left-over Rice Grain-colored sample paint (Sherwin Williams) with a little bit of left-over mocha-colored Valspar Translucent Color Glaze to create the color I filled the numbers in with…
Last but not least, I gave all four drawers a quick coating of Deft Clear Wood Sealer (Lowes) and ta da!
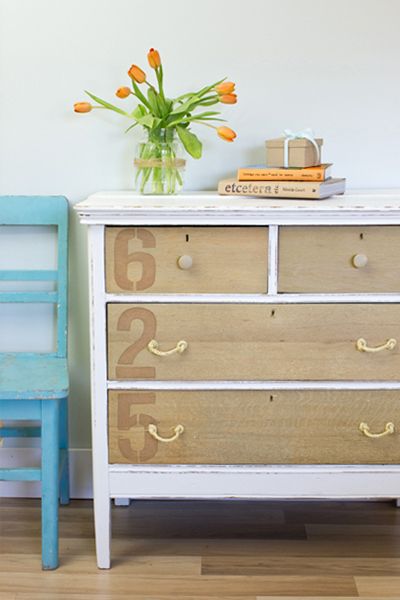
I’m not super confident about arts-n-craftsy kinds of things, so these types of projects tend to really intimidate me. But we’re lovin’ the way it turned out, and since it sits against the wall that’s opposite our bed, it’s been fun to wake up to each morning too.
Hi. I’m Layla and I’m mushy.
Next up, a wall pocket project on the wall space above the dresser. And by “wall pocket”, I mean “niche” (for our TV). But because Kevin gets the willies when I say the word “neesh“, I’m gonna try go with “wall pocket” from now on.


PS-
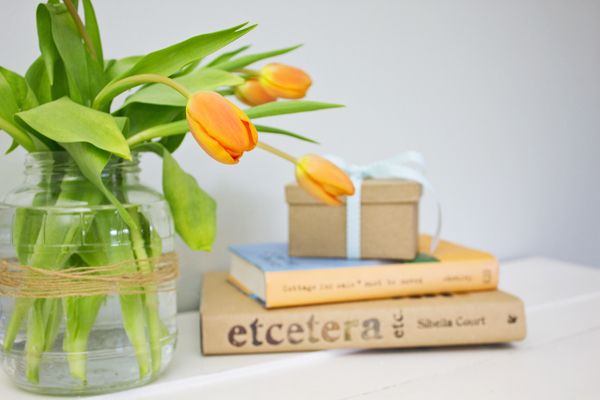
I can’t wait to show you what came inside that little box back there…
Stay tuned!
——————————————————————————————————–
Join us on Twitter or Facebook!


————————————————————————————-
Need help with your living room layout?
Check out my e-book!


LOVE IT. The numbers make it super sweet. 🙂
Love it y’all!! Fabulouso job! I’m totally digging the numbers. 🙂
It’s beatiful! I love how you keep reinventing the dresser.
I love how you re – refinished the dresser Layla! It looks fabulous! I’m looking for a similar style that I can refinish for my foyer. I love the numbers!
I LOVE it! That is an awesome improvement and very creative. 🙂 Is that a new shirt from Target? I think I tried it on today. 😀
Nope. I think I got it at Rue 21 (or something like that) a while back. 🙂
Darlin’ how on EARTH can you not feel confident about your crafty abilities?! You blow my mind on a regular basis, and if I had a “I’m a Layla groupie” tee shirt, I would wear it! You rock the craft department my friend. The entire thing turned out gorgeous. Thank you so much for sharing the whole process with us!! Love it!
Blessings,
Sasha
Love YOU. 🙂
Off to make a “Lemonade Makin’ Mama Groupie” shirt now….
It looks *fabulous*! I am so glad you tried the rope for the pulls! And here I was thinkin’ you thought I was totally cRaZy when we talked about that this past summer! ;o) I think they look fan-tas-tic!!!
Love those special numbers, too!
You always amaze, me Miss Layla. Your talent has no end!
Happy week to you!
Mary
How cute are you?! Love the dresser and the anniversary date…I use our “numbers” for everything. Best day ever – right?!
I’ve spied that dresser at Anthro you’re referring to and it always leaves me longing. Layla I love your take on it. It turned out super fabulous. And I completely adored how you personalized it with your wedding date. Guess I’m a little mushy too..
oxox
Jennifer
What a great find in that dresser! I am loving the mirror part and wonder if you have any plans for it?
bee blessed
mary
ELLLLLLLLLLLLLL!
I’m in love.
Way better than that podunk anthro job! 🙂
You are a genius. Are you tired of me saying it? No?
You are a genius.
And those tulips + the twine + the aqua chair = perfection.
Cute! I like the tone on tone of the numbers. Everyone seems to be doing dark numbers. This is a nice change.
So cute!! Love it you mushy gal!
Your project turned out way better than the Anthropologie inspiration! I’m digging the gray-stained drawers, translucent numbers, and rope pulls. Very beachy… or maybe it’s seashore-chic? Either way, I love it!!
I like yours much better than the Anthropologie one! Great job!
I am in LOVE!! I’m totally going to try doing something similar to my son’s dresser! Love, love, love. Thanks for sharing!
I LOVE it now! It was cute before but it is awesome now! Can’t wait to see what is in the box.
This is a MOST EXCELLENT dresser post! 😉
How stinking adorable is that? I love it! You make it seem super easy to do, as well!
Layla, love how the dresser turned out. I especially love the numbers and the rope drawer pulls. Such a clever idea!!! Love & blessings from NC!
Very beachy, reminds me of our trips to Florida.
So stylish. Great job.
Mary Ann
Oh, I love it! I think it looks even better now.
layla.. i honestly love your dresser BETTER than your inspiration!! really.. REALLY great job!!!
I LOVE it!! What a great makeover 🙂
love it love it…..
Love this transformation of the dresser! I’m totally going to remember that font one day when I number my stairs. Do you think you can post a template??
totally love it great job…
Subtle and gorgeous!!
That’s really fantastic.
Layla, it is too cute. The numbers make it so special…and so romantic! I love your blog! You and Kevin are so adorable, and I enjoy reading about a young couple starting a family together. My DH (dear husband) and I are still totally in love and mushy after almost 23 years of marriage. Our 18 year old daughter says that our mushiness has given her an eye twitch 😀
Seriously!!! That couldn’t be any more awesome! I love it! 🙂
Nice job, Layla! I especially love the rope “knobs”.
You are so good at making everything in a room go well together where I seem to have a mismash going on!
Looks fabulous! Love the numbers, very charming 🙂
Ooooo, nice! You’re super talented!!! My girls have a nice dresser that’s in need of a makeover it still has nursery theme paint job and the oldest is 12! I think I could handle this (and then keep it for myself!) ☺
This is adorable! I’m going to be getting married soon and we have to get all new furniture-this is an awesome idea!
Ok, I know we’re all drooling over the dresser…it’s beautiful! BUT… what really caught my eye was the simplicity of the “vase” of tulips! Totally going to steal that one. Thanks!
Layla, I absolutely love the way your little crafty project turned out! It looks beautiful. I bet it is a fun piece to wake up to in the morning. 🙂
Great job, girl!
xoxo
LOVE it!! So cute! And I espescially love the numbers…. our wedding date is 6/2/2007! I’m inspired – gotta go search craigslist for something to paint! : )
Layla,
Love that you’ve incorporated your anniversary on a piece in your bedroom. Love the dresser more with your second refinish. The color, personalization and rope handles — now it looks “LAYLAIZED!”
Your Friend,
Deborah
I have to do this project somewhere! I LOVE LOVE LOVE it!!!!!
The end result looks amazing. I am so impressed.
LOVE your site – I am totally addicted and completely inspired!
If you want your tulips to stand upright in the vase, drop a penny in the water. Not sure why it works, but I have some tulips on my kitchen window sill that have been there for a week and they are still standing tall.
Yep. Totally perfect. I’m looking for something to number these days. Love it!!
xoxo
shaunna 🙂
i’ve adored dressers with numbered drawers for sooo long. thanks for the “how to”.
it looks great!
LOVE the numbers and the meaning! Please tell me that your retainer is in that boc 😉 HA!
Nope. I would love to get one of those too, though! 🙂
Layla
What a wonderful look! The numbers are GREAT!
I love it! I actually really liked the “before” (not the before before, but the before after you’d sanded and distressed it) so I was surprised when you were going to redo it again (if it ain’t broke…). Anyway, I LOVE the new “after”! It’s amazing because with the new treatment and rope handles, it doesn’t even look antique anymore. It looks totally modern. What a great way to completely transform your piece! Can’t wait to see the “wall pocket” 🙂
Anyone who would pay $998 for that from *A* needs a good kick in the head. I think yours is really much better. I’m giving you a 9.5 on the 1-10 scale!!!!!
I have had my eye on the Ordinal Dresser for a while now. I have thought about redoing it with one of the ikea unfinished nightables, but I like your weathered look better. Great job! By the way, we are 6-24!
Cool! We’re 6-25-2004. What year were you married?
Layla
Great project, but please lose the fingernails. You are too pretty and down-to-earth for that fussy look. No anthropologie model would be sporting a french manicure.
Hey Julie,
Truth be told, I had them put on for a special event I went to- but only the thumb and pinky nails were still hangin’ on by the end of this post! LOL!
I sort of like ripping them off as much as I like getting them put on! 😀
Layla