Remember this guy?
.jpg)
We started blogging about it here, and today I’m going to cover the second half of our first True Value project. We used an frosted glass kit (the material comes on a roll) on the insides of both pieces of plexiglass. You can’t see through it at all, so it gives 100% privacy while still allowing the light from the bathroom to shine through into the hallway. It’s a really pretty effect at night! After that, I mitered some decorative wood molding and attached it to the plexi using epoxy, and filled in all the gaps with stainable/paintable wood filler.

Here’s a close up of the wood filler after it had dried…

It’s amazing how it has the ability to make the molding look like it was always a part of the door. (And hide all my imperfect cuts. Shhh!) The door knob was preventing the door from laying flat while the epoxy dried, so I set it on top of four paint cans.

The next thing I did was tape off the door knob and plexiglass…


I was so proud of my tape job on the knob I actually made Layla come outside and have a look-see. I probably took 7 or 8 pictures of this bad boy, but she thought it would be a little excessive to post more than one. 🙂
After the tape was in place it was prime time! I used some gray-tinted primer that we had left over from a previous project.

Finally, I painted the door Benjamin Moore’s “Fieldstone”. Once it was dry, Layla came out and distressed some of the edges with her little electric sander…

We picked up some water-based Polycrylic the last time we were at True Value. I gave the door a coat to seal and protect it.

We could hardly wait to get it into the house and on the guest bathroom doorway. It’s been really uncomfortable for our guests to go to the bathroom for the past few weeks, so we were eager to give them their privacy back.

(I kid, I kid!)
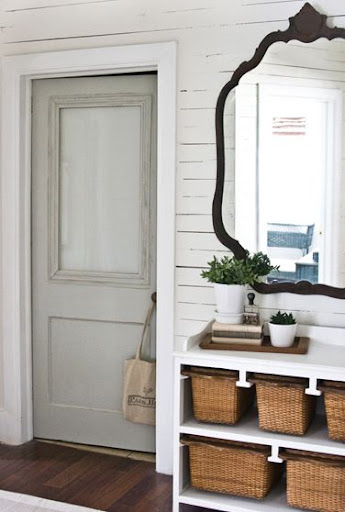
Here it is today, happily hanging in the hallway…

We changed out the mirror over the linen press with one that we were previously using in the kitchen. We like the way its curves contrast with the straight lines of the wood planks on the wall behind it.

Move your cursor back and forth over the image below to see the before and after…
We did a different technique on the inside of the bathroom door, which we’ll blog about as we start to renovate the guest bathroom. We’re super pleased with how our first True Value project turned out and can’t believe we almost threw this old beauty away at one point. Silly wabbits!
We’re gearing up for our 2009 Halloweenie Roast this Friday. It’s a costume party and we’ll be counting on you guys to choose a winner next week. Even though Layla and I aren’t eligible to win the prize because we’re hosting the contest, that didn’t stop us from really getting into picking out our costumes! We look forward to taking los of pics to capture all the craziness. It should be a blast and we’re really looking forward to hanging out with our friends!
Have a great Halloween week,
Kevin
—————————————————————————————————
We are one of five bloggers selected by True Value to work on their DIY Blog Squad. We have been compensated for our time commitment to the program, as well as our posts about our experiences. We have also been compensated for the materials needed for our DIY projects. However, our opinions are entirely our own and we have not been paid to publish positive comments.

That has to be the best taped door knob job I’ve ever seen! 😉
Great project…they always are, of course!
Your bathroom door project is a great inspiration to me. We just bought an older house (circa 1965) that has already had a lot of renovations, but there is this intersting door very similar to your door standing outside, leaning against our shed. It already has the glass intact, and tons of character. (I haven’t taken a picture yet) I’ve been scheming about ways to use this door in the house to bring back some of the old with the new. I will let you know what develops…thanks for the ideas!! Glad to see I’m not crazy to want to use this old door!!
This is great, but I want to see the beginning and the link isn’t working, and I can’t find it on a search. I want to do this to cabinet doors. I’m hoping it wouldn’t be much different, but it’s the taking the wood panel out and putting glass or plexiglass in that I’m worried about. Thanks!
I LOVE IT! what a door! I was wondering what you did to your wall next to it? It’s looks like wood but I can’t be sure, but either way I’ve got to have it! Could you please tell me how to do it?
Wow, amazing transformation ! This is very inspiring ! The taped doorknob is very well done and I was just wondering if you have ever tried aluminum foil instead? I use it for all of my work on doors and it is really simple and works great! just thought I would let you know ! Keep up the good work!
Hey Kevin & Layla
I love your blog design, it looks great, I am an interior designer but when it comes to my blog I look like I have no clue about design at all!! How do you import your own fonts and get such a great layout? any forums or articles you can recommend?? I love your tutorials on ‘How to@ they are perfectly laid out and make it seem so simple!! Will be adding you to my blogroll, thank you for the inspiration! Helen 🙂 X
The door looks great! Where did you find your storage container with the slide out baskets?