Hi!
Remember those mismatched nesting tables I blogged about last week? In that post, I shared that I had decided to separate our black metal nesting tables because I wanted to use a taller, wood table with the one of them, and find another smaller table to go with the other one.

Well, I found the perfect little “table” to use with the other one this weekend.

It’s a stool we’ve had for several years, and it’s been sitting beneath a stack of towels in our master bathroom since we moved into this house. I got it at a flea market when we lived in Prattville, and I painted the number 5 onto the top of it with craft paint. It was covered in milk chocolate-colored paint when I got it, but I sanded most of it off and finished it with some kind of sealer. It’s the perfect size, and I love that it’s the same wood tone as the table I brought home last week.

We’re having company tomorrow afternoon, so I wanted to put something pretty on top of the metal table above it. I was inspired by this picture from my Friday post about Kelley’s cottage, and thought it would be a fun project to try to re-create:

I started with this little bushel basket from Michaels (sale price- $2.99):

I removed every other strip of wood with an Exacto knife. The strips are very thin, so you really only have to score the pieces you want to remove, and then they snap out really easily.
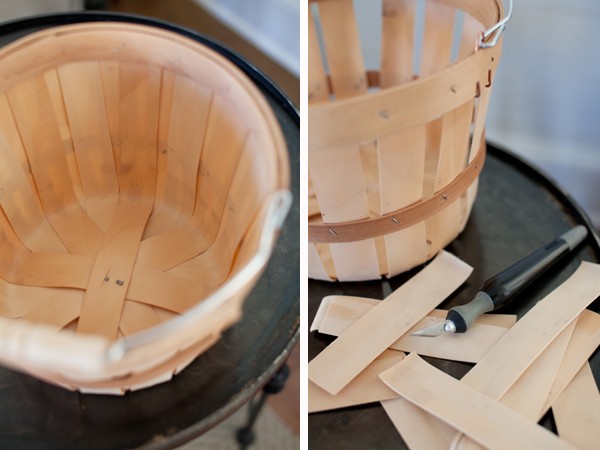
After that, I stained the handle and outside of the basket with some (Farmhouse Paint) tea stain antiquing gel, and painted the inside of it with some leftover Heather Gray paint.

Lastly, I dry-brushed some more Heather Gray paint onto the outside of the basket.

It was a quick and easy project, and when my Keepsake azaleas kick the bucket bushel basket, I’ll find a house plant to set inside of it.
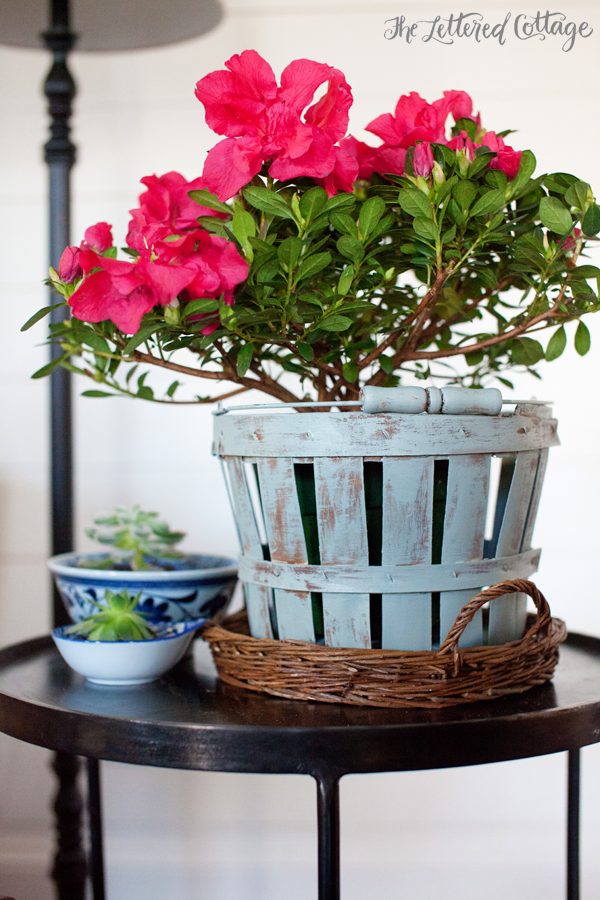
Can you tell I’m already excited for Spring? 🙂


Love these ideas so much….
can you show a pic. of both table like you did in the 1st. pic of the other tables. i hope the azaleas don’t kick the bushel basket. they are so pretty. i can not wait for spring it is so cold where i live.
So cute. Sure does brighten up a cold winter day. Are the succulents live?
Yes. I got them in early December and have loved having them around! 🙂
How did you even know these little slats would even come out???
I swear, I need to start being so timid withmy crafts!
I positively love this, Layla!!!
Thanks
Hi Ter’e! The wood felt very thin, so I figured it wouldn’t be too hard to break it apart. 🙂
OOPSIE!!!
That’s STOP being so timid!!!
I have a spot for this idea! Bring on spring. Burr!
Great idea with the basket I have one in my basement to revamp….one more project to add to my list.
Ann
Just plain LOVE THIS! Thanks for the inspiration!
Thank you, Linda! 😀
I love that basket..I already had a trip to Michaels planned for today now I’m adding the basket to my list..I’m not familiar with that brand of stain..can you please share where it’s sold? Thank you.
Sharon
I got it from a friend of mine, Sharon. I bet if you Google it you can find a dealer located in your area. It is SO fun and easy to work with!
blows my mind how creative you are! love it.
question…can you see in your mind how the projects will turn out or do you just think, “i could maybe take out this here and paint that there” while hoping for the best?
Answer: I could maybe take out this here and paint that there, while hoping for the best. 😀 LOL!
You’re gonna cause a run on Michael’s for baskets.
Ha! I’m glad you liked the project, Sandy. It was fun to work on! 🙂
Have to say my eyes go right to that pretty kitty with the perfectly crossed legs and curled tail. Great picture catch!!!
Super cute and super easy! I have some plants that could use some new containers. Might have to try this!
I love this! Such a great idea! I think when my poinsettia on my hearth kicks it I’m going to have to do something like this too!
Layla –
Gorgeous, but how do you “dry brush” paint?
Thanks,
Amy
I LOVE this idea Layla! So cute! You are such a smarty pants . . . Thank goodness for you! XO
Great little projects! I love that stool idea perfect for your space and goes with the other table nicely!
That’s a great basket project that I may try myself. Such bright and inviting colors to bring a spring into your step 🙂
That stool is so darn cute! I love the numbered thing that everyone does… I have tons of things with numbers on them in my own home and a friend one day asked me what they mean. She said “Are you somehow counting all the things you own?” She has such a quirky brain… now numbered things always remind me of her!
Either way I think your stool works perfectly in a space.. and isn’t it so much fun when something we own works for a project? It’s like it finally found it’s spot.
Oh, that looks like a fun project! I happened upon a rustic sign the other day that said, “I love you a bushel and a peck.” Seems like you could do a version of it to snuggle up with your newly created bushel basket! Thanks for your creativity and heart-felt blogs. You had me hooked at “Hope Heals.” What a way to kick-off the new year!