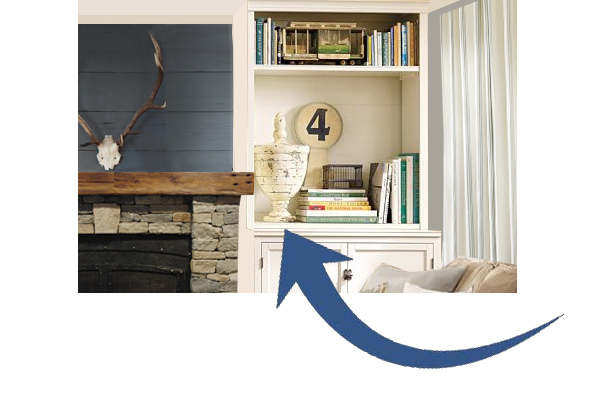
We’ve still got a few construction projects to complete over at our friend Keith’s house, but I got a little antsy for accessories, and decided to create a sculpture *sort of* like the one sitting to the left of the number “4” in my inspiration photo:

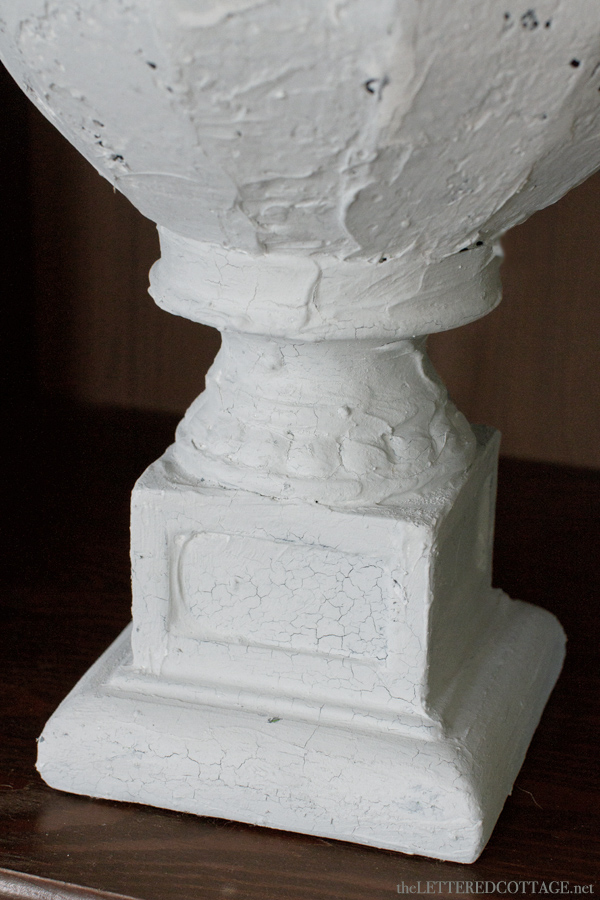
I started with a lime green piece of decor that was marked 50% off at Hobby Lobby. First, I covered it with black paint and joint compound I had left over from other projects. I used a small plastic putty knife and my fingers to apply the joint compound because I wanted it to look old, and sort of like clay or concrete. I didn’t try to be neat…I just slopped it on there!

After it was dry, I painted on some “Grain Sack” colored milk paint I got from my friend Marian (Miss Mustard Seed)…

…and when that was dry, I used a sanding block to reveal some of the (lighter-colored) joint compound underneath.

I love how some of the holes in the metal part underneath are still showing, and the way the milk paint created a crackled effect in different places while it was drying.
Here’s the finished piece:
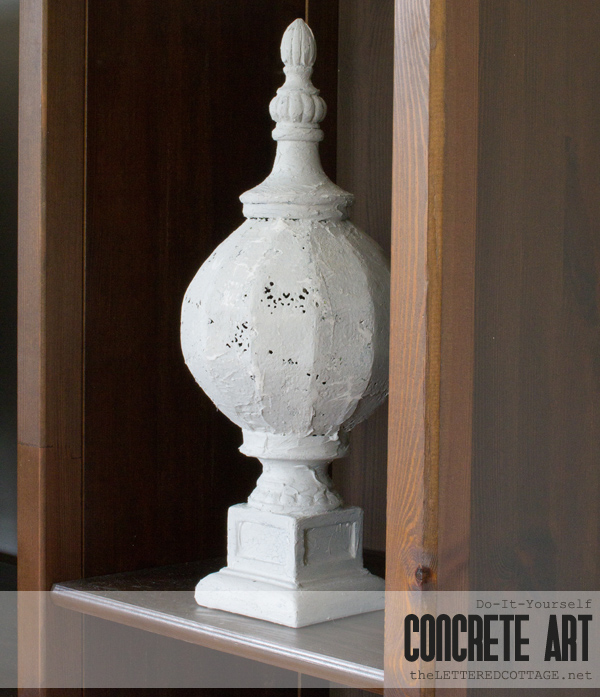
It was a fun little thing to work on, and I think it’ll fit right into Keith’s soon-to-be decked out bookshelves!

PS- To check out all of my Keith-related posts, click here: Keith’s Living Room Makeover…and for more makeover pics between posts, join us over on Twitter, Facebook and/or Instagram!


Wow! What an awesome technique! Such a great idea Layla! I’m sure Keith will love it! 🙂
You are one crafty lady! Can’t wait to see the finished product!!
Pretty nifty! I love that you achieved the look of concrete without the weight! Might have to try this awesome little project. 🙂
wow. really looks like concrete!
Wow, Layla! You really have an eye for recreating and making unique pieces. Now Keith will have a one of a kind piece created by you. Thanks for sharing the process with us.
Thanks, Dawn! 🙂 I hope he likes it, too!
I purchased a concrete planter and as we were placing it on the porch, it dropped and broke. Is there anyway that you know of to repair, “glue” it back together? It was stained a lovely light sage green and had cute rabbits all the way around. I’m so sad it broke…
Hmmm…I’m not sure about repairing concrete, Glenda. 🙁 I would check at the hardware store for some kind of heavy duty adhesive. Maybe Liquid Nails?
One of the cherubs on my cement fountain lost it’s head this past winter. Believe it or not…my DH repaired it using some high contact gasket sealer. It’s been fine all summer with water running over it. They do make some cement sealers though and you should be able to find some at any hardware store. I hope you can save your cute little pot!
Gasket sealer- good to know! Thanks, Rose! 😀
Way to repurpose! That looks pretty darn close to the inspiration pic – love it!
Layla, I love how this piece turned out! And now I know just what to do with that pair of old lamps I got from the thrift store 🙂 Thanks for the how-to!
You’re welcome, Rose! I love the idea of using this technique on lamps! 😀
First close up pic ( under the pic of milk paint pakage) I see a little heart on the “thingy” do you? Or is I my old eyes seeing things.
Yep. 🙂 I was wondering if anyone would see that, too! I used the tip of a pen to create that little guy. 😉
Wow! You did an amazing job on the transformation. I’ll start noticing those brightly-colored pieces more often when I’m at Hobby Lobby from now on.
So fun seeing you at Las Casitas the other day, Marsha! 😀
I love it! It’s a great way to take something found on sale and turn it into something beautiful! I need to try this!
Happy summer to you guys!
~Kim
Thanks, Kim! Always fun to see you pop up here! 😀
What a fantastic way to create that inspiration piece, for LESS! -and, Missmustardseed milk paint is my FAVORITE! Thanks for sharing!
I am fully impressed! I wish I had your mind sometimes.
Layla, That’s just stinkin awesome. Your brain amazes me.
c
i bet years down the road this ends up at antique roadshow! It’s that awesome.
I recently discovered Miss Mustard Seed and love her new color of paint, Artissimo. Do you recommend her paint?
BTW the finished product came out great.
So creative, Layla! The piece looks amazing – so inspiring how you take a look at photo and re-create items using what you already have. Keith is one lucky guy to have you and Kevin working on his living room!
Well, I would have never thought to do that. It works. It looks wonderful.
I saw Sarita’s lil heart as well. How cool. LOL.
After you mentioned Hobby Lobby, I went to our new one in town. That store is TROUBLE! Now I know, if I love the shape, it does not matter the color or texture. I can “play Layla” and improve that sucker. I love this fully improved piece.
Lucky Lucky Keith.
Oooo…fabulous idea!!
That is a great idea! I love the finished product and the crackled finish. What a cool piece to add to your house!
Brilliant!! Very pottery barn esque!
Wow – this turned out so perfect! I have been seeing Miss Mustard Seed’s Milk Paint popping up everywhere. I think it is time I get my hands on my own!
Great DIY, though. Thanks for showing it off to us!