Meet Kev.

My husband, and the man behind the magical molding in our kitchen.
🙂
———————————————————–
Hello there!
I’m Kevin, and this is my first blog post. Here goes….
Let me start by saying I thoroughly enjoy working on this home. I’m truly inspired by Layla’s never-ending passion and ideas. It has been so much fun watching this place come to life, and it’s so cool to be a part of it.
Alright, let’s talk molding!
This project calls for a lot of miter cuts, which, if your anything like me- means you’ll be running back to the hardware store to buy more wood. It can be a little tricky trying to figure out the angles sometimes. There are online tutorials about how to cut crown molding, but I’m more of a “wing it and pray” kind of guy.
I used this Ryobi compound miter saw. It was the cheapest one in the store, but it always seems to get the job done…

Here are the various pieces of trim, MDF and molding I purchased…


It’s just 1″x6″ pre-primed MDF, some 3″ crown molding, and some small, wood decorative trim molding. All of the cuts had to be made holding the molding at an angle. It took me a minute (and a few pieces of molding) to figure that out!


Here are the cabinets above the stove before I got started…
 …and here is what the cabinet on the left looked like after I attached the first 1″x6″s, and the first piece of crown molding…
 And here it is, all taped in place…
 I wish we had a small nail gun. With all these projects, I think it’s time to invest in one!
 I used a type of caulk that starts out pink, then turns white when it’s dry. Pretty cool!
Caulk can be a real life saver if the corners of the molding don’t meet up perfectly.(Or should I say WHEN the corners of the moulding don’t meet up perfectly!) 🙂
Here is a photo of the kitchen cabinets with all of the new molding in place. That was definitely the hard part. Now on to the fun stuff!
 I used small, decorative wood trim to hide the seam between the cabinet and the 1″x6″. The miters are a lot easier to cut on these little guys, because the trim sits flush to the cabinet, it doesn’t stick out at a 45 degree angle like the crown does.
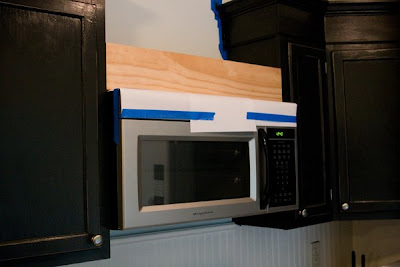
 Next up on my to-do list was to install an above-range microwave. I put up a piece of wood to mount the top of the microwave to.

I simply secured the shelf to the cabinets on either side with L brackets and screws. Pretty easy…
 I had an electrician come over and install a dedicated outlet above the wood shelf for the microwave to plug into. It was a cinch for him to install, and since he was here less than an hour, it didn’t cost that much at all…
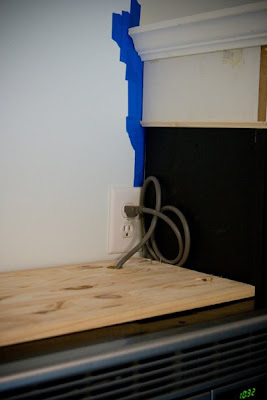
Oh yeah, that reminds me. I say, don’t let the placement of your outlets dictate the placement of your furniture. I used to think the T.V. had to go on whichever wall the cable outlet was on, even if it meant you hated the way your furniture was arranged. For the price of a night out on the town, an outlet can be moved. And all that furniture you worked so hard to get, will finally look/fit right!
Here I am, getting close to the finish line…
 I added a piece of wood above the microwave to give it some extra visual height…and added some more of the little decorative trim and this log scale stick Layla picked up at Eastbrook for good measure! 😉

I painted everything black, distressed the edges, added a coat of polyurethane and put a cool old wine rack, we got for $4.99, on top. Layla isn’t a huge fan of wine racks above microwaves, but I like it, and I’d like it to stay. It even looks cool empty…

There used to be a cabinet hanging where the new microwave is, so I’m going to reuse it by re-hanging it above the refrigerator. Then on the right side of the fridge, there will be another tall, pantry cabinet, like the one on the left side of the fridge. Layla says it will make the fridge look more “built in”, and I’m down with that.
 Layla still needs to add more corbels underneath the upper cabinets I just finished, but for now, it’s 6 o’clock, and I’m going to go see if she wants to kick it on the front porch with me.
One more thing though, before I sign off. I want to thank you all sooo much for all the kind comments you leave here! It truly means the world to my bride. You have all inspired her more than you will ever know. This blog has changed our lives in such a positive way…and it’s because of all of you!!
I had a great time writing this, have an awesome weekend-
Kevin
 P.S. We have plans to change out the refrigerator, the dishwasher (which is broken), and the stove (which is malfunctioning) with stainless steel ones, too.

Dumb question alert. How did you attach the 1×6 to the top of the cabinet?
I tried to see if someone else already asked this question, but could not find the comments for this post. Basically, I’m hopeless. 🙂
Yes, I want to know this too!!! We just painted our cabinets, we’re getting knobs and pulls this next week and I’m ready to add moulding!
Yes PLEASE!!! 🙂
I am sooo excited to do this project too, but I can’t figure out how to attach the 1″x6″ to the top of the cabinets! Are they just sitting up there, like unattached boxes or are they nailed into place or something entirely different???
Help!!!
~Lisa
P.S. Love, Love, Love your blog!!!
I have a nice size kitchen with very little cabinet space.I made a closet into a pantry so all I need is a lil space for dishes.I just got married and received a very nice set of a olive green dish set that I have not opened because my cabinets need a real bad make over.The cabinets over the sink are coming apart from the wall.I know all we would have to do is replace the backs of the cabinet and mount them up properly on the wall.I tried to explain it to my husband <but he understands more when he sees it in writing.I have always loved the idea of cabinets with no doors.I love baskets as well and so I went on a hunt for a idea to bring my vision of what i would love my kitchen to look like.One day I decided to go on my favorite web site and I saw a picture of black cabinets,no doors with baskets.OMG..I was so excited I called my husband at work.I loved the idea of how you made the cabinets look taller with the crown moulding.Plus the step by step instructions were so easy to understand that my mind is set.Soon I will have your kitchen lol.Thank God for your website..
This looks GREAT! If Layla has this vision, she should be helping others do home remodels. spw
You guys are so cute! My boyfriend and I are buying a fixer-upper in a few months and I cannot wait to try out some of your ideas… I am already planning… with an imaginary house with imaginary scenarios for now 🙂
The black you used is EXACTLY what I want for our kitchem cabinets but can’t seem to find. What color, brand, and type of paint did you use? You have no idea how much of a lifesaver this would be! Also…how did you paint them? Did you spray them, use a sponge bruch, ect.? Sorry…it’s a lot of questioms lol…thank you SO much in advance!
Hi there! Thanks so much for the comment, you can find all the answers about the kitchen here: https://theletteredcottage.net/our-house/
We used a grey based primer and brushes. Hope you have a great weekend! 🙂
-Kev
Ahh! Hoooray thank you so much! There comes a point where some projects just aren’t fun anymore and these cabinets have become exactly that. Did you know you can’t put laytex over oil without a primer and that you really can’t purchase oil anymore? We didn’t………and all our cabinets are olive grey oil. Words of wisdom: don’t try to renovate an entire home within the 2 months before Christmas. Used to be called Project Schmidt Move-In but we’ve given it a few other names since then…haha high five guys, you have a beautiful home! Tyler and I will have to send you a picture of the kitchen when it’s done 🙂 thank you again!
Love this! How much time would you say it took you to do this? a weekend? or several days…
So awesome!!! Our kitchen mirrors your “before” pic…which is terribly unfortunate for us. I’ve convinced my fiance to do this project to our cabinets, woohoo! One question…how did you attach the whole shebang to the cabinets themselves? Was that also wood glue or did you nail them in?
Thanks muchly, and I love this website guys, keep it up! It has become one of my favorite internet haunts 🙂
Please send him to my house ! I hate my kitchen and it looks just like your before picture. I would love that ! So jealous !!!
Absolutely brilliant! Kevin, you are not only a master carpenter, you are an amazing writer! Seriously, this is a terrific post that will inspire so many people.
You two are amazing!! You have such a keen eye for what looks good and you know just how to implement your ideas and save so much money in the process!! Really enjoy your website! Keep up the good work and keep impressing us!
We are just preparing to install new kitchen cabinets purchased from Home Depot. We did get the taller cabinets but they are going in a kitchen with a very tall and sloped ceiling. I just saw your post and think this is a great idea and am excited to share it with my husband. You two have great ideas, thanks!
Beautiful! You have given me soooooo many ideas! And, the inspiration! Thank you!
Layla,
I love your blog! My favorite magazine, Cottage Living, is no longer in print and your blog and fb page are just what I needed. I am also from MN and love everything cottage and coastal. I should have been born on the coast and long to live there someday. In the meantime, I’m turning our cozy MN home into my coastal retreat.
I am going to be tackling my own kitchen project this spring/summer. We have 90’s honey oak cabinets, which are in great shape, but I plan on painting them. Unfortunately, our cabinets have a routered-out groove. Should I just leave it and paint it, fill it in, or add narrow strips around the edge to cover the groove and give the doors a shaker look?? Any thoughts??
I LOVE THIS POST! We are currently doing this to our builder grade cabinets. I was wondering, if you remember, what exact settings you set your miter saw to. We have been doing trial and error & haven’t quite figured out the exact angle. Thanks!!
Kevin,
Amazing transformation of your kitchen! You and your wife are amazing! Love your ideas and positive energy for getting things done! Keep blogging!
Jurene
What a huge transformation! I love it! Congratulations
I know this is an old post for you … but it’s a new idea for me. And it gives me an overwhelming amount of hope and motivation that I too can give my builder grade cabinets some style and personality! It feels doable … so every few months I stop by and revisit to remind myself what my kitchen can grow up to be one day ….
Oh, and congrats on your new home purchase. It really looks so charming. And the view looking at the lake makes me think of a Caribbean island.
And I see what you said about the finishings not being what you would have selected. But am excited to see you put your personal stamp on it …
🙂
Linda
As usual ‘I love it’. Been following Layla for a while but hadn’t seen this post yet (cabinet topped with moulding). I would love to try this sometime. Thanks so much for all the projects and inspiration. Wishing you much luck always in everything you do:)