Greetings!
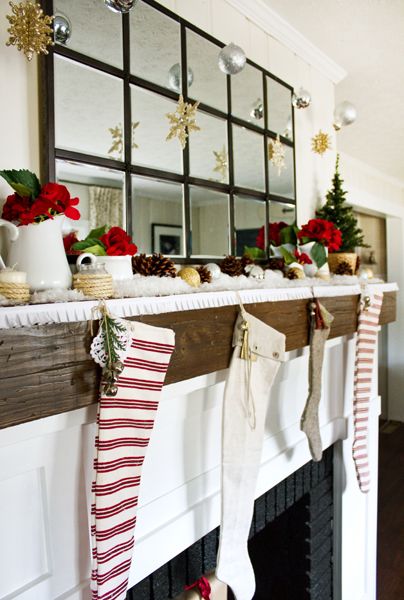
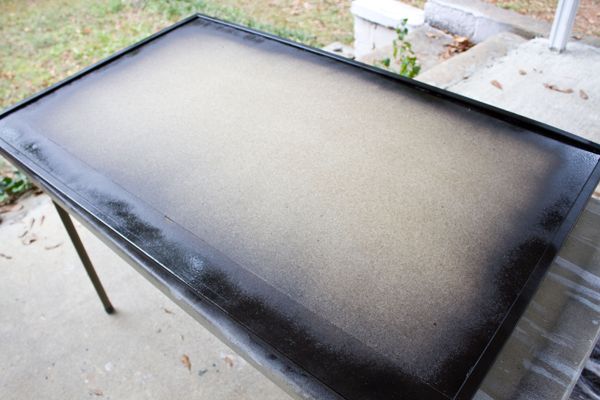
Today we’re gonna attempt to show you how we made the Pottery Barn-style mirror we used on our mantel.
We recorded a short video about it (which you’ll find at the bottom of this post) but before you watch it, I’m gonna walk you through the process using photos & drawings.
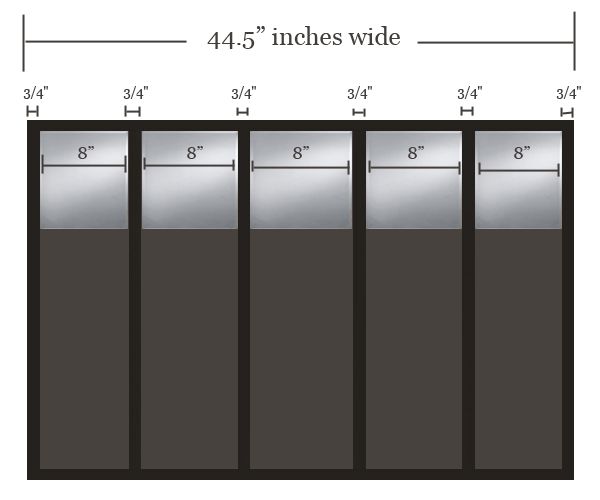
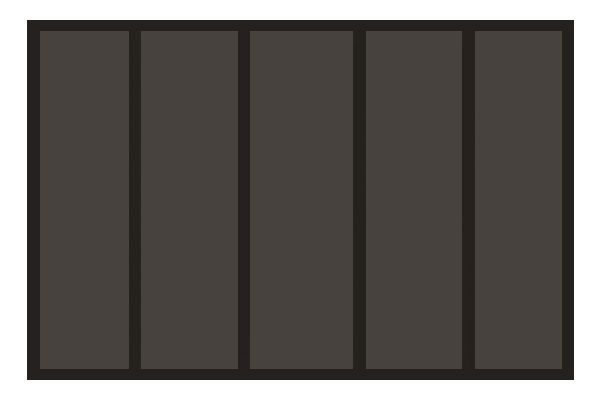
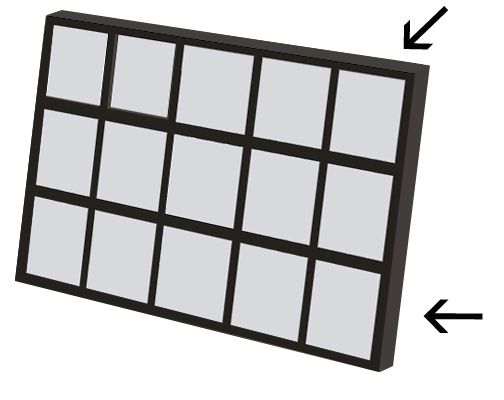
The first thing you’ll need to decide is approximately how big you want your mirror to be. Once you know that, you can shop for your mirror tiles. We got ours at Hobby Lobby, and they measure 8″x8″. They were regularly $3.99 a piece, but we scored all 15 of ours during a 40% off sale. They’re located in the candle section of store because they’re normally used to make tabletop centerpieces.
The next thing you’ll need to decide is what kind of moulding you want to use around the edges, and in between each of your mirrors. We used some plain, 3/4″ wide, wood moulding. The bottom side of it is completely flat, and the top side of it has slightly rounded edges. We bought four, 8′ lengths of it, and that was just the right amount for our mirror.
Once you have your moulding, and your mirror tiles, you’ll need to do some math. (Did I just hear you groan?) To determine the exact width of your mirror, you take the combined width of each mirror tile and each piece of moulding. Sorta like this…
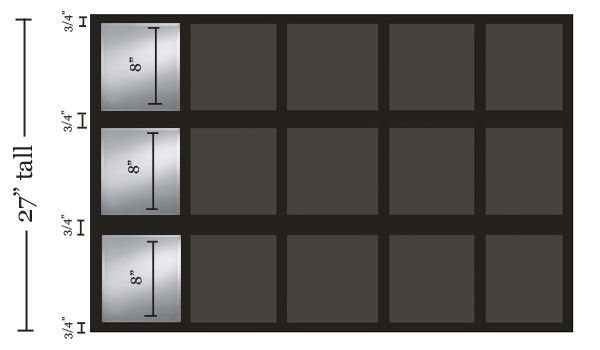
Do the same thing to determine the height.
Once you’ve determined the exact overall size of your mirror, you can decide what type of wood you’d like to use as the back of it. We chose particle board because it was the cheapest option. You can find 2’x4′ pieces of particle board (or any other type of plywood for that matter) at almost any home improvement store.
Since our mirror needed to measure 27″ high, we had to attach an additional piece of particle board to the top of it to make it the right height. Like this…

(PS- For extra stability, we squeezed a line of Liquid Nails between the two pieces of particle board before we added the bracket.)
Once that additional piece was securely attached, we used our circular saw to cut our “newly-sized rectangle” down to be the right size width-wise. (44.5″)
So that we could have the option of hanging the mirror vertically, the next thing we did (and this is a totally optional step, by the way) was add two 1″x4″ pieces of wood to the back side of it. We attached them first with Liquid Nails, and then with 1-1/2″ long wood screws. We did this step at this particular time because I thought it would be easier to add the 1″x4″s, the picture hangers, and the wire before we attached the mirrors to the front side.

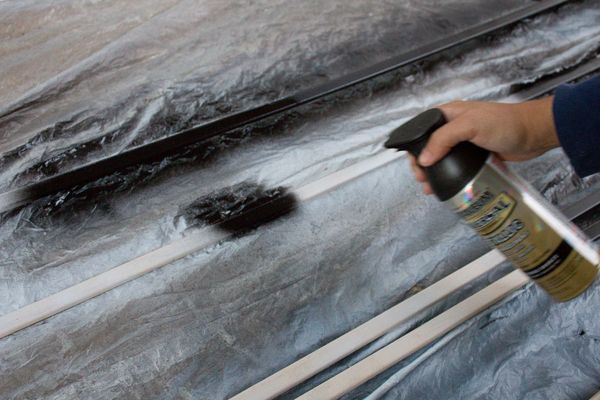
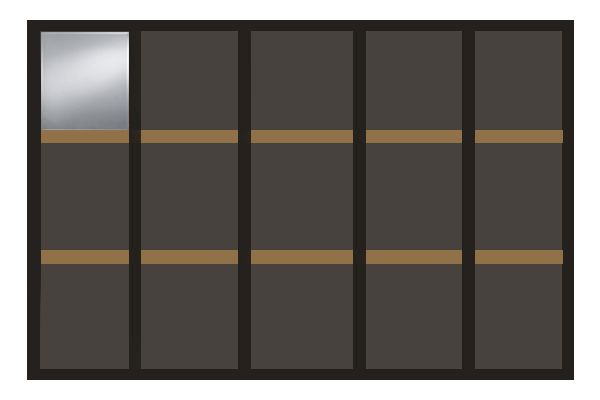
Next, I sprayed all four pieces of the moulding we bought with Rust-o-leum’s “oil-rubbed bronze” spray paint…
Then Kevin mitered the ends of the ones for the edges of our mirror, and I glued them down (with wood glue) and sprayed them with more spray paint…
I actually sprayed the entire front side of it with spray paint, but I stopped taking photos after I snapped that last one, so I don’t have a picture of it.
Here’s a drawing instead…

That last step is an important step, because if your measurements aren’t exactly right, you’ll be able to see raw particle board or plywood in the small gaps between the mirrors and the moulding. Your “mis-measurements” will sort of disappear if everything is all painted oil-rubbed bronze.
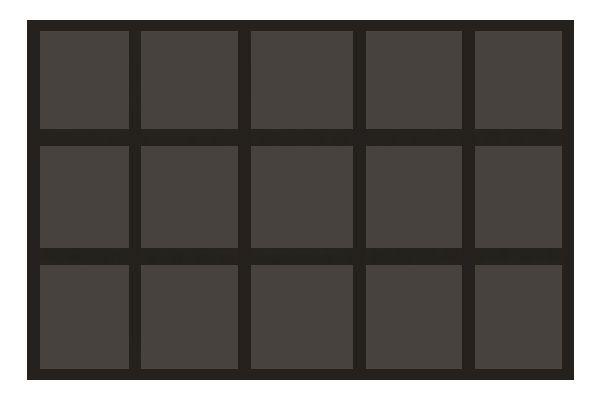
After that, we cut and attached the vertical pieces of moulding. Like this…
Then we cut and attached the short, horizontal pieces of moulding. Like this…

(I colored them tan so you could see which ones I was talking about.)
Helpful hint: Use one of your mirror tiles as a guide as you glue your ALL of your pieces of moulding into place. That way you can make sure each mirror tile is gonna fit once the wood glue is dry.
(Just hold a mirror tile inside each “square” as you go to make sure it’s gonna fit before you glue the moulding into place.)
After all the moulding is attached, give the whole thing another quick coat of spray paint, so it looks like this…
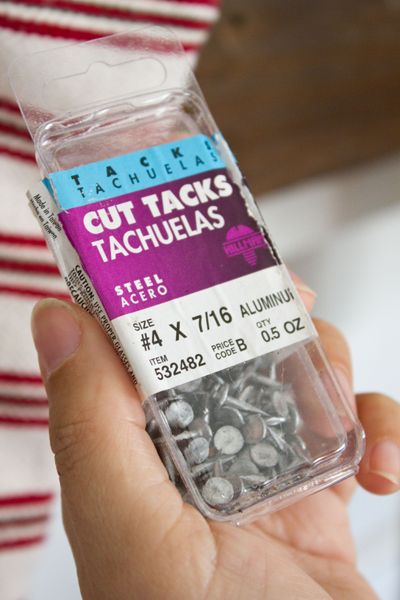
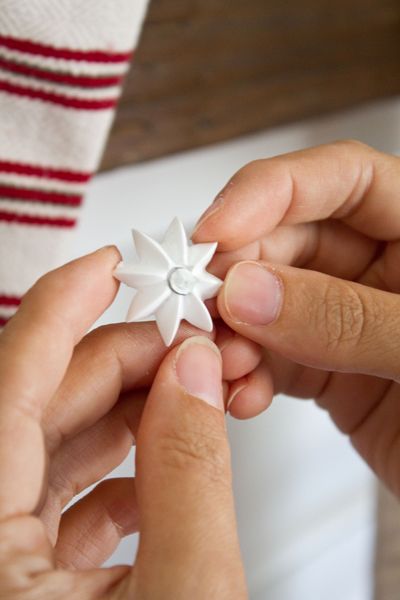
After the spray paint is dry, use wood glue and a “cut tack” (ours came from Lowes) to attach a plastic mirror rosette to each “cross-section”. Like this…

Give everything one last coat of spray paint when you’ve got them all attached…
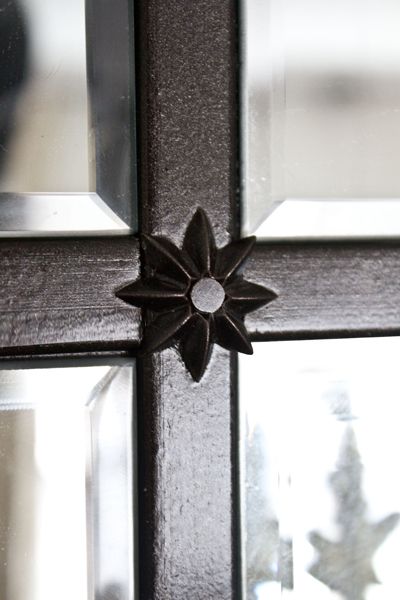
(Our rosette)
Pretty close to the Pottery Barn ones, eh?
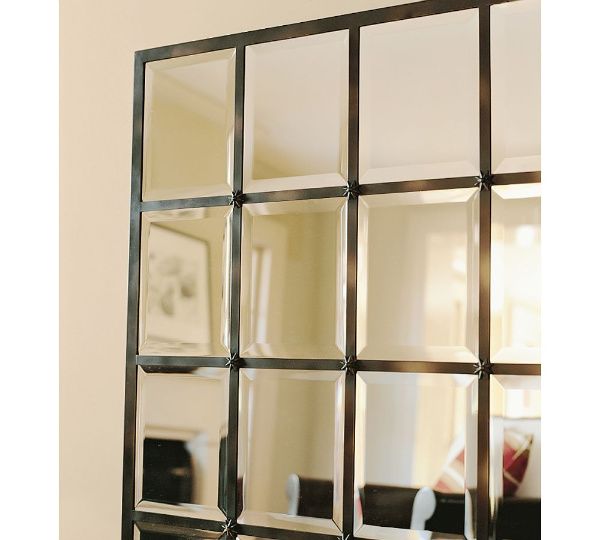
(Pottery Barn’s “Eagan Mirror” rosettes)
After that, all you have to do is attach your mirror tiles with some mirror adhesive and voila! You’re done!
I recorded a little video which sort of shows what I described in the photos and drawings above…
(You can watch it on YouTube too.)
And last but not least, we’re thinkin’ we’ll eventually add some trim to all four sides of our mirror. Not only to make them look more finished, but also to cover the gap between the wall and the mirror, created by the 1″x4″s on the back side. Like this…
But that project will have to wait for a while…we’ve got some floors to refinish first!

——————————————————————————————————–
Join us on Facebook or Twitter!


————————————————————————————-
Need help arranging your furniture?
Need design help?
Check out my e-book!


Oh, I’ve been waiting for this tutorial! I’ve been drooling over PB’s mirror since the moment it came out, and I am SO inspired by your courage to tackle it. I just have to convince my husband that he’s going to help me. LOVE it, Layla!
I am in love! I am going to have to put this project on my spring project list! We need something awesome for above our sofa and this is perfect! You got your “rosettes” at the hardware store? About how much did you spend on the project?
I can’t wait to get this started!
I’m so glad you posted this- I have also been waiting for it! 🙂 Your instructions and diagrams are so detailed- thank you!!!
Did you have a final cost put together yet?
You just made my Christmas! I’m stopping at HL tomorrow to start getting the supplies together. I emailed you for the rosettes but if you don’t have enough I’ll survive! THANK YOU SO MUCH!
Oh and this “attempt” at explanation was perfectly perfect!
Layla, what a team the two of you make. I love the mirror… it is perfect and looks very expensive!
Joyeaux Noel!
xoxo
Karena
Art by Karena
Layla,
I would love some Rosettes!!! Wow, who knew an expensive-looking PB mirror could be recreated at home using inexpensive supplies! I absolutely love this idea and I’m really inspired to create it (with my husband’s help) after the New Year. Let me know how much $$ for the rosettes. Thank you for being so inspiring!
Your Tampa Fan,
Jenny
Thank you, thank you, thank you. Layla I’m so glad you got to post this – I’m on it asap after all the presents have been opened. I would love to take some rosettes off you hands too, maybe 16 just to play it safe as I don’t yet have my mirror size confirmed. I will gladly trade you rosettes for a letter “P” to add to your decor stash. Merry Christmas!
That is amazing! It looks so good. Thanks for helping me think outside the box when it comes to home decorating.
Love that mirror and all the little “danglies” hanging in front of it!
One word of caution; that will be a very heavy mirror to hang. Particle board or plywood are heavy; you want your wire hanger to be sufficiently sturdy to hold this up on a nail. And, of course, the nail will need to be securely in a stud. It’s a pretty project! Great for the mantel.
Fantastic job!
This project turned out looking so great but it also looks like it was a pain in the tucus to do! But aren’t most projects worth doing? Love it! Also, what did you decide to go with for your floors? Are you still doing carpet or are you trying the plywood board thingy?
Great job! I don’t think I’ll be making a mirror, but I’m going to use the first few steps as a guide for making a frame for an oversized/awkwardly sized map I have (it’s a reproduction, so no need to have it behind glass). My initial thought was a backing board surrounded by molding, and thanks to you, I have instructions on exactly how to get it done!
That’s one of my favorite PB mirrors!! Your’s looks exactly like the original! I’m printing out the instructions 🙂
Layla, you and kevin did an amazing job. I cannot tell the difference between yours and Pottery Barn’s. Thanks so much for sharing!
yay! my dining room loooooooves you!
Hi Kevin & Layla- Terrific tutorial and team you make! Thanks for putting this together for all of us out here. My gut says there will be a lot of these made in your EXACT sizes just so people don’t have to do their own math 🙂 Can’t wait to give this a try and I have it on my list for the new year.
Blessings and Merry Christmas!
Anne
wow! thank you for this post! i’ve been thinking/drooling over this pottery barn mirror for some time now! hoping i have the time/guts to make my own!!! 🙂
Love it! This will be one of the next projects we tackle. Probably a couple of them for the master bedroom.
Awesome look-a-like mirror!!! Thank you for being detailed in your video…it really helps make this DIY seem possible. I’m thinking about having my husband make this…but he’ll probably have to screw it right to the wall because I need it a little bigger for the spot I’m thinking…. Sounds weird like we live in a hotel or something….
Layla-it looks amazing! And a great tutorial!
Merry Christmas and blessings for the new year!
I am so excited! I have my looking at this mirror over and over again since Pottery Barn came out with it. Thank You! Thank you! Thank you!
I’m totally going to make this. We are trying to sell our house and this will be perfect to lighten things up- plus I will be able to TAKE IT WITH ME! If you have any more Rosettes, I will be happy to take them off of your hands.
You guys did such a great job with this mirror, it looks incredible!! I am totally inspired. I’d love to know the exact cost if that isn’t too nosy. I’m sure it is WAY less than PB. If you have 12 extra rosettes I would like to buy them from you and give this a try myself.
BTW I have two kiddos via international adoption and one failed domestic adoption under my belt. If you would like to chat or would like to ask any questions, I would be happy to share what I know.
Looks great! i LOVE diy projects like these!
Great tutorial! I’m sending it over to my hubby’s computer! I would LOVE one of these mirrors! ♥
Love the mirror and the onsie pajamas too! You guys make it look so easy. About how much time and money went into the project? I would love to do a mirror like that standing on the floor and about 5-6 ft tall. I think that would look great in a living room behind a small side table and some baskets on the floor. Your thoughts? I would love some of those rosettes, if they are not all spoken for. Thank you, Kevin and Layl,a for all you do. You bring all of us hopeless decorators lots of great ideas.
Great question Sandra! We’ll have to see if we can figure up a price and add it to our next blog post!
🙂
PS- The rosettes are actually all spoken for. Sorry about that! 🙁
Okay, LOVE the PJ’s (and the mirror too!)!!
I love how you make this look so easy!!! Great job!
Wow! So pretty!! You are both so talented! Layla, you make it seem like any of us could do this beautiful project. Thanks. Teija
Oh, my gosh! Layla, it’s b-e-a-u-t-i-f-u-l! Great idea! I love your project.
You are hilarious, Layla! Love the mirror!
I always LOVE a good Pottery Barn knock off, and yours turned out beautifully! Thanks for sharing the “how to” with us!
Fantabulous job on the mirror knock-off. Very impressive! May give this a shot one of these days. 🙂
Impressive knock-off! Those instructions are so great, I may be able to pull this one off.
Incredible! Loved it at the reveal and love it even more now! Thanks for sharing!! 🙂 happy refinishing to y’all! -shaunna
That is fantastic! Would love to have that over my fireplace 🙂
Thank You! I have wanting this mirror forever!
I am so excited to try this.
Wowza! I know what I’m doing over holiday now. Oh, and I’m not British, I just like using the world ‘holiday’ because it makes me feel fancy.
genius! i’m so impressed and i actually might do this myself even tho i’m not great at “building things.” this looks easy enough. i’m pretty good w/ a tape measure and glue. hehe my FIL can miter my corners for me!
Thank you! Thank you! Thank you! I’ve been checking in everyday waiting for the tutorial. Thanks for the heads up on adding the extra piece of molding to cover the gap.
you are just too darn cute!
I also did this mirror!! I wanted stain…Too funny to see this post today!! LOVE IT!
http://refreshandrepurpose.blogspot.com/2010/10/mirror-mirror.html
I absolutely love the mirror. It’s just what my mantel needs.
I have to tell you that you were the very first blog I subscribed to almost one year ago. You got me hooked on blogs. In fact, I just started my blog in progress. Please check it out if you have a minute.
I am amazed at how much you and Kevin accomplish.
this looks awesome!
I love this mirror. THANK YOU SO MUCH FOR SHARING THE DIRECTIONS!!!! I will be making this while I’m off work over my Christmas vacation.
Fantastic job! Now where could I put one of these…
This is fantastic! I love it! I was just looking at those little mirrors at WalMart the other day wondering what I could do with them. Now I know!! Thanks!
Awesome! I may just try that one!