Remember when I did that presto change-o for Kevin’s brother, Kerry, a while back?
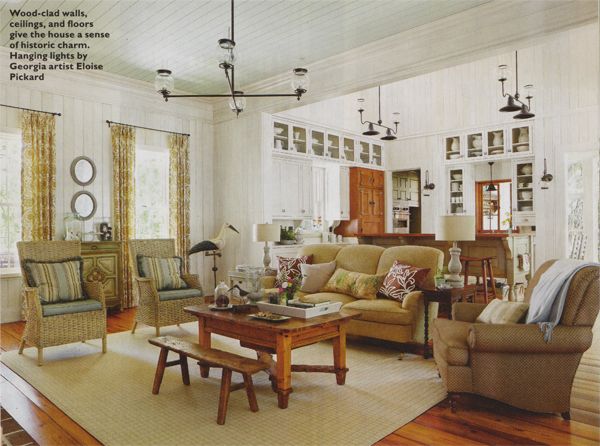
The one where I mentioned, that he mentioned, that he wanted his living room to look more like this:
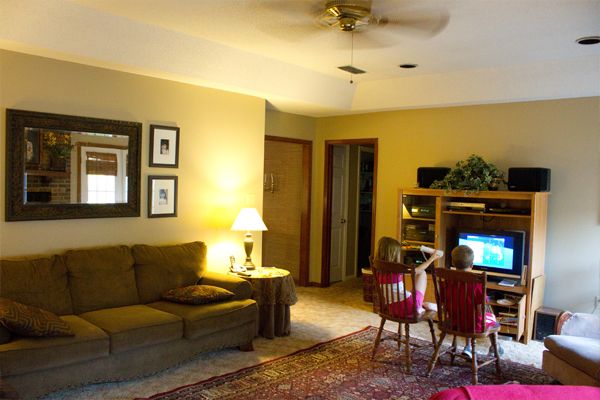
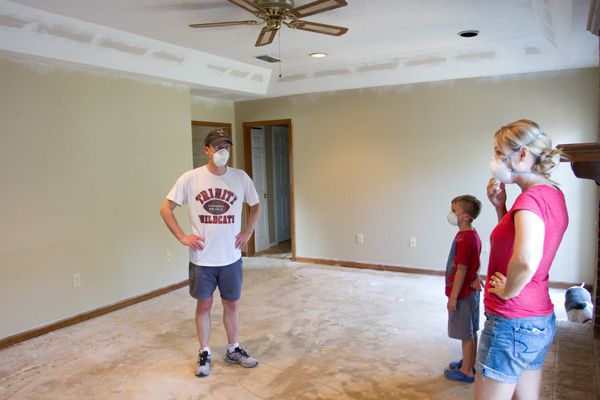
Well, I’ve been blogging about what we’re doing over here at our house a lot lately, but what I haven’t blogged about yet is that we’ve also been working with Kerry on his living room, too. Here’s the “before” photo again…
And here’s the inspiration presto change-o I blogged about last year…

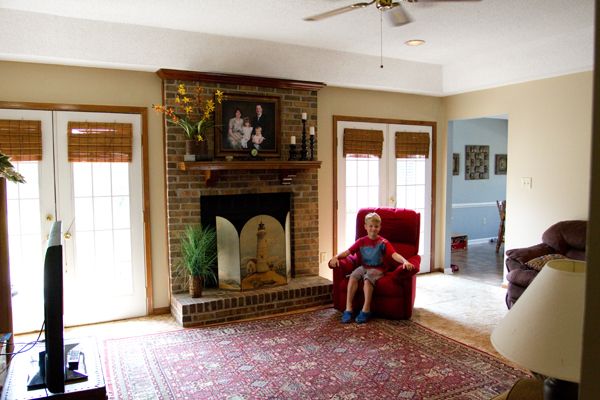
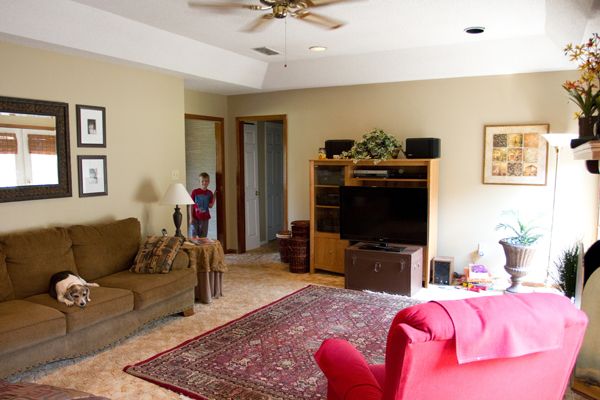
We went back over there the other day to help him scrape the popcorn off the ceiling, and I took a couple more “before” photos, just to have them documented…
Kerry’s wife, Robyn, was at work that day- so me, Kerry and Kevin took on the job of scraping the “popcorn” off the ceiling around the border of the room. (Note: Kerry’s house was built in the mid-80’s, and the ceilings had never been painted, so we didn’t have to worry about aesbestos- but that is something you’ll want to check if you’re house was “popcorned” or painted earlier than 1979.)
We started by misting the area we wanted to scrape with water. We worked in (approximately) 12″ square areas at a time…
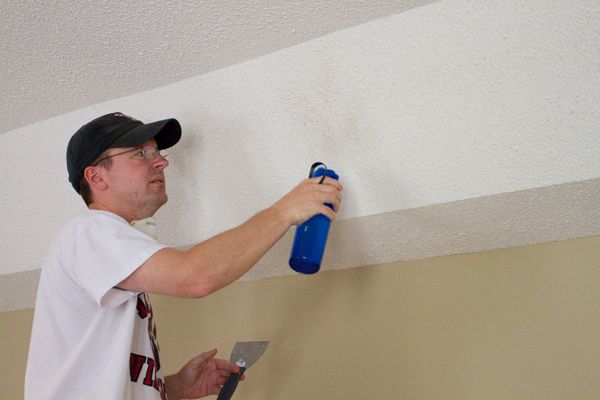
After we were done misting, we immediately started scraping the popcorn off with flat-edged, metal scrapers…
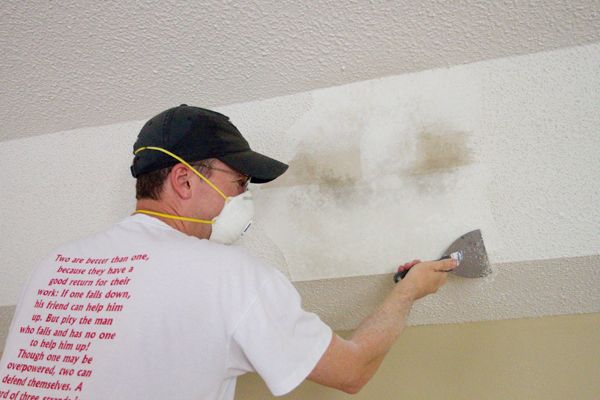
We didn’t know what to expect when we started that day, but because the drywall underneath hadn’t been primed or painted- the stuff literally came off like melted butter. We were so happy!
A note about the mist bottles: If you can find some like these (Kerry got his at Academy Sports)- get them! They spray the water vertically into the air and they worked SO WELL for this job!

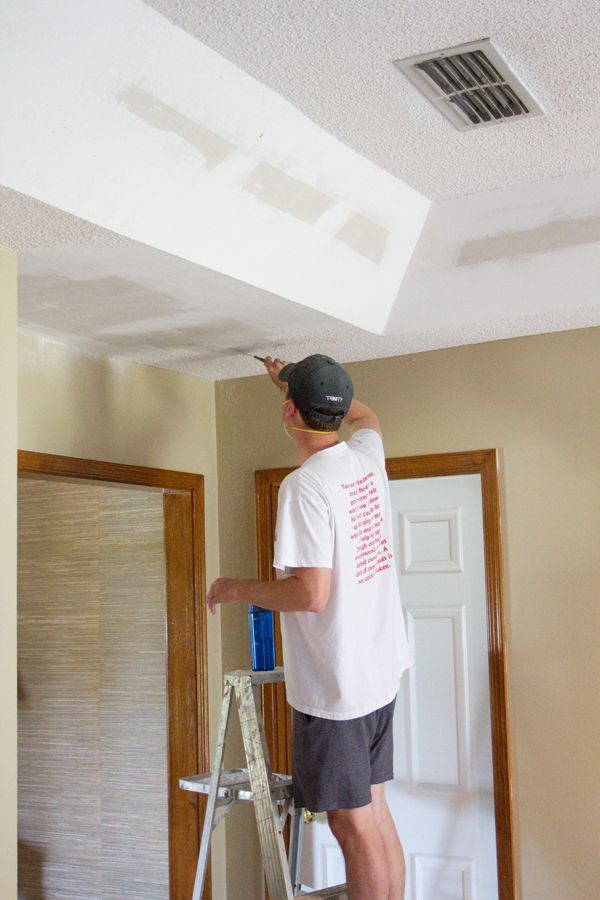
It took us about 2 hours to finish scraping the entire soffit that runs around each side of the room. Then we all did the popcorn shakey-shake…
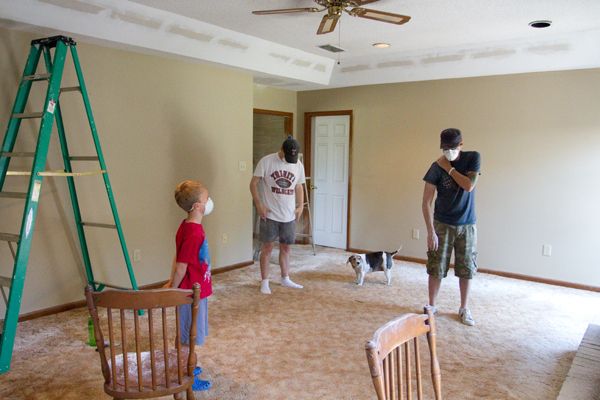
After that, we ripped out the old carpet, and stood around with our hands on our hips for a while…
The next step is to replicate the blue-painted wood ceiling in the inspiration photo up above, so this week, Kev and I are going to head back over there and install 165 square feet of Sea Salt-painted wood planks on the center part of the ceiling. It’s still covered in popcorn, but since we’re doing the planks, we didn’t see any point in scraping it all off…

We’ll just find the ceiling joists with a stud finder, mark them with chalk lines, and nail gun them into the joists. And for a little extra security, we’ll squirt some Liquid Nails on the back side of each plank, too.
And speaking of wood planked ceilings- we still haven’t finished the one in Kev’s office…
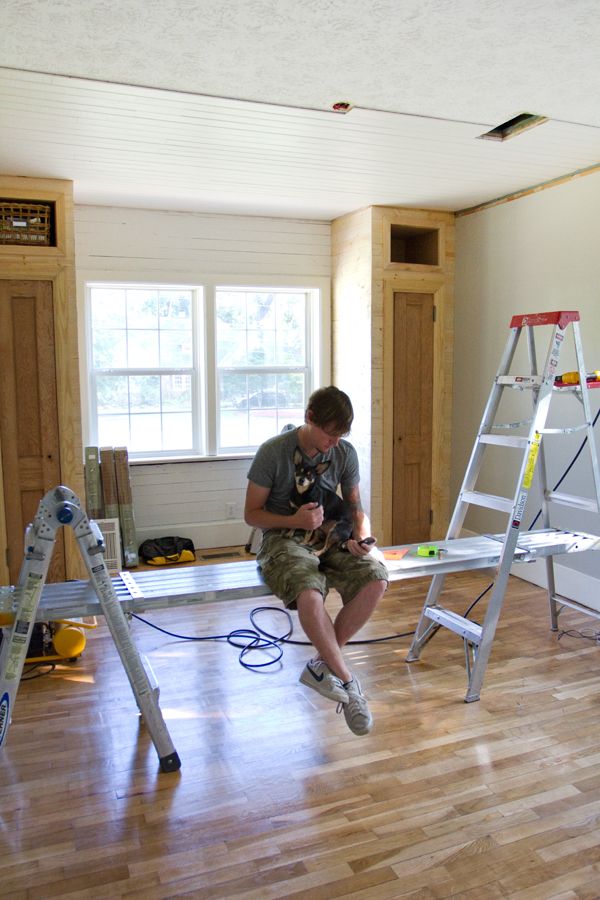
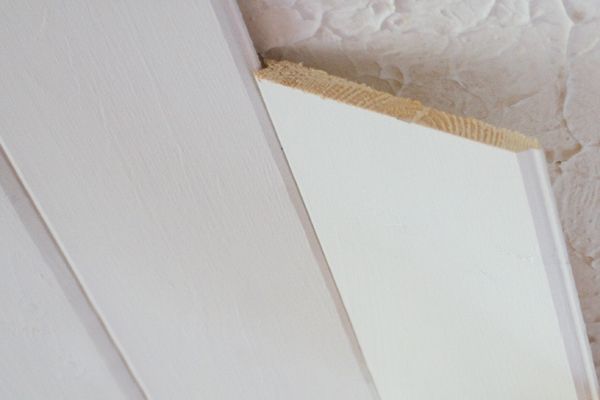
…but I wanted to show a close up of what our textured ceiling look like. It’s different than popcorn. It has more of a “sponged” look…
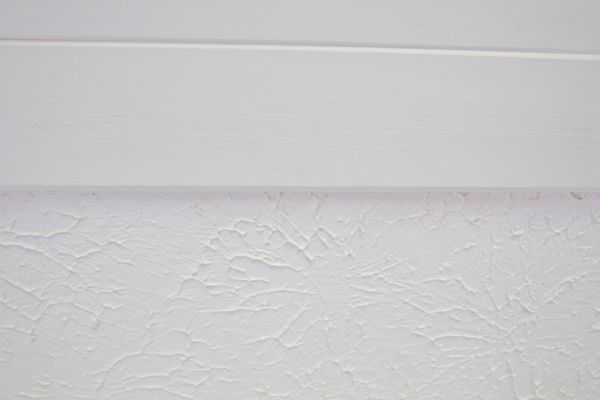
We’re also just covering ours up with the same tongue-and-groove planks…
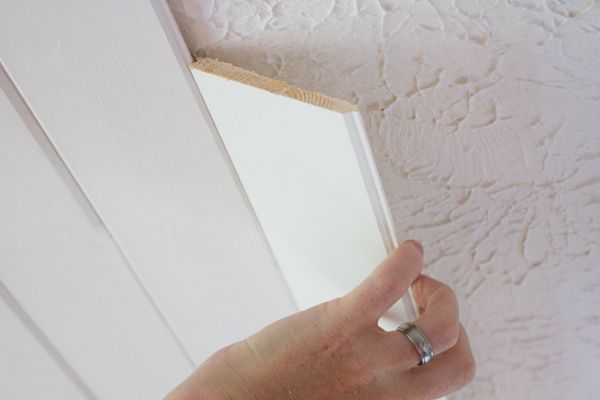
They’re pretty inexpensive (just under $11 for a pack of six, 8-foot long planks at Lowes), so not all of the tongues-and-grooves are created equally (in other words, some planks are harder than others to lock together) but we’re really happy with how they look when they’re all in place. Here’s a close up of how they lock together…
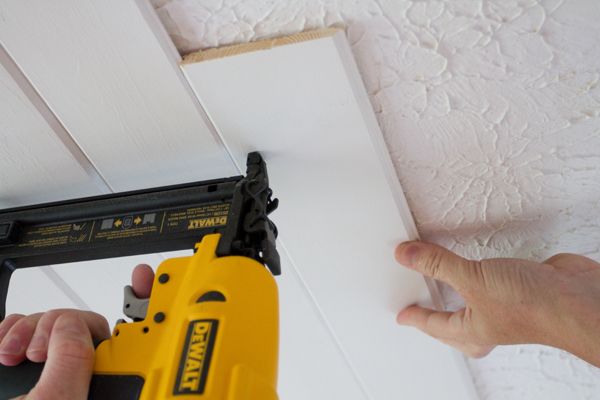
We nail them along the back edge only so that it’s easier to click the next row of planks into the tongue on the previously installed row.
Well, I better sign off for the day. Kevin’s in there waiting for me to come help him put up some more planks as I type. Only 82 square feet to go!

PS- Each pack of planks covers 14 square feet. (It only cost $155 to do our entire office/guest bedroom!)

You give me courage. 🙂 (You make this look easy!!) Can’t wait to see the finished project! Wowza!
WOW…WOW…WOW, I live in a Log Cabin and it took three tries to recover the ceiling with popcorn after the previous tenants almost destroyed this lil diamond in the rough. I didnt even think about this kind of ceiling but I really love it!!!!!!!!!!!
I am new to your blog – what a gorgeous ceiling! Would you share (or point me to a past post) where you describe the “how to” or background of your horizontal – painted plank-style walls as well? Love the warm cozy look of your cottage/porch/farmhouse style
.
Hi Margo!
The horizontal planks in this room were actually hiding under the drywall, but we added some in the new part of the house, and you can find that post here:
https://theletteredcottage.net/mdf-from-true-value-in-the-house/
Thanks so much for stopping by today! 🙂
next time use a brick to scrape really works & is alot faster 🙂
Hmmm, bricks are heavier, and my arms are weak! 😀
Love the tongue and groove planks, they look amazing. Hugs, Marty
Oh, I wish my life could be this easy. We bought a foreclosed farm site. (It was what we could afford.) There is popcorn on the ceiling. The farm was built prior to 1900. The addition was done in the early 70’s. I am guessing there is asbestos in the popcorn ceiling. It would be so wonderful to cover it with tongue and groove wooden planks and be done with it. But, there was a roof leak and some of the popcorn is friable and hanging precariously. So, we bought disposable protective clothing with built in boots and head covers and full face masks. We are going to take it down.
hahaha I like the ‘stood with our hand on our hips for a while step’. I could do that! looking good so far! Can’t wait to see the finished product!
That was my favorite step too, Emma! 😉
Hi Layla. I have a question about the ceiling planks. Could they be applied to a wall? How wide are they and are they prepainted? I want to do one wall in our dining room (horizontal) and those look like they would do the trick! Lauri
Hey Lauri!
I think they’re actually made to be used on walls, so yes! 🙂 I think they’re a little over 3 inches wide, and no, they are not pre-painted. Just click on the Lowes link in this post to take you over to their site, and happy re-decorating! 🙂
I love the planks! If you want a nice free trip to calif, I could use some help!
My parents have ceilings like yours (house built in 1984). The pattern was made by a paint covered mop. One of the painters just walked all around the room holding a mop upside down and hitting the ceiling with it, plunger style! Love your style!
Thanks Layla! You’re the absolute best! Lauri
I thought you would have to remove the popcorn ceiling before putting up planks. I’ve been wanting to do that in our family room, but thought scaping the ceiling would be a nightmare. Are you not applying planks to the part around the outside – is that why you scraped it and not the middle? I’m curious to know how it goes. I adore beadboard plank ceilings and think it would be the ticket to cover up some water damage in the popcorn ceiling. You guys are amazing – what you tackle.
I want to know too, if you’re putting planks over the border couldn’t you just put them over the popcorn?
I need to know so when I tell husband that we are doing this (or getting someone else to) I have all the info first. He takes things better that way! 🙂
that’s a great idea for the ceiling…thinking our kitchen ceiling would look great this way….
We did a blue beadboard ceiling in our screened porch and I loved it so much that I ended up painting the ceilings in my living and dining rooms blue, too! I love the look, can’t wait to see your finished project.
hands on my hips, wondering why someone invented popcorn ceilings! I have way too much! Yours and Kerry’s looks great!
i love our wood plank ceilings we have in our remodeled garage turned family room. our room is huge and it was up 2 me to white wash them 16 boards at a time it took a couple days. i painted and my husband installed. the result is beautiful. now i wish i could get him 2 do the rest of the house!
holy Moses-I will be waiting w/ baited breath to see your progress on Kerry’s ceilings. We have the very same angle from the wall to the ceiling and I KNOW it would be stunning if I could accent it somehow–Can you finish this weekend? 🙂
You two are so flipping inspiring. I love you and think I am going to change my will to include you!
Thanks!!!! Cheri
great idea. we have a summer home and the pop[corn ceiling. I have been wanting to get rid if it but my husband does not want to battle the mess. This might work for him. I hope so, I love the idea.
Can’t wait to see his brothers room!! Very inspiring! I love the plank board look!!
I so need to do this to hide my awful artex ceiling it looks great xxx
Ugh! Every time I see these popcorn ceiling ideas I cringe. My old farmhouse has popcorn ceilings in several rooms and I dread scraping them. You have encouraged me to think about doing it sometime in say….the next 10 years. I love the planks….it adds character. Lovely. Just lovely. Lisa!
When you install the planks, do you cut the plank ends on a 45 degree angle to minimize the seam or do you just butt the ends together? I just wonder if the planks contract during times of the year when there’s low humidity if those seams will show a lot more?
Love those misters. I’ve never seen them before.
Steve
will you be my sister-in-law please? now i want to plank a ceiling in my house. i don’t know where, but that’s the fun part – figuring it out – right?
many of the projects you are working on are ones I am planning to do in my newly purchased 1919 home… the closets and the board ceilings… not sure I can DIY them like you and kevin but its awesome to see what it could look like…. you are one of my favorite blogs! Thanks
Love,love,love! ! The room just brightens up! Love getting you in my inbox and seeing your updates . I want you as my decorator.
This post was fascinating. Thank you for sharing the process.
Did you nail directly into the top of the plank (which you would need to fill the holes with spackle or wood filler) or did you nail into the groove like you would for hardwood floors?
The picture looked like you nailed into the top which would be a pain to fill all the nail holes after. I want to have the whole process down before we attempt our kitchen ceiling.
It looks so great in your rooms!
Liz VanKirk
Hi Liz,
We nail into the plank, but we only shoot 2 or 3 teeny brads per plank. When we’re done we just hit each of the itty bitty holes with touch-up paint and we’re good to go! 🙂
I really, really LOVE this look and would die to do it in our living room over the popcorn BUT we live in a 2 story townhome and the ceiling is solid oncrete…so I am pretty sure there is NO way to nail anything to that ceiling. Boo Hoo.
I also changed our old ugly popcorn ceiling for the planks! I love the country look!
Yay! I love country/cottage/coastal, too! 🙂 #The3C’s
Just wondering…….was Kerry’s tee-shirt chosen ‘specially for that day?!!! Verse seemed appropriate considering all that work 🙂
Looks great, I did the same thing in my house check it out http://www.thecottagefarmhouse.com.
Thanks for all of the great tips. I think we could handle this in our house!
You guys are such an adorable couple and how awesome of you to help out relatives. I wish we could tackle our ceilings but my husband doesnt have the DIY gene in him and we small babies that take up any time we have open, they’d probably love playing in the popcorn scrapes (prob. try to eat them too, yuck)… you look great btw 🙂
I love you, Layla! You have solved my problem!!
One quick question.. Would you recommend this for ceilings that are only 8ft tall to begin with? Thanks!!
Sure! The planks are super thin! 🙂
This is a great project. In the inspiration photos it looks each plank spans the entire length of the ceiling. The planks you bought were 8 feet long, correct? Is it possible to get longer planks? How do you handle the transition if they are not long enough?
Hi Amber!
Yes, our planks are only 8′ long, so we just make sure to stagger the seams. 🙂
We have that stippled ceiling in three bedrooms and the front hall…no DIYers here unfortunately…that is an excellent price though!
I’m marking this one for future reference!
I have the same ceiling you have (circa 1972). We call it the “chicken foot” ceiling…. At any rate, since asbestos is something we do have to worry about and we REALLY want the chicken feet to go away… What do we do?
I guess you’ll have to cover it up, too! 🙂
Already sent the hubs a link to your site… He approves although he has a DIY-phobia. A little therapy (a/k/a send him away for a weekend) and I’ll take care of it. 🙂
Seriously, who ever thought popcorn ceilings were a good idea?!! We have them in our entire house and I would LOVE to remove them but I am so afraid of the work. Because our living space is open floor plan that would be like 1,000 sq. ft. just for that “one” room.
You make this look so easy to do! I noticed that you didnt take off all the popcorn ceiling in the whole room, only in certain areas. Was it done purposely or you felt that only certain parts of the ceiling needed to be removed?
Hi Franky!
Like I mentioned in my post, we’re using planks on the inset part. We hope to blog about it again soon! 🙂
Thanks Layla! looking forward to it 🙂
I love what you did with the ceiling. I work in the home decorating industry and I see a lot of people with those old popcorn ceilings. Your simple and elegant redesign is pretty affordable for most of my clients so I’ll let them know about some alternative design choices, inspired by you of course!
I am LOVING all the changes!!! I can’t wait to see both rooms finished!
where one board ends and the next begins, did you fill in the seams with something?
how does it look so tight and seamless?
How funny – I saw that exact feature in whatever magazine (I was waiting at a dentist’s office for my son to have his check-up done) and ripped out that exact spread to show my husband. We have popcorn ceilings and I hate them. And now I know how to change it! You guys rock – thanks for sharing the process! ^_^
what a great project, at the looks of it you and your family looks like you guys are having a ton of fun doing this together! I wanted to know if it would be easier to handle wood planks that are shorter? i know you used 8 ft.
Hi Frank!
We used 8 footers when we could, but most of our planks ended up being shorter because it was hard to get the long ones to lock together all the time. (Bad cuts, uneven ceiling, etc.) So, yes, it was easier to handle the shorter planks! 😀
Looks fab! How high are those ceilings?
Hmmm…I’d guess the lower part is around 8′ and the higher part is closer to 9′. ?
Hi Layla-
Love what you did to the ceiling but what really caught my eye was the entertainment wall in your inspiration pic. Is the wall unit something I can buy or is it a custom build idea? I want to do this in my den without breaking the bank. Thanks!
I love this look and want to do it too. A few people have asked the same question I have and you have yet to answer so here goes. How do you handle the end to end? Do you calk and then paint the joins? I understand that you stagger the boards so that the ends to ends don’t end up in the same place, it is the finishing I would like to know. Thanks for your relpy.
Hi Deb!
We’ve actually published a couple of posts about the ceiling since we published this one, here are the links:
https://theletteredcottage.net/wood-ceiling-installation/
https://theletteredcottage.net/wood-ceiling-installation-complete/
Kev’s brother caulked and touch-up painted the seams where the boards ended, and you can see the finished result in that last link. Thanks for swinging by today! 😀
I scraped for 2 and half hours by myself on my popcorn ceilings in my craft room and was wondering if I need to use a special paint to repaint the ceiling? I’ve noticed ceiling paint at the hardware stores but wasn’t sure if there really was a difference or if I can just paint it the same as the walls.
Layla love the room! What software do you use to create the rendering of what you guys wanted the new room to look like. Its amazing and would be a huge help to visualize any major changes I try and convince my husband I want to do to a room!
Thanks,
Amber