Hey there!
It was nice and sunny out today, (yay!) so I was able to snap some pics of our progress in the master bedroom.
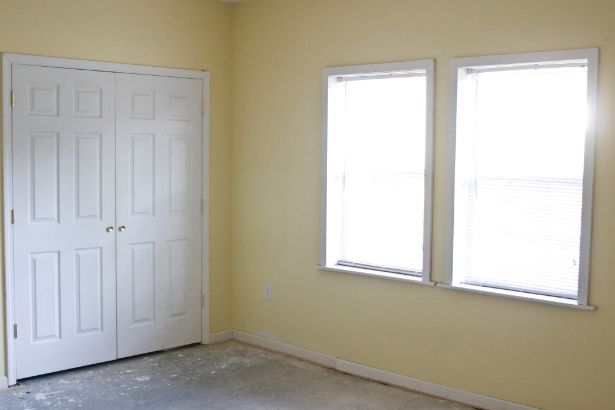
You may remember how it looked BEFORE…
…well, this is where we’re at CURRENTLY…
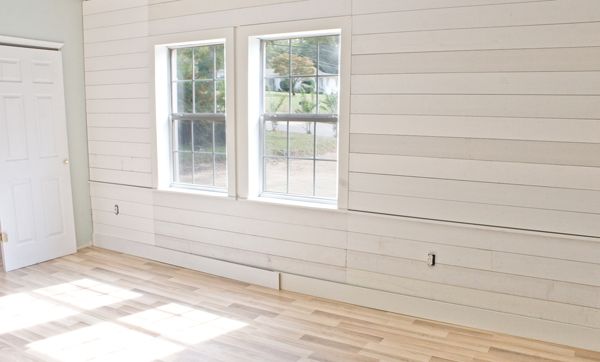
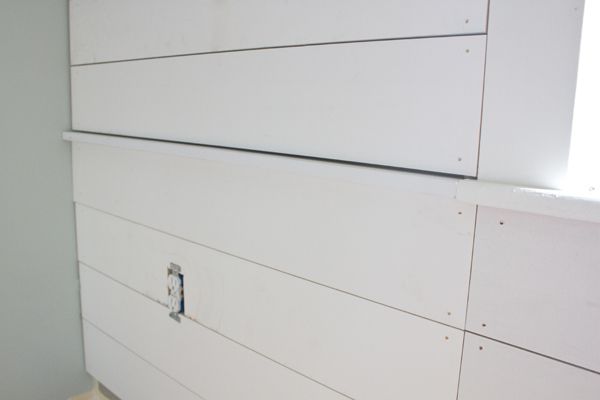
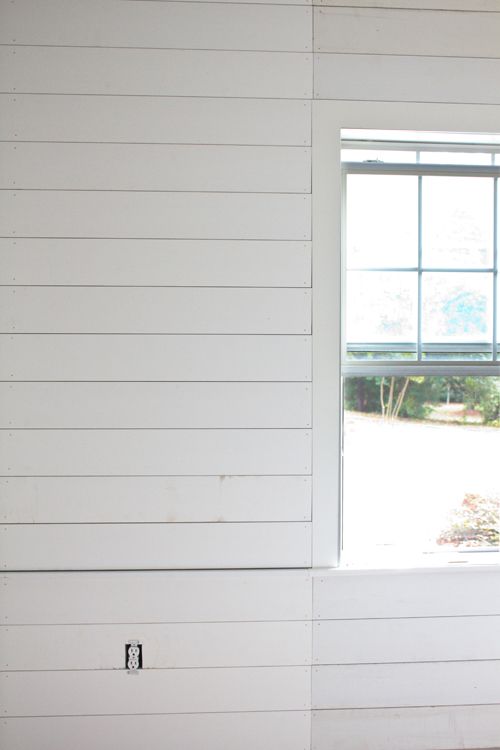
Keep in mind, we’ve still got LOTS of nail holes to fill, outlets to re-cover, base boards and crown molding to cut & attach (the base boards are just laying against the wall in the photo above), corner trim to attach (to make for a nice, smooth transition where the wood wall meets the “Blue Hubbard”-painted wall), and 144 square feet of planks to paint (the boards in this photo are just primed- not painted)- not to mention, we’re gonna clad the wall next to this one in wood too. But man does it feel good to have some of those suckers up off the floor and attached to the wall!
We’re using 1″x6″ planks of MDF we got at True Value. They’re smooth and straight, and thanks to our new, high-powered nail gun- they’re a cinch to put up, too!
We started by breaking up the window wall into three sections…
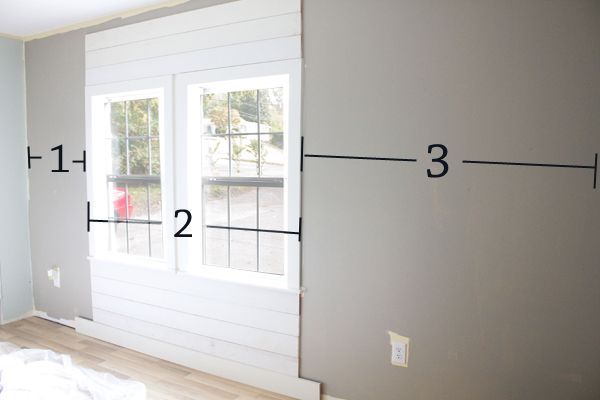
Obviously, we worked on section 2 first. Kevin used our laser level/stud finder to mark where each stud was within that section…
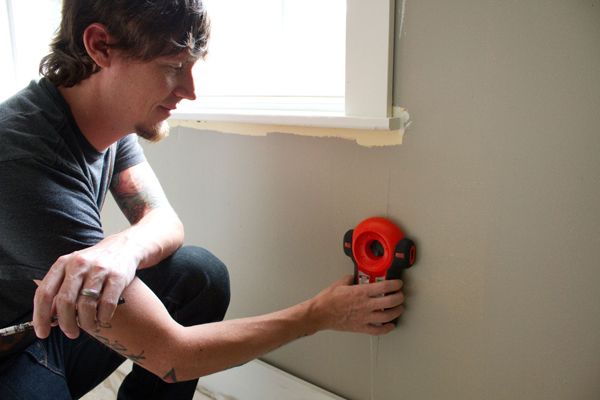
Next, he drew a vertical line where he found each of the studs…
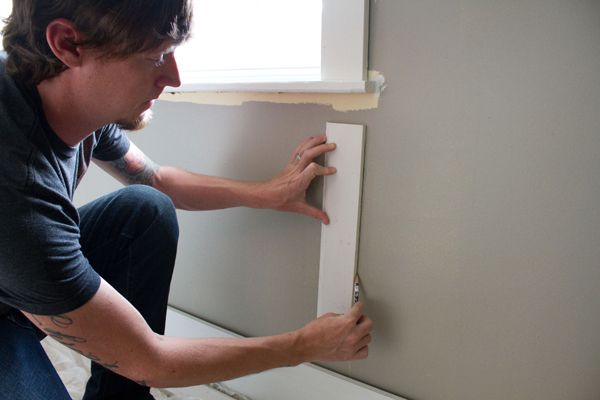
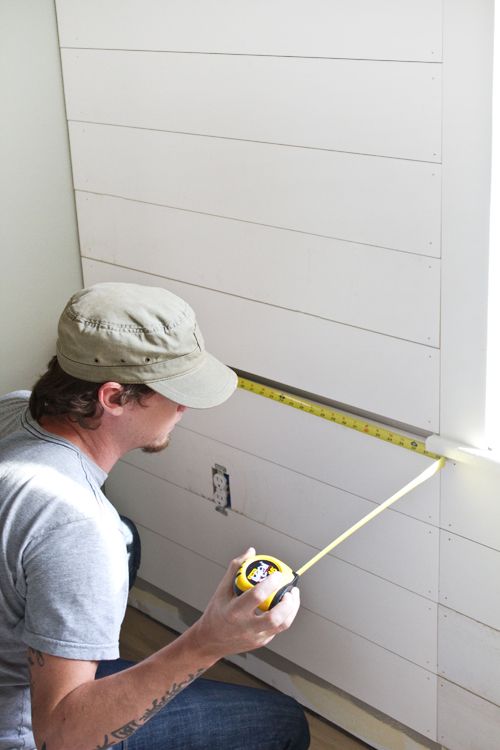
Then he used a measuring tape to determine how long each plank should be…
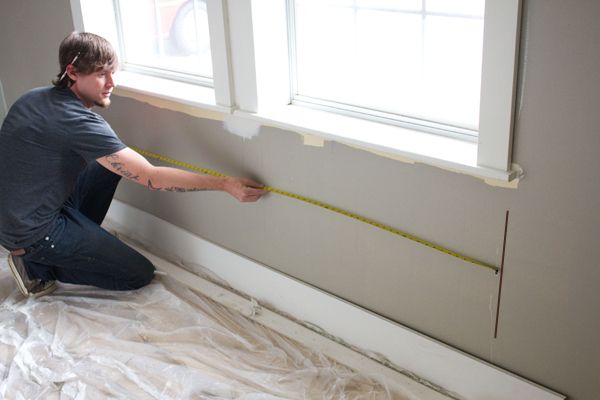
(I made the line a little darker so you could see it better)
Here’s a little video we shot right after we had finished working on section 2…
(Click here to watch it on YouTube)
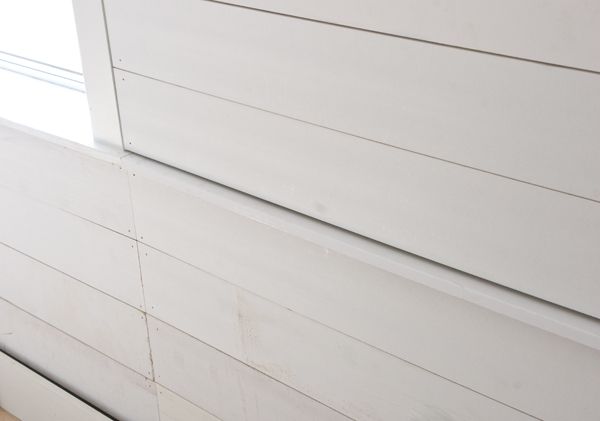
Once we got all the boards up in sections 1 and 3, we added a little schmarchitectural interest (that’s schmancy, as in “fancy schmancy”, architectural interest) by using a 1×2″ in the gap created by the window sill…
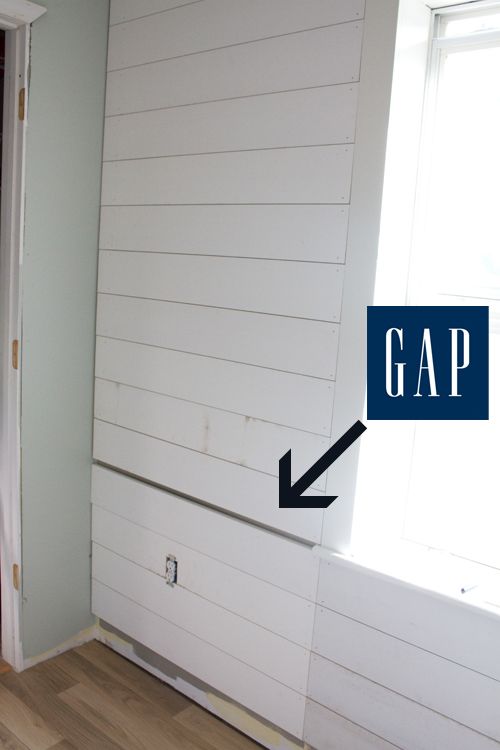
(Section 1)
(Section 3)
It looks sorta chair rail-ish. I dig it.
We intentionally planned for the “seams” between sections 1, 2 and 3 to hide behind where the curtains would fall- so it’ll look like the boards stretch from one side of the room to the other. Move your cursor back and forth over the photo below to see what I mean…
(If you’re reading in Google Reader, you’ll have to come over to our site to see it!)
As for the rest of the room, well, this is the old view from the doorway, into the room…
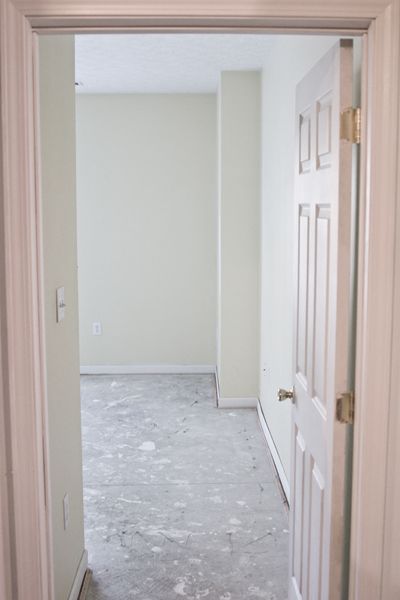
Ya see that weird “bump out” thing at the back of that picture?
That’s actually the end of our front porch…
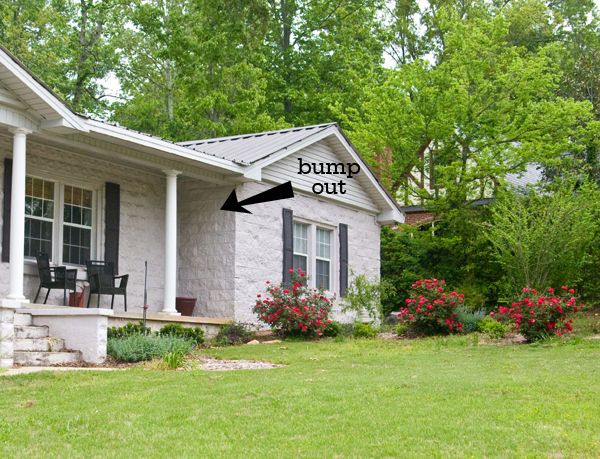
Two feet of the living room and the entire master bedroom were added on to the house in 2003. The red line in the photo below shows where the old house and the new part of the house meet…

(They had to use a different type of decorative cinderblock on the addition. Apparently you can’t get the other kind anymore. Boo. We’ll have to do something about that eventually.)
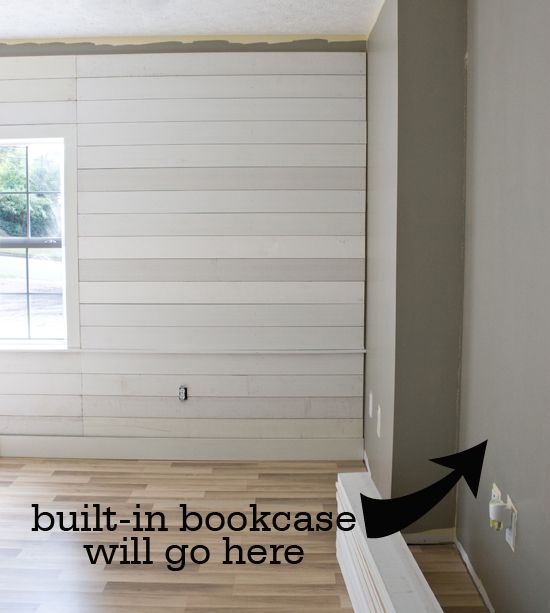
Anywho, we’ve decided to embrace the bump out, so we’re gonna attempt to build some kind of built-in bookcase to the right of it. Sort of like this:
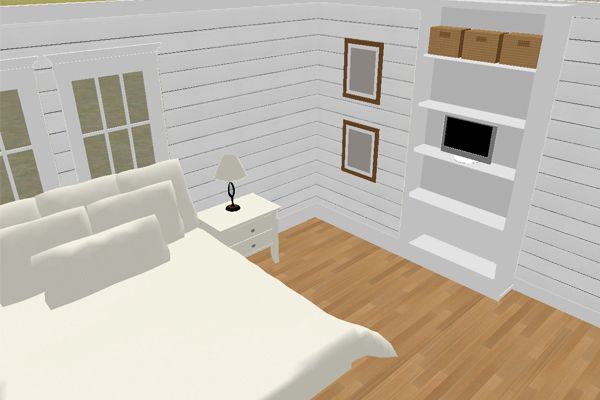
I’m not sure exactly what it’ll look like, or if it’ll have doors or not have doors, or if it’ll have five shelves or six shelves, etc. etc.- but I think it’ll be nice to have a little extra storage/display space in the room.
And it won’t take up any valuable floor space either- yesssss! Plus, the cable hook up is already right there on that wall. Double yesssss!
I’m really happy with how it’s all turning out.
So happy, I’m including another presto chango…you know the drill:

I love presto chango’s.
And True Value MDF.

*We were selected by True Value to work on the DIY Blog Squad. We’ve been compensated for our time commitment to the program as well as for the materials needed to complete our DIY Blog Squad projects. That being said, our opinions are entirely our own and we have not been paid to publish positive comments.

Looking good! You have such an ‘eye’! Can’t wait to see the finished product with that amazing bedding!
I love what you’ve done. The bookcase area will be perfect for the space. I can’t wait to see it all finished!
Great woodwork in the bedroom! I love that look. I’m going to have to post my family room paneling redo. It was tons of work because we did the ceiling as well. It came out beautiful though. Thanks for the great pictures! Desiree
Sweet 😉
Love the look and you are so creative. If you don’t mind me asking, what program are you using for the perspective…love the detail it provides. Thanks if you can share and will continue to look forward to your post.
Best to you both,
Margaret
Plan 3D! Thank you for the sweet comment!
🙂
Layla
Wow Layla, I love it!!!! I can see where it’s going, and I know it’s good!!!!! Can’t wait! Can’t wait!
It’s looking great! Kevin is quite the handyman! Can’t wait to see it when it’s completed. Love the GAP logo 🙂
I love the way it is turning out! The bookcase is a great idea to hide the “bump out”. Can’t wait to see the process. 🙂
Love, love, love it! We are embarking on remodeling a 1950s house that was remodeled in the 70s. A lot of work ahead of us!
I am so proud of & excited for you two. Making your dreams come true and every day working on something you’re both passionate about. What could be better than that?!
It is going to be as cheerful and sunny as the rooms you’ve already done. I’m looking forward to seeing it finished – come to think of it, I bet you are too!
Looks great. I think I’m really liking the Blue Hubbard wall too. Are you pleased with it? I wish our house were progressing as eficiently as yours is!
Yes! It was my first choice all along. So glad our friends chose it! 🙂
Layla
I love what you’ve done! The built in bookcase is going to be a beautiful touch.
Its just as great as I imagined! I’ve been thinking of doing the same thing in my entry but the wall I’m planningon is bumped out. Are you doing anything special for your edges?? And is a table saw necessary or did you use something else? Curious and jealous!!
Hi Caroline,
We are using our compound miter saw to make all our cuts.
We’re going to cover the edges with some kinda little flat trim.
We kinda wing it as we go- but I’ll be sure to post close up pics when we get to that point!
Layla 🙂
It is looking amazing, but I would expect no less! I must admit, my favorite parts are “schmarchitectural ” and the Gap….
The sun finally came out here today as well! So glad to see the progress pics. I can’t wait to see the finished product. Lookin’ good. 🙂
Great job so far…I’m lovin’ it!
Super amazing!
What colour did you guys paint the bedroom again? I can’t find the post where you decided on the colour… Thanks!
Thanks Andrea!
It’s Blue Hubbard- Sherwin Williams.
Layla 🙂
The progress on your room is AMAZING!! You two are awesome!
Love what you guys are doin!!! ..hubs isn’t ready to walk the plank just yet…. maybe pics of your gius awesome space will be the encouragement he needs…
xo
Layla,
My bedroom as a teenager up had walls like these. I love them! Incorporating that bump out into a built in shelving unit is brilliant!
Your Friend,
Deborah
Looking great! Can’t wait to see more!
LOVE. IT. 🙂
I need your photoshopping skills! I have been trying to figure out what kind of portico to build over our front door and my presto chango skills are not up to par….you need to rub off on me! LOL
I KNEW you were gonna love that nail gun….TJ and I have used ours more than I ever even thought we would….we enjoy dragging out all our tools and playing with them! 🙂 Have fun working on your room…can’t wait to see the finished product! Oh, and if it makes you feel better, I would never have realized your cinderblocks are different…..can’t tell in the picture anyway. 🙂
HUGS!
It’s coming along nicely!
I hope you all don’t get tired of hearing how amazing you both are because YOU ALL ARE AMAZING! I look forward to seeing the finished product (and the progress updates, too!).
Amazing …. great architechural interest. It will be a very pretty room when finished.
Well Layla, only you & Kevin could take MDF and make it
stand for Mafnificently Deliciously Fabulous!!
LOVE, LOVE, LOVE
the horizontal look verses the wood vertically.
I am also emracing my “stucco’ farmhouse with a coastal flair.
I have given up the ghost however with my adorable blonde Lab Henry
that is really an adorable blonde “pit”. hehe
I am so excited to see the next installment.
Can you please also tell me what kind of wood you
used for flooring. Thank you, geri.
Love it! It’s coming along so nicely & brightens the room up & what a perfect spot for a built in bookself too. Once can never have too much storage 🙂
Hey kids…I gotta know. Is it really MDF that you used? In the photos where the outlet is cut, it looks like standard pine. (MDF is pressed wood and usually very dark color, was this like that? I thought I saw woodgrain.) I am just wondering because I have never seen MDF come in 1×6 size. I am in the process of doing this same treatment to my guest bedroom and want to know if I should seek out MDF in my area. I had it all planned out to use some salvaged wood, but I am going to be short so have to try to whip up a plan B! ;o)
Mary
Hey Mary!
Yep! It’s MDF alright!
Some of the planks were primed on all four sides, and some of them were only primed on the front and top.
(Hence, the plank you saw in the first outlet photo)
The True Value we went to had a HUGE lumber yard out back- so I have a feeling you might have to seek out a local lumber yard to find the 1×6 size.
Good luck on your room!
Layla 🙂
Looks great and I like your idea about the bookshelf! Have a wonderful weekend!
Layla & Kevin I love what you did with the planks!! Your room is looking beautiful. Thanks for your daily inspirations 🙂
It’s looking great so far! Like you, I can’t wait to see the finished result…it’s gonna be good:)
Looks great. At first, I wondered why you planned the three distinct sections, the curtains made it make sense, great planning ahead. Can’t wait to see it done. Looks great so far, very Pottery Barnesque!
Did I miss a post where you guys did the floor? I noticed it was wood in your first nail gun video but didn’t see anything before that! I love the varying shades of light and dark!
Here’s a link to it Amber:
https://theletteredcottage.net/quick-closet-update
🙂
Layla
Layla, what is the color of the “bookcase wall”???
“Fieldstone”, by Benjamin Moore.
(Same color as the base cabinets in our kitchen!)
Layla
Looks INCREDIBLE! Love the planks (i got addicted to those after doing our attic), of course, and really love blue hubbard in there! Thanks for your sweet comment on the mustard chair! -shaunna 🙂
Embrace the bumpout~ I loved that!! I quote Barney…”It is gonna be super dee super! ” *sorry*! :0)
Lookin’ good! I know you are excited to have it finished. You’ll have a gorgeous bedroom and your dining room back!
You are a freakin’ genius with putting the seams where the curtains will hide them. I never would have thought of that (at least before it was finished!)
WOW! This is a huge project but I can tell it’s going to be fabulous!! Thanks for sharing.
The roll-over shot of the window (with the curtains) looks soooo amazing it practically took my breath away! I was still having trouble visualizing the space and now I can see your vision! It’s going to be lovely. Not that I had any doubt.
At first I wondered why you went with straight seams instead of staggering the planks, but once I saw the rollover shot with the curtains I got it! As usual, lovely. And seeing even just that little bit of blue hubbard wall proves that we readers made the right call with that color!
such a cool idea! (I’m doing the Wayne and Garth bow- I’m not worthy! I’m not worthy!)
I never would have thought of using MDF planks. I’m rethinking a project in our master bedroom and bath now….. nice job!
Hey Layla:
I’m going to be in Prattville this weekend. I’m from New Orleans…my daughter is a newlywed/new resident of Prattville. Me and my other daughter are coming for a girl’s weekend. We plan on some Yard Sales, junk stores, etc. Also, helping her decorate her living room.
Do you have any suggestions of some thrift stores, junk stores in the area that we shouldn’t miss??? Would love any ideas for shopping.
Thanks,
Trisha Ray
“Memories”, and “J & G” are my favorite spots to shop for “junk” in Prattville!
Have fun!!!
🙂
Layla
Thanks!! We will go there and hopefully there will be some Yard Sales in the morning.
I love what you have done so far. So much more interesting than the former wall!
I wanted to give you a little tip. After adding to the depth of the wall, you don’t want to just pull the outlet out and screw in into the new wall. You’ll want to add an outlet box extender. They are super cheap and super easy to install, but they will keep your house safer from electrical fire–especially since it is now surrounded by not-fire-resistant wood.
From one DIY-er to another . . .
Awesome advice- thank you SO much! 🙂
Layla
i absolutely LOVE the wood planked room! but, i do have a question…..how will you embrace the wood ledge that has filled in where the gap was? will you cut it down to be flush? will you use it as a display ledge? I love everything you guys do! wish i could afford your help with a design dilemma i have, but i will just have to take my cue for now from your other projects. LOVE you guys!
cece
Hey Cece!
Like I mentioned in the post, we wanted to add some “schmarchitectural interest”. (That’s schmancy (as in fancy-schmancy) architectural interest) 🙂 It’s sort of like a chair rail, and yes, I had thought about maybe propping something on it every now and then. Who knows!
🙂
Layla
Looks great, but I noticed an issue with the electrical. When extending the wall, an electrical box extender should have been used instead of pulling out the receptacle and screwing it into the wall. You can find them at Tru-Value here: http://www.idealtruevalue.com/servlet/the-58598/Detail
Hey thanks Christopher- we’ll definitely do that ASAP! 🙂
Layla
LOVE LOVE LOVE it!! ooooh i cant wait to see it completed 🙂 think the built in bookcase is a fantastic idea-i can just picture all the lovely bits n bobs you’ll have on those shelves. thanks to you-i have decided to do a ‘plank wall’ in my master bedroom too! we have just built our house & we’re almost at second fix carpentry stage and i had originally planned on a salvaged brick wall but i have that in our dining room and it was workin out too expensive,so then i thought vertical planks but i much rather the horizontal planks now since seeing them on your blog-thank you for the wonderful inspiration. hope you have a lovely weekend 🙂
I love it! 🙂
We’re currently getting ready to put up some wood planking above our tub surround!
And now that I see the wood planks in the master… we’ll definitely have to carry that look over!
Oh, oh!
And guess what I got Cason yesterday!? An air compressor! It’s a little guy, but now we won’t have to borrow. Thanks for the informative video post on yours!
Now, if you could just tell me when your HGTV show airs, here in Utah… It would be greatly appreciated.
🙂
Haven’t you had an offer yet? Jeesh! I would watch you two transform a room, over some of the goofs on there… ANYTIME 🙂
Happy planking, you two!
~Shelley Smith
houseofsmiths.blogspot.com
Layla- Looks great and I have a question for you. How do you think the MDF planks would look on a ceiling? I have an old plaster ceiling I would like to re-do. Do you think the seams would look bad (I would stagger them)? Thanks and keep up the great work!!
Hey Nichole!
We’re actually considering doing that on our ceiling in there!
Just trying to decide if we want to go through all the back-breaking work or not!
🙂
Layla
We did the ceiling and walls of our family room and the seams did not match up (which we knew that they wouldn’t because the panels on the walls are smaller than the ceiling) but we put up crown molding and it looks like a professional did it.
Desiree
Thanks Layla and Desiree!!
It looks like it’s coming along great! Very light and airy. Can’t wait to see the finished product!