Hello! I thought I’d share some photos of where we’re at in our half bath renovation today. (PS- We’re putting together a short video about some of the key steps in our process, and I look forward to sharing that whenever we wrap things up!)
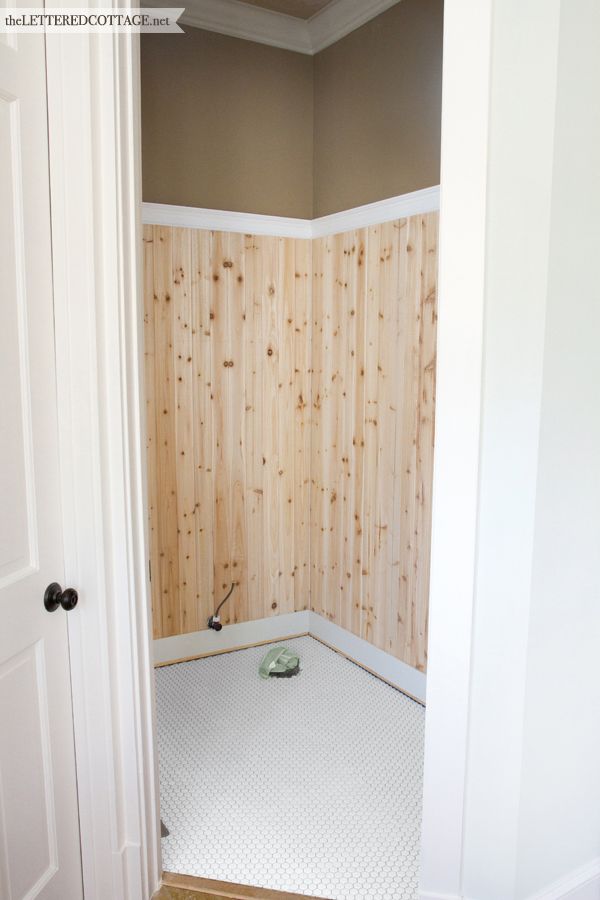
The floor and walls are starting to look much different than they used to, and although we’ve still got a ways to go, we’re really excited about how the room is coming together:
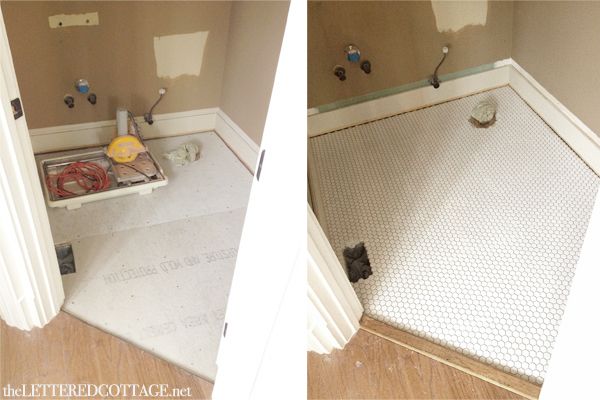
First, Kev ripped out the tile that was previously in there, and since some of the backer board underneath it was damaged in the process- we had to use new backer board underneath our new tile. Here are a couple of cell phone pics that show the new backer board (left) and the new hex tile all thin-setted into place (right):
We’re looking forward to taking this house back a few generations over the next several years, so replacing the contemporary tile with something a little more classic and cottage-y was just what the (old house) doctor ordered in here. We got our hex tile from Overstock.com, and since we only needed three packages of 10 tiles, we felt like it was a good opportunity to get some major cottage bang for not a lot of cottage bucks.
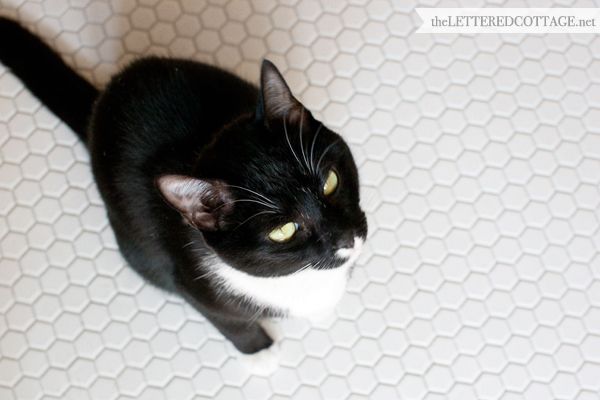
We used Warm Gray grout in between the tiles, and I think Mr. Kit-Cat likes it as much as we do.
We’re really excited about the wood wainscoting we’ve got up on the walls in there now, too. Because the wall studs (behind the drywall) run vertically, our carpenter friend, Wade, suggested we secure our pine paneling planks to horizontally-oriented strips of luan plywood. Here’s a photo of the first few strips of luan after they were nailed to the studs behind the drywall…
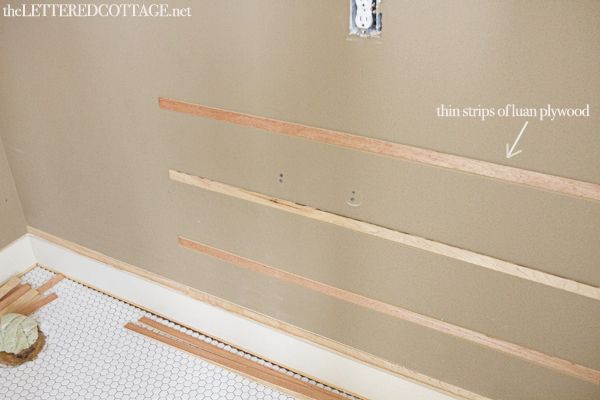
And here’s an “in-progress” shot of the pine planks and chair rail molding being nailed to the luan:
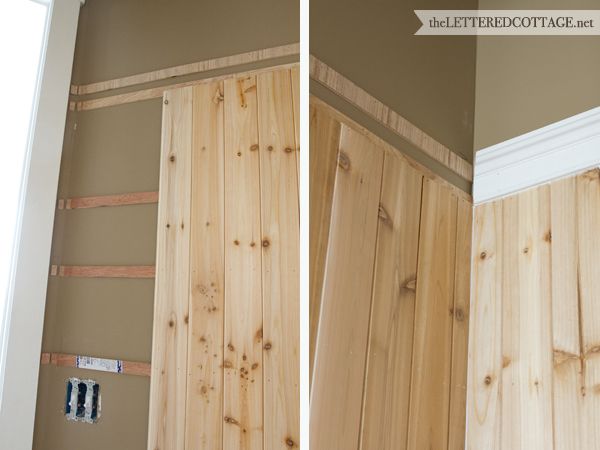
We got the planks at Lowes. They’re super thin (5/16″ thick, to be exact) and they’re usually displayed on an end cap, at the end of the trim aisle. They come in 4′ and 8′ lengths, and we decided to go with 7-foot tall wainscoting because we’ve always been fans of the two-thirds look. (Meaning: the lower 2/3 portion of the walls have wainscoting, the upper 1/3 does not.) Here’s a photo of the label that was on the packages of planks in case anybody out there is interested in picking some up:
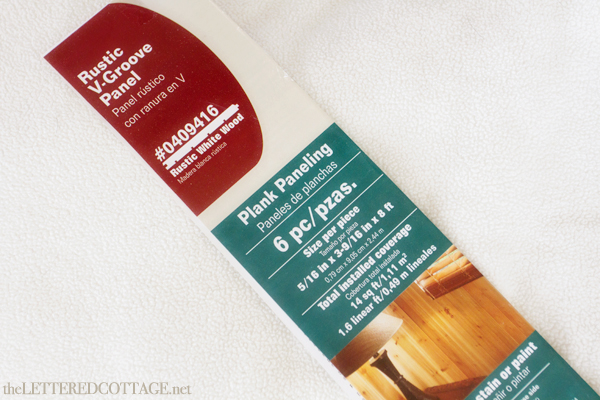
A pack of six planks is 13 bucks and some change, but again, since this room is teeny-tiny, we thought it would be a fun way to give it a big dose of cottage charm without spending a huge chunk of change.

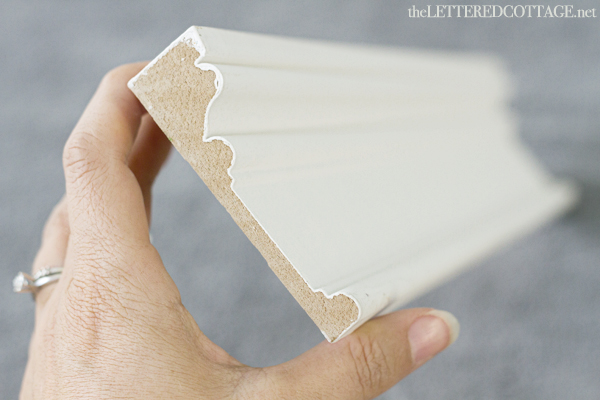
We also got the chair rail molding at Lowes. We chose a top-heavy one because we’re both suckers for a “shelf-y” profile when it comes to that stuff.
We’re hoping to get some primer up on the ceiling, walls, and wainscoting next week. After that- PAINT! We’re thinkin’ Simply White on the ceiling, and Wedgewood Gray on the baseboards, wainscoting, chair rail, and crown molding. And after that, WALLPAPER! Aaaaaaaahhhhhhh! #MyFavoritePart


I love the tile! And the walls are going to be gorgeous. Can’t wait to see it all finished!
Thanks, Erin! We’re excited to be able to go to the bathroom in there again- LOL! 😀
Cutest line in this post “because we’re both suckers for a ”shelf-y” profile.” Looks great! Can’t wait to see that gorgeous cloud wallpaper!
Ha! I’m glad you liked that, Rene’! It’s true!!! 😀
It reminded me of improper fractions in school. My teacher said to remember them like Dolly Parton. Big on top and little on the bottom 🙂
Ha! That is HILARIOUS! Since I homeschool I will be sure to pass that along to my 5th grade daughter….although she might not know who Dolly is now ;(
I like the pine planks just as they are!
Looking good!! Good thing the cat likes the tile…otherwise it would be back to square one ! 🙂
We’ve used that same wood in our kitchen. We’re not done yet, and I can’t commit to a colour yet! Looking forward to seeing your completed!!! Maybe I’ll finally decide on a colour for mine!!!!
so are you telling me that you don’t have to remove the floor moulding before you put that stuff up on the walls? cuz I want that in a bedroom but have wondered if I have to remove the mouldings first. Yes, I am an amateur at this stuff.
Nope! The planks are SUPER thin, so the existing baseboard sticks out further than them, which made installation easy-peasy! 🙂
*overcome with the possibilities now* thank you!!!
Layla, a question about the chair rail molding…Did you butt the bottom of it against the top of the wainscoting, or did you overlap the molding to sit on the front of the wainscoting? We’re currently discussing a similar project, and have wondered what the proper placement of the molding would be. I’d love to know how you achieved it. 🙂 Thanks for any guidance you can share.
Yep! It’s just butted up and caulked. Once it’s all painted, any imperfect cuts will just disappear! 🙂
Oh I’m such a moron! *sounds of head banging against nearest wall* I completely missed seeing the very obvious answer to my question IN THE PICTURE YOU HAD ALREADY SHOWN earlier in the post!! oy. Forgive me, please. – Nanette
my only bathroom is super tiny and you just inadvertently made me want to redo the floor with this fantastic tile!
#swoon
Love the tile and planks look! Can’t wait for the finale!!!
Going to be so pretty! And looks kind of like a sauna mid-project 😉
Are those the same wood planks you used on the ceiling of your other house?
Yep! 🙂
Layla, I LOVE this! Great job so far!! Can’t wait for more, more, more as you banish the golden/Tuscan colors & add cottagy charm!
It is coming out great, Layla. Love how the tile and the beadboard looks. Those colors will look stunning! Can’t wait to see.
Layla, Just curious why you didn’t paint then wall paper then put up the wainscoting? We just bought our first home–I’m a novice. It looks so nice!
I guess because we’re novices too! 😀 Your thought process would probably make more sense! #GoodThinkin
Layla and Kevin: Again, another great project! I know that the end results are going to be spectacular!
I can’t wait to see it all finished! I have Wedgewood Gray in my bedroom – it turned out a little darker and a little bluer that I thought it would but I still love it. I’m so excited to see that fun lofty (by lofty I mean cloudy/bird-y) wallpaper you picked!
Looking good but I am laughing at myself because when I first saw the wood/ tile, I was thinking, “Why are they putting wood in the shower?” Finally realized, “Oh, wait, this is a half bath. Wood wainscoting will be great!”
Me too. It took me a long time to “get” that this is a bathroom and not a shower that we’re seeing. I couldn’t figure it out at first! It is adorable, as usual, with everything the Palmers do.
Me too. Duh! 😉
Glad I wasn’t the only one.
Hi Layla,
They look great! I just bought the exact same boards for our kitchen ceiling yesterday. Kitchen is 17 x 23 so I had to purchase 30 packs. Here in Toronto they are $15.80 a pack. EEK! That hurt the pocket book A LOT!!!! I love the look so much so I bit the bullet and went ahead with it. Looking forward to the end result!
Rosette
Oh gosh, I can’t wait to see more! Never realized so much could be done for so little money. It helps to have some skills though.
check out another site called Remodelista. they just did something called 10 favorite wood paneled baths.
you might enjoy it.
I’m going to faint…stunning. I’m so jealous of the hex tiles. I want those so bad but we’re having to make “resale friendly” decisions from now on. But you can bet that when we get in our own cottage/bungalow that those babies are going into at least one bathroom whether the Mr likes it or not! Pffft!
Thanks, Anele! Not that we’re looking to sell anytime soon, but I’m hoping our end result is re-sale friendly too! 😀
I love it! I may be partial beacuse I have beadboard the same height in our powder room. Ours is white, but I love the idea of gray wainscoting. I was thinking about that for my master after seeing one done that way on pinterest. I can’t wait to see it painted!
Love the hex tile… I always forget about Overstock.com as a source for things like that. Thanks for the reminder, Layla ~ TGIF!
xo Heidi
Sure thing, Heidi! 😀
Layla, your bathroom & your “vision” are coming out beautifully!
I have a question… My bathroom is tiled half way up. And then the tiles have painted over. They are chipping, and a MESS. Can I put paneling over them? My mom said moisture would get behind the panels 🙁 Really appreciate your insight on this!
Hi Julie! Is it a half bath, or a full bath?
It’s a full bath with shower & tub combo. It all needs to be ripped out, and I need to start fresh, but that’s not really something I can do right now…
I am not the biggest fan of painting gorgeous bright white molding. With that being said, I bet it is going to look fabulous.
I’m a sucker for bright white too, Necole- but since our wallpaper is white, I thought having the Wedgewood Gray up against it would make it pop more this time around! 😀
OMG it looks amazeballs already so I can only imagine how amazing it will look when it’s done! Will be waiting on pins and needles for more updates!
I love it! I have been a reader for some time now, and I just love how you and your husband work together so sweetly–I always find something inspirational on your blog, whether it’s a style idea or the motivation to be a little more patient and kind with my husband. I have been saying prayers for your adoption process as well! (and Happy Friday!)
It looks FANTASTIC! Love the wood planks with the shelf-y molding up top. I used wedgewood gray in my master bath and LOVE it. It’s my happy place! Can’t wait to see more!
Loving it so far! Can’t wait to see more!
Beautiful!
It’s coming along beautifully. Can’t wait to see the video. Can you tell me about the molding you have at the base, along the wall/floor. Thanks!
!!!!!
We just bought a house that was built in 1991 and has NEVER been updated. I’ve been dying to do something with my kids’ bathrooms, and I do believe that that tile is just the solution!!! Maybe with pretty pedestal sinks! Thanks for the inspiration 🙂
I love your tile! We’re planning a master bathroom makeover and I want to use something similar!
I can’t wait for the next installment! I’m curious what happens to those planks. I love the 2/3 look too. I did it in my girls’ room with just moulding and a little shelf on top. Perfect to lean a few pictures atop.
LOVE your wainscoting! That gives the room a totally different look, and I am sure it feels different, too!
Oh my goodness – how exciting! This is awesome – you guys are awesome! Kit-Cat is one lucky fella. I L O V E the wood, love all things natural, you’re gonna feel like you’re showering outside!
Please come and do mine ……pretty please !!!!
It’s all gorgeous…and so is KitKat! Love your cartoon hanging wallpaper…too cute!
Wow – that is looking super fab. Your ceilings look pretty tall in the bathroom as well – and NICE crown molding – swanky! 😉
Love it!!! Do you think you will replace the door with something vintage?? (You did that in your last house, didn’t you? The guest bath, I think??)
#hurryupandfinishpleaseandthankyou – haha! I just cannot wait to see the “afters”: )
It’s fun to see the process. Thanks for the great pics! I can tell you really love taking care of your home.
It’s looking good! And I’m really loving that hex tile on the floor!
Thanks, Ashley! 😀
Do you just butt the lower edge of the molding against the top of the vertical planks and, what, caulk the seam? I have always loved this look and wondered how it was done.
Hi Layla, Love the little bathroom! Did you have to buy more than you actually needed or used? You said you only needed a few packs of it, so I’m curious. I’ve actually been looking for this type tile or penny tile to use as an accent in a new bathroom. So, I definitely don’t need a lot! You have any extra you want to sell?? 🙂 If not, did you see any other good places that sold it individually and cheaply?! Thanks!
Hi Crystal! We actually used every square inch of it! We even had to break off some pieces that weren’t going to be seen as much so that we could use them in places that were! 😀 I *think* most hex tile runs around $12/square foot, so we got ours on Overstock since it was only $6/square foot there. I’ll keep my eyes peeled for individual ones for you though!
Do you know the model # or item # for the chair molding?