
Poor thing.
🙁
I am psyched to report that, according to the weatherman, we are supposed to get some more snow tonight (yay!). So maybe I will actually get to experience three full days of winter this year! If so, it’ll be the first time that’s happened since I moved to Alabama in October of 2003. So exciting.
🙂
And speaking of white stuff, I’d like to introduce you to our “new”, white dining table…
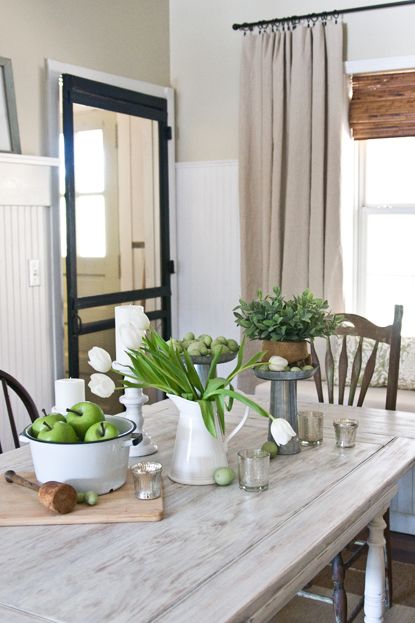
Dining table, meet friendly blog reader. Friendly blog reader, meet dining table.
I achieved the weathered, whitewashed look with a little help from my friends, Trial and Error. I call on them every time I’m more interested in diving head first into a project than taking time to researching the “right” way to do it.
Which is pretty much every time.
🙂
I’m going to attempt to describe how I did it, but you may also want to give Trial and Error a call if you don’t have any luck with my instructions. Their number is 555-6574. If Error answers, ask to speak with Trial. Hopefully he’ll be able to help you with your project from start to successful finish, and Error can just stay out of it altogether.
Okay. Here we go.
Basically, as soon as I finished sanding down the tabletop, I applied one coat of polyurethane…

…with the smallest foam brush in the world…

What!?
It was the only thing I had!
Well, that’s not entirely true.
I do have a huge box of Q-tips. And believe you me, if I hadn’t found that puny foam brush at the back of our junk drawer, guess who would’ve been out in the driveway swabbing poly across the entire surface of her dining room table with an itsy-bitsy, teeny-weeny, cotton-wrapped stick?
You’re darn tootin’.
(I told ya, I’m a diver)
🙂
Once the poly was dry, I painted on a coat of watered down, water based paint (Sherwin Williams “Alabaster”). The mixture was about half paint, half water. It sort of reminded me of the consistency of milk. I let that dry, and until the whole surface looked sort of hazy. After that, I used a regular paint brush to dry brush on super, duper thin layers and layers of the Alabaster paint, in the direction of the grain. I probably did about four layers of dry brushing. Finally, I used a piece of 120 grit sand paper (wrapped around a sanding block) to sand the whole surface down until it looked the way I wanted it to. Then, I sealed the tabletop with Deft Clear Wood Finish (from Lowes):

It’s non-yellowing, and can be applied over paint. (Polyurethane yellows over time)
The last thing I did was lightly sand the whole top once more with the 120 grit sand paper I had previously used to sand down the dry brushed paint. The clear wood finish I bought was satin finish, but I realllllly wanted the table to be very matte, so the final sanding just took a little bit more of the sheen off, but not enough to affect its durability. Water still beads up on it, which is great.


Pretty nifty, eh?
I’m really happy with how it turned out. I’ve never had much luck with faux finishing, so it was neat to finally have one turn out the way I wanted it to!
Here are a couple of close up shots that show some of the distressing I did on the legs…

They’re painted Alabaster, and I used my 120 grit sand paper to rough them up a bit here and there…

I had fun decorating the table for these photos using a bunch of Spring-inspired accessories I had around the house…(yes, I said Spring- ’cause I’m excited for that season too!)

(The tulips were $5.00 at Walmart.)

I found the eggs at HomeGoods a while back. I bought them to use on our mantel. (Have I mentioned I’m doing a mantel decorating series next month?)


One of my favorite things about the new tabletop is that is looks pretty without anything on it. I always felt like it needed a tablecloth before. Now, a pitcher full of tulips is good enough for me…


You’ve come a long way baby…
I’m still working on my “chair situation”, but I think I’ve got it all figured out. I just need to do some more painting before I can introduce you guys. 🙂
Happy Monday y’all!
Layla
PS- Are you a Mac, or a PC? Let us know by entering your answer in the poll in our left sidebar, and thank you so much for taking the time to do it!
————————————————————————————-
The winner of the Savon De Marseille soap is:

Sara at The Story of a House
Congratulations girl!
Drop me a line at [email protected] to claim your precious prize!
————————————————————————————-

The $5.00 wal-mart tulips have made their way into my shopping cart a few times. So pretty!
Wow what a great redo! Just jumped over from Censational Girl & I’m always afraid of stain….this post makes me feel like I should give it a try! Thanks!
How did you handle the indented areas of the table top? I have one that is very similar and I am dying to get my hands on it, but I fear pooling in the crevices, or worse, debris from sanding and what not getting wedged in there! Your table is beautiful!!
My husband and I just completed a table redo that was inspired by your tutorial! (GREAT tips, by the way!). Check out the blog post about it when you get a chance:
http://thecraftedcure.blogspot.com/2012/01/distressed-dining-room-table.html
I am stripping a table now and will stain with walnut. At least that was the original plan 🙂 This table is more than awesome. And your Spring Table….so beautiful!
I love this site!!!!!! can you tell me how i can strip an old kitchen table that has that crappy board on top?
Love that table! Can you provide any information? Would like to know the manufacturer and/or the style to see if I can search and
find anything similar that I can tinker with.